• If you spend $90, you get one free level 1 product.
• If you spend $180, you get one free level 2 product, OR two level 1 items.
• If you spend $270, you have the option to choose three level 1 items or one level 1 item and one level 2 item.
The Sale-A-Bration promotion is current now until March 31st. Be sure to request your copy of the brochure today.
Sale-A-Bration is also a great time to join our fabulous team. Ask any of the girls on the hop!
I decided to use the Tutti Frutti Cards and Envelopes to make a mini album for my Blog Hop project. I used 4 of the cards (one of each pattern) and 5 envelopes. You get 4 each of the 4 cards and envelopes, so there was still plenty left over from the set after I made my album. I also used another Sale-A- Bration item on the front of the album - the Celebrate You Thinlit dies - to cut the word celebrate.
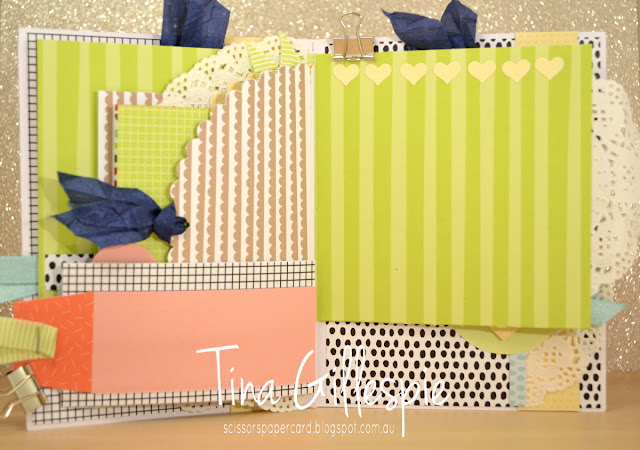
This is the first page. The checked paper is from the inside of one of the envelopes. The right side page is formed from the Lemon Lime Twist card. I scored a line 1 1/2 inches from the bottom and folded it up to make a pocket.
I've followed a bit of a theme in decorating the album, using hearts in a circle on many of my pages as a decorative element.
The small blue dotty flaps on this page were made using another of the card bases. I cut a 2 inch section off to use as a page, and then used the rest of the card to make the tags for the LLT page pockets.
I used a retired Circle die to cut a scalloped circle from the Daffodil Delight card base. I edged the left side of the page with some doily offcuts I had floating around on my craft desk.
This middle page is the only page that doesn't use one of the Tutti Frutti Cards or Envelopes. It's a piece from the Tutti Frutti DSP pack. After I cut all my pages to size, I layered them and then used my sewing machine to stitch all of the layers together along the spine.
It was a lot of fun mixing and matching the patterns and colours for each of the pages.
The ribbons were a fun little touch to the pages to add to some of the pages. A lot of them I stapled to the page and covered with a circle/heart combo, but this Night Of Navy Seam Binding was threaded through a hole in the page.
I'm not sure yet how I'll use this album, but it will likely be for a birthday. I have kept all of the offcuts so that I can add more decoration to the photos once they are in place.
Well, that's it from me for now. I hope you enjoyed looking at my Mini Album. I can't wait to finish it with some photos. Now you're off to the blog of the lovely Monika O'Neill.
If you find a broken link or have come to this blog hop from a different entry point, you can view the participants below:
Bye for now,
Tina


Amazing project Tina, I don't know where to look first, love it!
ReplyDeleteWhat a fabulous idea...so very creative, I love it!
ReplyDeleteSuper cute Tina. I have the cards and envelopes. Might have to give this a go.
ReplyDeleteI love your smash style mini album and look forward to an update once you have filled it with birthday memories.
ReplyDeleteAbsolutely fabulous Tina.
ReplyDeleteThat's amazing Tina! A real WOW project. Just love it. Thanks for playing along in the Art with Heart Team monthly blog hop.
ReplyDeleteWhat a fantastic project Tina and so much work put into it! I love it!
ReplyDeleteOOH!!! Tina your gorgeous album is right up my alley, have to say this is my favourite, love how you have put it together so many elements, I know how much work they are but it is worth it. Just love it!!! xx
ReplyDeleteOh-so-sweet, Tina. Those cards and envelopes are gorgeous, aren't they? Love what you've done with them.
ReplyDeleteOh wow Tina! This is amazing!! <3
ReplyDeleteOh wow! Your project is so creative. I dont think I have a quarter of your imagination! Love it💜
ReplyDeleteWow, love your mini album, Tina. You have an amazing talent with them. Would love to do a class with you to learn how to go about it.
ReplyDeleteFantastic project Tina! So much to look at. Very special - I love it! :)
ReplyDeleteFab Mini album Tina!!!
ReplyDelete