The Art With Heart Team are back with another inspirational Blog Hop. This month we are featuring Gift Bags and Boxes, just in time for the Christmas gift giving season. The bags and boxes featured are all made using current Stampin’ Up! products and any of our wonderful team members are happy to help you with the supplies you will need to reproduce these beautiful projects.
It took me a while to work out what I was going to do for this Hop - for the longest time I had 'Boxes and Gift Tags' in my head, not Gift Bags. Oops! Back to the drawing board!
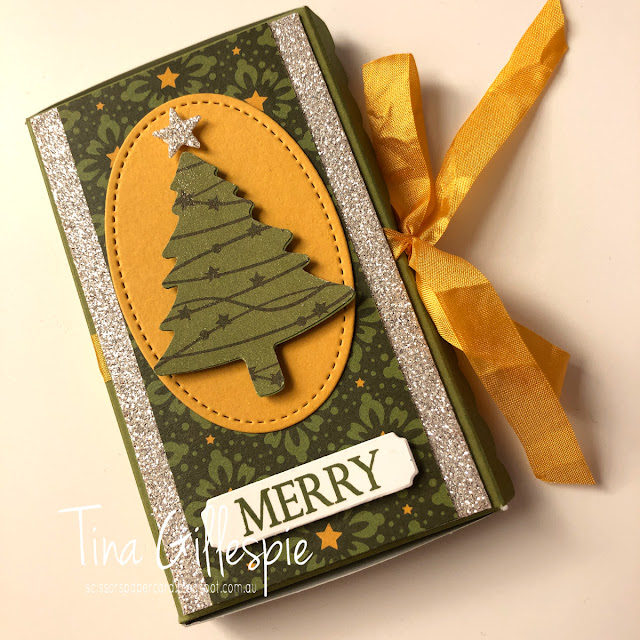
I ended up making this cute little gift box from one of the Old Olive Scalloped Notecards. Have you noticed them in the Annual Catalogue? I hadn't, until recently. For the very low price of $14.00, you receive 20 cards and 20 envelopes, 5 each of Balmy Blue, Old Olive, Light Pink and Terracotta Tile. I like making something unexpected from our products, and this fit the bill nicely!
I love how the scalloped edge of the Note Card gives a cute little finish to the opening of the box. It really feels like cheating to use these to make a box!
I used some Night Before Christmas DSP on the top of the box. I couldn't resist adding some Wink Of Stella to the Pine Tree shape, although it's hard to photograph. I love that this paper makes the tree look decorated without any extra effort on my behalf!
Here's some instructions on how I made the box:
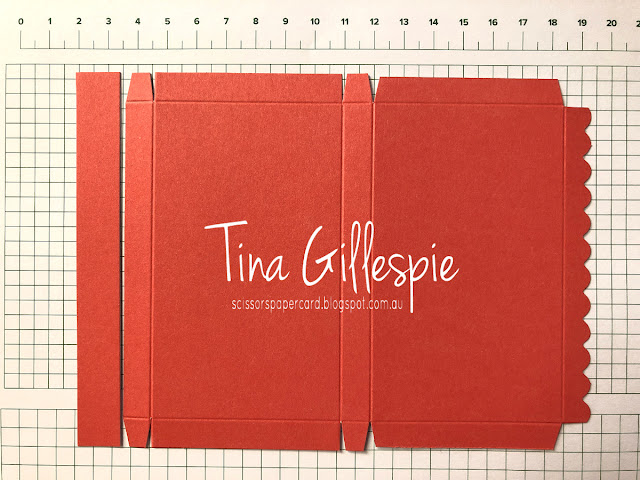
I cropped 1 1/2cm from the straight edge of the card. I then scored at 1cm all the way around the edges, as well as another score line 1cm from the pre-scored line in the card, on the side of the scalloped edge. Did that make sense? The extra line is basically under the l and e of Gillespie in my watermark. I then snipped the corners as shown, and folded and glued the straight edged side of the card to form a box. To close it, the side flaps fold into the box, and the scalloped edge stays outside of the box. You might be able to see that I trimmed a tiny bit off the side flaps to make them easier to fold into the box.
You can see that the box is very thin, but it would be perfect for a gift card or voucher, or maybe even cash. The box could be made to be deeper, but you would lose width and length.
That's all from me for this month's Blog Hop, now it's time to jump on over to Kate Morgan's blog to continue the hop.
If you have a broken link or have come to this blog hop midway, you can view all the participants below:
Bye for now,
Tina


Such a clever alternative use of the cards - a very cute box size!
ReplyDeleteYou are so creative and think outside the box to so you could make this box. Love it and love the way you decorated it too!
ReplyDeleteSo very clever Tina and your colour combo is so striking! Thank you for the instructions, I will definitely be making some of these xxx
ReplyDeleteThanks Tina - your project is "good to know". I have another idea inspired by this box - could you put a set of colour pencils in the box?
ReplyDeleteThat's an awesome idea! I think the box would be a great size for the packs of mini pencils.
DeleteOh my goodness, you are so creative coming up with ideas like this. Who would have thought to turn those cards into a gorgeous box!! Wow!
ReplyDeleteOh Tina, you are so creative. Love your gift box - it’s delightful. Love the way you used the scalloped notecards to make the box. 💓💓💓
ReplyDeleteInitially I was just loving the decoration, and wondering what stamp you used for the tree. Then I read on to get all these answers....and more. I think you are very clever to come up with that box idea. Thanks for sharing it.
ReplyDelete