Hi!
Welcome to another week of Just Add Ink challenges. This week it's a sketch challenge, designed by little old me! I'm usually a 'nope, no way' person when it comes to tilted panels, so I designed this sketch to push myself out of my comfort zone a little.
How's that for tricky - not one, but TWO tilted panels. Oh dear!
LOL, it's not really tricky at all!
My Petal Garden DSP stack has been looking a bit neglected, so I decided to get it out to have a bit of a play with this card. I love soft flowers juxtaposed against the lines of dots in the paper.
The Everyday Label punch, which I used to crop my sentiment, carried over from the previous Holiday Catalogue. I hope it carries over to the upcoming Annual Catalogue, as I haven't used it nearly enough yet.
I love using little strips of left over DSP on the inside of my cards. There always seems to be little strips left over, and it's a great way to use them up.
You can see what the rest of the team have created over at the Just Add Ink blog, where you can also link up your card fr the challenge. I can't wait to see what you can do with my sketch.
Bye for now,
Tina
Thursday, 22 March 2018
AWH March Blog Hop: Easter
Hi!
Welcome to another Art With Heart team Blog Hop.
Tonight the Art with Heart team are sharing creative Easter projects. Don’t forget, Sale-A-Bration has just over a week left for us to earn free product with purchase. It is also a fabulous time to join Stampin’ Up! - just ask any of the girls on the hop for more details.
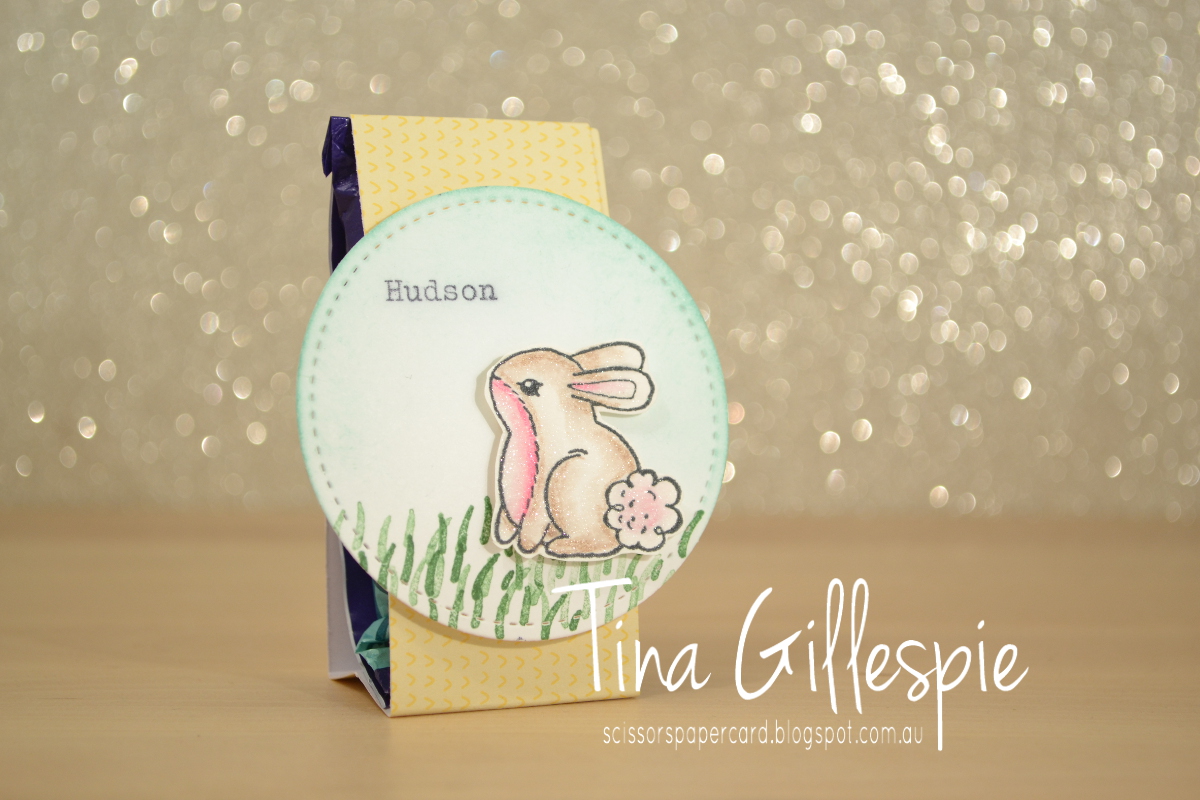
I don't really make Easter cards, but I do like to send a little something with Hudson to school to give to his school mates each year. He goes to a special school that only has 26 students, so it's not a huge task. Having said that, I do like to keep it simple!
I have used the Tutti-Frutti Cards & Envelopes Sale-A-Bration choice from the first round as the base for my chocolate treat holder. I started by trimming a 3.5cm strip from one card base and then scoring it to fit around the Freddo Frog chocolate that sits inside. I've provided a template at the end of the post so that you know where to score the strip.
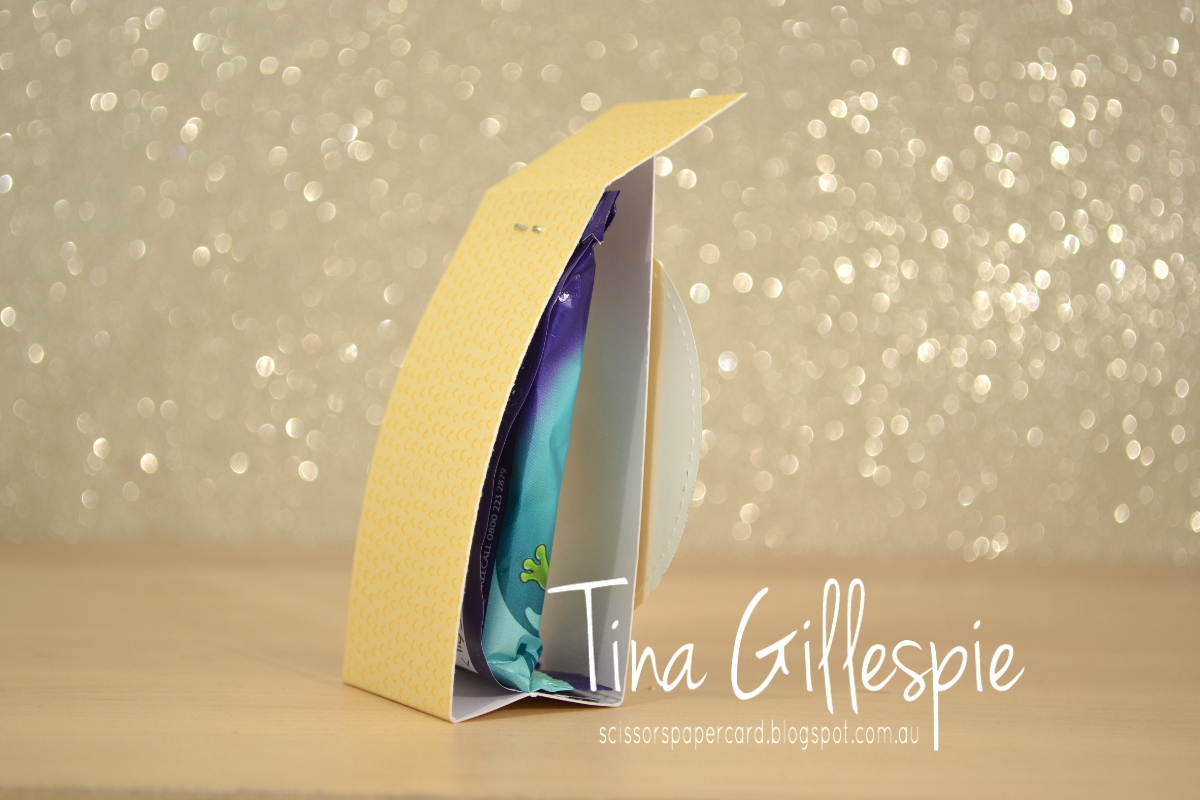
From the side you can see that the base of the treat holder is a W for a little stability. It also helps to hold the chocolate in place. The Stitched Shapes Circle is held to the front with a Dimensional, and provides a little slot for the top tab to slide into. You can see the open top in the next photo.
Here you can see that I've stapled the chocolate to the back of the treat holder. I didn't want to add a belly band to each one, so this was a quick and easy way to hold the chocolate in place. Let's face it, the kids just want to rip into the chocolate, so I wanted to make it quick and easy to get to!
To finish, here's a closer look at the cute bunny from Garden Girl. I stamped him on Shimmery White cardstock using Momento ink. He's coloured using my Melon Mambo and Early Espresso Watercolour Pencils and then blended with Wink Of Stella. I typed the name on my typewriter, just for a bit of old school fun!
That's it for me - well, not really, as I still have another 24 of these to make! For you though, it’s time to hop on over to our next participant, the very talented Ros Davidson.
If you find a broken link or have come to this blog hop from a different entry point, you can view the participants below:
Monika O'Neill
Sharon Davern
Caroline Manwaring
Tina Gillespie
Ros Davidson
Rachel Woollard
Rebecca Jacovou
Catherine Proctor
Kathryn Mangelsdorf
Fiona Ryan
Judy May
I don't really make Easter cards, but I do like to send a little something with Hudson to school to give to his school mates each year. He goes to a special school that only has 26 students, so it's not a huge task. Having said that, I do like to keep it simple!
I have used the Tutti-Frutti Cards & Envelopes Sale-A-Bration choice from the first round as the base for my chocolate treat holder. I started by trimming a 3.5cm strip from one card base and then scoring it to fit around the Freddo Frog chocolate that sits inside. I've provided a template at the end of the post so that you know where to score the strip.
From the side you can see that the base of the treat holder is a W for a little stability. It also helps to hold the chocolate in place. The Stitched Shapes Circle is held to the front with a Dimensional, and provides a little slot for the top tab to slide into. You can see the open top in the next photo.
Here you can see that I've stapled the chocolate to the back of the treat holder. I didn't want to add a belly band to each one, so this was a quick and easy way to hold the chocolate in place. Let's face it, the kids just want to rip into the chocolate, so I wanted to make it quick and easy to get to!
Here's my template. Cutting the strip 3.5cm wide means that you can get 4 of these from one card base without any waste. The kit is American sizes, so you may need to adjust a bit if you're using a different sized card base. The score line third from the left is the one that comes pre-done on the card base.
To finish, here's a closer look at the cute bunny from Garden Girl. I stamped him on Shimmery White cardstock using Momento ink. He's coloured using my Melon Mambo and Early Espresso Watercolour Pencils and then blended with Wink Of Stella. I typed the name on my typewriter, just for a bit of old school fun!
That's it for me - well, not really, as I still have another 24 of these to make! For you though, it’s time to hop on over to our next participant, the very talented Ros Davidson.
Bye for now,
Tina
If you find a broken link or have come to this blog hop from a different entry point, you can view the participants below:
Monika O'Neill
Sharon Davern
Caroline Manwaring
Tina Gillespie
Ros Davidson
Rachel Woollard
Rebecca Jacovou
Catherine Proctor
Kathryn Mangelsdorf
Fiona Ryan
Judy May
Thursday, 15 March 2018
JAI #400: Just Add Inspiration
Hi!
Yay! Time for a new Just Add Ink challenge! This week Kim has found this gorgeous inspiration photo to be a springboard for our creativity.
Hmm, this one stumped me for a while, as I don't usually make or send Easter cards. In the end I decided to go with the colours and the speckles and see where I ended up.
I kind of stretched the 'speckles' element by using my Blue Brushos powder with a minimal amount of water on a sheet of Glossy White cardstock. Using very little water limits how much colour is released by the powder. I also deliberately spritzed at a sharp angle to the cardstock so that the force of the water pushed some of the powder across the card. I was so pleased with how it turned out! To add to the speckles, I scooped a small amount of my Silver Embossing paste onto my Silicone Mat, added a little bit of water to make it a little runnier, and then flicked it over the page.
The mermaid, seaweed and shells were fussy cut from the Myths and Magic SDSP, and layered over a die cut from the Swirly Scribbles Thilits. I used my Labeler Alphabet stamps to create the sentiment. I deliberately haven't added a number after the 'look who's turning', as I don't know who will get this card yet. Given that all the little people in my family are currently boys, I might not use it for a long time! I finished the front of the card by adding some of the Clear Epoxy dots.
I had a second mermaid and shell already fussy cut, so it was quick and easy to pop them into the inside of the card.
So, what are you going to do with the Inspiration photo this week? Pop on over to the Just Add Ink blog to see what the rest of the Design team have done, and to link your card when you've made it. See you there!
Bye for now,
Tina
Yay! Time for a new Just Add Ink challenge! This week Kim has found this gorgeous inspiration photo to be a springboard for our creativity.
Hmm, this one stumped me for a while, as I don't usually make or send Easter cards. In the end I decided to go with the colours and the speckles and see where I ended up.
I kind of stretched the 'speckles' element by using my Blue Brushos powder with a minimal amount of water on a sheet of Glossy White cardstock. Using very little water limits how much colour is released by the powder. I also deliberately spritzed at a sharp angle to the cardstock so that the force of the water pushed some of the powder across the card. I was so pleased with how it turned out! To add to the speckles, I scooped a small amount of my Silver Embossing paste onto my Silicone Mat, added a little bit of water to make it a little runnier, and then flicked it over the page.
The mermaid, seaweed and shells were fussy cut from the Myths and Magic SDSP, and layered over a die cut from the Swirly Scribbles Thilits. I used my Labeler Alphabet stamps to create the sentiment. I deliberately haven't added a number after the 'look who's turning', as I don't know who will get this card yet. Given that all the little people in my family are currently boys, I might not use it for a long time! I finished the front of the card by adding some of the Clear Epoxy dots.
I had a second mermaid and shell already fussy cut, so it was quick and easy to pop them into the inside of the card.
So, what are you going to do with the Inspiration photo this week? Pop on over to the Just Add Ink blog to see what the rest of the Design team have done, and to link your card when you've made it. See you there!
Bye for now,
Tina
Thursday, 8 March 2018
JAI #399: Just Add Water
Hi!
Welcome back to the new Just Add Ink challenge. This week Chloe has set the task, and it's to Just Add Water. I love how broadly that could be interpreted!
I hadn't done any colouring for a while, so I decided to pull out my Watercolour Pencils, Wink Of Stella and the Just Add Colour DSP. The underwater design on one of the sheets was perfect for this challenge!
It was heaps of fun using the different colour pencils to blend and create some more realistic pictures. The seaweed at the bottom right uses Old Olive and Daffodil Delight, and the seahorses used a mix of Calypso Coral, Pumpkin Pie, Daffodil Delight and Basic Grey.
I love using my Wink Of Stella pen to smooth out the colours. It's a great way to blend the pencil lines that also adds a gorgeous shimmer to the card. Hard to photograph, but trust me, it's shimmery! I love how the Basic Black card base makes the colours pop.
I was a bit tired of colouring by the time I got to the inside, so I cheated a little and used the fish stamps from Jar Of Love to finish the card. Do you cheat a little like this sometimes?
Why not pop on over to the Just Add Ink blog, where you can see the cards the rest of the Design Team have created? You can also link up your card for the challenge. How will you add water to your card?
Bye for now,
Tina
Welcome back to the new Just Add Ink challenge. This week Chloe has set the task, and it's to Just Add Water. I love how broadly that could be interpreted!
I hadn't done any colouring for a while, so I decided to pull out my Watercolour Pencils, Wink Of Stella and the Just Add Colour DSP. The underwater design on one of the sheets was perfect for this challenge!
It was heaps of fun using the different colour pencils to blend and create some more realistic pictures. The seaweed at the bottom right uses Old Olive and Daffodil Delight, and the seahorses used a mix of Calypso Coral, Pumpkin Pie, Daffodil Delight and Basic Grey.
I love using my Wink Of Stella pen to smooth out the colours. It's a great way to blend the pencil lines that also adds a gorgeous shimmer to the card. Hard to photograph, but trust me, it's shimmery! I love how the Basic Black card base makes the colours pop.
I was a bit tired of colouring by the time I got to the inside, so I cheated a little and used the fish stamps from Jar Of Love to finish the card. Do you cheat a little like this sometimes?
Why not pop on over to the Just Add Ink blog, where you can see the cards the rest of the Design Team have created? You can also link up your card for the challenge. How will you add water to your card?
Bye for now,
Tina
Thursday, 1 March 2018
JAI #398: Just Add Colour
Hi!
Welcome to the new Just Add Ink Challenge! This week Patrice has given us this gorgeous colour combination to work with.
Isn't it fabulous? I decided to use my Beautiful Peacock Sale-A-Bration set to create a card.
I love the flourish stamp, so I started by stamping it twice on each side of the Cardin Sahara Sand. I then stamped the little dotted stamp over the top in Berry Burst, followed by the flowers in two sizes in the same colour.
I spotted a couple of scraps of the metallic edged Berry Burst ribbon on my desk, so I decided to add them to the card too. I adhered them to the top of the Sahara Sand circle, and then adhered a smaller Berry Burst circle over the top. It was mostly to hide the ends of the ribbon, but it also adds a nice, surprise, pop of colour when you look from the side.
I finished the inside with some of the same stamping. No rhinestones on the inside though!
You can join in with the fun over at the Just Add Ink blog. Come have a look at the Design Team's cards, and then link up your own. It's a fab combo to play with!
Bye for now,
Tina
Welcome to the new Just Add Ink Challenge! This week Patrice has given us this gorgeous colour combination to work with.
Isn't it fabulous? I decided to use my Beautiful Peacock Sale-A-Bration set to create a card.
I love the flourish stamp, so I started by stamping it twice on each side of the Cardin Sahara Sand. I then stamped the little dotted stamp over the top in Berry Burst, followed by the flowers in two sizes in the same colour.
I spotted a couple of scraps of the metallic edged Berry Burst ribbon on my desk, so I decided to add them to the card too. I adhered them to the top of the Sahara Sand circle, and then adhered a smaller Berry Burst circle over the top. It was mostly to hide the ends of the ribbon, but it also adds a nice, surprise, pop of colour when you look from the side.
I finished the inside with some of the same stamping. No rhinestones on the inside though!
You can join in with the fun over at the Just Add Ink blog. Come have a look at the Design Team's cards, and then link up your own. It's a fab combo to play with!
Bye for now,
Tina
Thursday, 22 February 2018
JAI #397: Just Add H
Hi!
Ooops! I'm a bit late with my Just Add Ink post today. Not sure what went wrong, but better late than never! This week we have one of my Alphabet challenges.
You can add anything that's 'H' related to your card - it could be a colour, a theme, a stamp set or even a technique. Just make sure you specify what your H is in your post.
My H this week is houses on a housewarming card. I really love the In The City Hostess stamp set, but don't really use it much. I thought it was perfect for this challenge.
I used my Stamparatus to stamp the houses and trees, but everything else was free hand. There's no way I could have got the spacing so uniform without it. Can you see that I also stamped some suns and clouds on the Daffodil Delight base of the card? It looked a little plain without them.
I alos made a little scene on the inside of the card. It's a bit strange stamping the clouds blue, but I think it would look even stranger to leave them as just an outline. What do you think?
You can join in the fun over at the Just Add Ink blog. Don't have a blog? Just email your cards and we can put them on our special challenge entries blog. You could also use a photo hosting site, just as long as your post is public so that we can see it.
Bye for now,
Tina
Ooops! I'm a bit late with my Just Add Ink post today. Not sure what went wrong, but better late than never! This week we have one of my Alphabet challenges.
You can add anything that's 'H' related to your card - it could be a colour, a theme, a stamp set or even a technique. Just make sure you specify what your H is in your post.
My H this week is houses on a housewarming card. I really love the In The City Hostess stamp set, but don't really use it much. I thought it was perfect for this challenge.
I used my Stamparatus to stamp the houses and trees, but everything else was free hand. There's no way I could have got the spacing so uniform without it. Can you see that I also stamped some suns and clouds on the Daffodil Delight base of the card? It looked a little plain without them.
I alos made a little scene on the inside of the card. It's a bit strange stamping the clouds blue, but I think it would look even stranger to leave them as just an outline. What do you think?
You can join in the fun over at the Just Add Ink blog. Don't have a blog? Just email your cards and we can put them on our special challenge entries blog. You could also use a photo hosting site, just as long as your post is public so that we can see it.
Bye for now,
Tina
AWH February Blog Hop: Sale-A-Bration
Hi!
Tonight the Art With Heart team are sharing creative projects using products from the Sale-A-Bration brochure. All Sale-A-Bration products are earned for FREE with sales of $90+ (AUD).
• If you spend $90, you get one free level 1 product.
• If you spend $180, you get one free level 2 product, OR two level 1 items.
• If you spend $270, you have the option to choose three level 1 items or one level 1 item and one level 2 item.
The Sale-A-Bration promotion is current now until March 31st. Be sure to request your copy of the brochure today.
Sale-A-Bration is also a great time to join our fabulous team. Ask any of the girls on the hop!
I decided to use the Tutti Frutti Cards and Envelopes to make a mini album for my Blog Hop project. I used 4 of the cards (one of each pattern) and 5 envelopes. You get 4 each of the 4 cards and envelopes, so there was still plenty left over from the set after I made my album. I also used another Sale-A- Bration item on the front of the album - the Celebrate You Thinlit dies - to cut the word celebrate.
This is the first page. The checked paper is from the inside of one of the envelopes. The right side page is formed from the Lemon Lime Twist card. I scored a line 1 1/2 inches from the bottom and folded it up to make a pocket.
I've followed a bit of a theme in decorating the album, using hearts in a circle on many of my pages as a decorative element.
The small blue dotty flaps on this page were made using another of the card bases. I cut a 2 inch section off to use as a page, and then used the rest of the card to make the tags for the LLT page pockets.
I used a retired Circle die to cut a scalloped circle from the Daffodil Delight card base. I edged the left side of the page with some doily offcuts I had floating around on my craft desk.
This middle page is the only page that doesn't use one of the Tutti Frutti Cards or Envelopes. It's a piece from the Tutti Frutti DSP pack. After I cut all my pages to size, I layered them and then used my sewing machine to stitch all of the layers together along the spine.
It was a lot of fun mixing and matching the patterns and colours for each of the pages.
The ribbons were a fun little touch to the pages to add to some of the pages. A lot of them I stapled to the page and covered with a circle/heart combo, but this Night Of Navy Seam Binding was threaded through a hole in the page.
I'm not sure yet how I'll use this album, but it will likely be for a birthday. I have kept all of the offcuts so that I can add more decoration to the photos once they are in place.
Well, that's it from me for now. I hope you enjoyed looking at my Mini Album. I can't wait to finish it with some photos. Now you're off to the blog of the lovely Monika O'Neill.
• If you spend $90, you get one free level 1 product.
• If you spend $180, you get one free level 2 product, OR two level 1 items.
• If you spend $270, you have the option to choose three level 1 items or one level 1 item and one level 2 item.
The Sale-A-Bration promotion is current now until March 31st. Be sure to request your copy of the brochure today.
Sale-A-Bration is also a great time to join our fabulous team. Ask any of the girls on the hop!
I decided to use the Tutti Frutti Cards and Envelopes to make a mini album for my Blog Hop project. I used 4 of the cards (one of each pattern) and 5 envelopes. You get 4 each of the 4 cards and envelopes, so there was still plenty left over from the set after I made my album. I also used another Sale-A- Bration item on the front of the album - the Celebrate You Thinlit dies - to cut the word celebrate.
This is the first page. The checked paper is from the inside of one of the envelopes. The right side page is formed from the Lemon Lime Twist card. I scored a line 1 1/2 inches from the bottom and folded it up to make a pocket.
I've followed a bit of a theme in decorating the album, using hearts in a circle on many of my pages as a decorative element.
The small blue dotty flaps on this page were made using another of the card bases. I cut a 2 inch section off to use as a page, and then used the rest of the card to make the tags for the LLT page pockets.
I used a retired Circle die to cut a scalloped circle from the Daffodil Delight card base. I edged the left side of the page with some doily offcuts I had floating around on my craft desk.
This middle page is the only page that doesn't use one of the Tutti Frutti Cards or Envelopes. It's a piece from the Tutti Frutti DSP pack. After I cut all my pages to size, I layered them and then used my sewing machine to stitch all of the layers together along the spine.
It was a lot of fun mixing and matching the patterns and colours for each of the pages.
The ribbons were a fun little touch to the pages to add to some of the pages. A lot of them I stapled to the page and covered with a circle/heart combo, but this Night Of Navy Seam Binding was threaded through a hole in the page.
I'm not sure yet how I'll use this album, but it will likely be for a birthday. I have kept all of the offcuts so that I can add more decoration to the photos once they are in place.
Well, that's it from me for now. I hope you enjoyed looking at my Mini Album. I can't wait to finish it with some photos. Now you're off to the blog of the lovely Monika O'Neill.
If you find a broken link or have come to this blog hop from a different entry point, you can view the participants below:
Bye for now,
Tina
Subscribe to:
Posts (Atom)