Pages

Showing posts with label En Francais BG. Show all posts

Wednesday, 7 August 2013

With Sympathy

Hi

Firstly, apologies for the long blog absence.  And that's about where I stop knowing what to write.

Sadly, a day after writing my last post we got the shocking news that Rob's dad Neil had died suddenly while visiting family in the UK.  And so began the long and emotional task of bringing him home for burial. We were finally able to lay him to rest on Saturday in a beautiful, heart wrenching ceremony.

We miss him so much, and it's going to take a long time to recover and for life to feel normal again.  Part of that is getting back into my papercrafting and blogging again. One step at a time.


Ironically, I'd made this card in the weeks before Neil's passing. It was meant to be my Just Add Ink Design Team entry for the challenge after he died.  I hadn't made a Sympathy card for a very long time prior to this one.  Funny how the universe works sometimes.


Bye for now,

Tina

Friday, 1 March 2013

Just Add Ink #155: Just Add A Sketch

Hi!


Challenge time at Just Add Ink again! This week Mae has designed a cute little sketch to inspire your papercrafting.


I decided to use the sketch to make a card for my parents-in-law who are celebrating their 39th Wedding Anniversary this week. That's a pretty big milestone!


As much as I love all of the new goodies from the catalogues, I decided to dust off some older favourites to use on the card. I needed the relaxation that I get from water colouring, so out came Pleasant Poppies.


I also used the gorgeous En Francais stamp for the background.  Can't remember the last time I used it, so it was well overdue!


I used a leftover piece of the water colouring for the inside - I didn't want to waste a scrap of it!

Stamps: Pleasant Poppies, Field Flowers, En Francais, Memorable Moments
Ink: Black Stazon, Riding Hood Red, Soft Suede, Old Olive, Sahara Sand
Cardstock: Water Colour Paper, Very Vanilla, Soft Suede
Other: Basic Jewels Pearls, Crumb Cake Taffeta Ribbon (retired), Blender Pen

I hope you can play along with us this week at Just Add Ink.

Bye for now,

Tina

Monday, 25 June 2012

Some Bird Punch Flowers

Hi!

Today I have some cards I made as samples for my stamping ladies.  They had requested some punch art flowers using the bird punch.  There are lots and lots of beautiful ideas out there for flowers but I had to narrow it down to 2 - roses and tulips.


To make a rosebud you need the wings and the branch. The branch is trimmed down to two leaves to provide the base of the bud.  The Cherry Cobbler petals are sponged with Basic Black for a bit of definition.


You can see that behind the roses I've used the Lace Ribbon Border punch as a Faux Embossed background.  Such a pretty, subtle effect on a card.


On this card I used the wings and branches to make tulips. The branches are completely trimmed and the wings are sponged again.


The roses and tulips are layered the same way, the key difference is that for roses the rounded part of the wing goes on the outside, and for tulips it's the straighter side.


I hope you've found some inspiration in these cards.

Bye for now,

Tina

Friday, 22 June 2012

Festive Friday #24

Hi!

Doing a happy dance today because it's FRIDAY!!!! One more week of school and then it's the holidays!  Yes, I'm one of those mums that love school holidays.  I love the slower pace and the lack of 'places to be'.  Just a wonderful chance to chill and recharge. And hopefully get lots of stamping time.  Speaking of which, it's Festive Friday time!


This week Nicole has challenged us to use fabric on our cards.  This one really had me stumped for a while - I guess that's why it's a challenge!  Here's the card I eventually came up with, and I think it was worth the wait.  I love it!


I used my Big Shot and Perfect Pennants Die to cut 4 doilies out of Deck The Halls Designer Fabric.  I then folded each doily in quarters and adhered them to a circle punched from a Multipurpose Adhesive Sheet.  An Antique Brad finishes off the embellishment quite nicely.


I embossed the base of my card with the new Adorning Accents embossing folder and then used my Simply Scored tool to score vertical lines from the embossed line to the bottom of the card.  Love the Classy touch this adds.


Some nice and simple stamping to finish off the inside of the card.  I'm loving having so many of my Christmas cards made already.  It will certainly avoid the November panic to get them done!  Join in with us each week at Festive Friday and you too can avoid that rush to get your cards made.  Don't forget that the challenge this week is to add fabric to your card.

Stamps: Season Of Joy, Snow Swirled, En Francais Background
Ink: Cherry Cobbler, Crumb Cake, Versamark
Cardstock: Cherry Cobbler, Crumb Cake, Very Vanilla
Other: Big Shot, Perfect Pennants Die, Adorning Accents Embossing Folder, Simply Scored Scoring Tool, Deck The Halls Designer Fabric, Crumb Cake Seam Binding Ribbon, Cherry Cobbler Seam Binding Ribbon, Always Artichoke Seam Binding Ribbon, Antique Brad, Cherry Cobbler Embossing Powder, Sponge Dauber, Paper Snips, Dimensionals

I hope you can play along this week!

Bye for now,

Tina

Wednesday, 6 June 2012

Just Believe

Hi!

Today I have a card for you that's been in my "To Blog" file for a long time.  I made it as a sample for a workshop I demonstrated at last year!  The guests all got to make this card as their Make 'n' Take.


Oh dear, not a great photo, but you get the idea! The guests liked the card but found the spritzing a little difficult.

Stamps: Just Believe, En Francais
Ink: Pear Pizzazz, Blushing Bride
Cardstock: Pear Pizzazz, Blushing Bride, Very Vanilla
Other: Decorative Label Punch, Dimensionals

Bye for now,

Tina

Friday, 2 March 2012

Festive Friday #8

Hi!


Here we are - up to the eighth Festive Friday Challenge.  Wow!  Today I have a very Clean and Simple card for you. It was inspired by this card.


This was an easy card to make.  I just used Post-It notes to mask off the section I didn't want to stamp and sponge in, and then away I went!  Once again the inside was done to complement the outside.


Stamps: Tree Trimmings, Snow Swirled, En Francais, Season Of Joy
Ink: Cherry Cobbler, Sahara Sand
Cardstock: Cherry Cobbler, Very Vanilla
Other: Basic Jewel Rhinestones, Corner Rounder Punch, Sponge Dauber, Post-It Notes

Don't forget to pop on over to Festive Friday Challenges to see what the rest of the Design Team have in store for you.

Bye for now,

Tina

Saturday, 28 January 2012

Summer Mini Catalogue Blog Hop

Hi!

Welcome to another casual little blog hop.  A group of my fellow Stampin' Up! demonstrators and I like to do a monthly blog hop to help our readers with some inspiration.  Di Dunk's blog was the stop before mine, but you can hop on and off wherever you'd like.  There are 7 blogs to look at - can you think of a better way to start a Saturday morning?
I have two cards for you today, both made with the Marry Me stamp set, which you can find on page 21 of the Summer Mini Catalogue.  I call the first one the 'City Wedding Card', as I think it has a very urban feel, especially compared to my second card.

I had to hold this one closed to photograph it due to the odd shape of the front.  The card is only a half card on the front, with the overlapping image.  The inside of the card shows through to the front when it is closed flat.  This was my first play with the Mocha Morning Specialty DSP.  I love all the neutrals in it and thought it would look quite classy on a wedding card.

I stamped off the En Francais stamp once before stamping on the cardstock.  The full strength Crumb Cake ink competed too much with the DSP on the front so it needed to be toned down a little.  It was a bit tricky lining up the inside parts so the 'right' bits showed at the front, but the effort was worth it.

My second card I call my 'Country Wedding Card'.  It's such a contrast to the other card!  I used the lovely Beau Chateau DSP on this one.  The Marina Mist blue with the Very Vanilla remind me of milk jugs and cream pots.

The main image was a little stark stamped on the Very Vanilla, so I spritzed over the top with my Colour Spritzer and Crumb Cake Stampin' Write Marker.  Looking at it now though, I probably should add a pearl to the little butterfly tucked in above the sentiment.


The inside was finished off to match the outside.  I used the gorgeous Very Vanilla Velvet Ribbon on both the inside and outside of the card.  It is so soft and smooth and adds a lovely texture to the card.  You can find the ribbon on page 11 of the Summer Mini Catalogue.

City Card
Stamps: Marry Me, En Francais
Ink: Crumb Cake, Basic Black
DSP/Cardstock: Mocha Morning Specialty DSP, Basic Black, Very Vanilla
Other: Lace Ribbon Border Punch

Country Card
Stamps: Marry Me
Ink: Marina Mist, Crumb Cake
DSP/Cardstock: Beau Chateau DSP, Marina Mist, Very Vanilla, Pink Pirouette
Other: Big Shot, Beautiful Wings Embosslit, Very Vanilla Velvet Ribbon, Basic Jewels Pearls, 1" Circle Punch, 1 1/4" Circle Punch, Sponge Dauber, Colour Spritzer, Circle Cutter, Dimensionals

If you'd like to continue the Blog Hop and see some more amazing projects, then please hop on over to Nikki Sadler's blog.  Please take a minute to leave a comment before you go.  It's easy to do, and I'd love to know what you think of my cards.

Bye for now,

Tina

Blog Hop Participants:
Nikki Sadler
Kathryn Mangelsdorf
Sue Madex
Alisha Watson
Kathryn Ruddick
Di Dunk

Saturday, 10 September 2011

JAI 84: Just Add White and One

Hi!

Today I have a card made for the current challenge at Just Add Ink.  The challenge is to make a card using white and one other colour.  I had been asked to make a card for a wedding, and so this challenge seemed perfect.  White and one other colour is a classic, elegant look.  When I think of elegant and classic I think of the work of Teneale Williams.  I searched her blog and found this card to CASE.  Here's my version:


I changed a few things, but essentially the card is the same.  I used a different butterfly, and also En Francais Background stamp on the plain Blushing Bride panel, to name a few changes.


I liked the inside of Teneale's card I CASED that too!


Isn't it a great card? Teneale is so talented!

Stamps: Creative Elements, En Francais Background, A Word For You
Ink: Blushing Bride
DSP/Cardstock: Blushing Bride Patterns Stack DSP, Blushing Bride, Whisper White
Other: Big Shot, Tasteful Trims Die, Whisper White Satin Ribbon, Basic Jewel Pearls, Paper Snips, Sponge Dauber, Dimensionals

Catch you later,

Tina

Sunday, 29 May 2011

An Andrea Walford CASE

Hi!

Today's card is a CASE of one made by Andrea Walford.  She makes the most stunning cards.  The only thing I changed was the colour of the base card.  The recipient of this card loves pink, so I used Pretty In Pink instead of the Pear Pizzazz Andrea used.


The main panel is stamped with the En Francais Background stamp in Whisper White craft ink.   It's such an elegant stamp and looks fantastic as a subtle accent.


I layered two of the Beautiful Wings butterflies and gave them rhinestone bodies.  Such a simple card, but I think it looks fab.

Stamps: En Francais BG
Ink: Whisper White Craft
Cardstock: Pretty In Pink, Basic Black
Other: Big Shot, Beautiful Wings Embosslit, Basic Jewels Rhinestones

Catch you later,

Tina

Monday, 14 March 2011

Just Add Ink #59 and Exciting News!

Hi!

I have some exciting news today - I have been asked to be a Guest Designer on Just Add Ink!  I'm so excited!  I can't wait to see what they have in store for me.  Thanks so much to Delys and Bron and the rest of the JAI team for the wonderful opportunity to be a part of a fantastic team.

Today's card is for their current challenge, which is a sketch challenge.  You can see the sketch here.


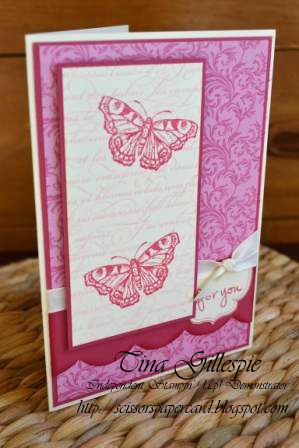
I love all the soft pinks in this card.  I used the Sweet and Sour Speciality DSP as the main base for the card, and went with the coordinating colours for the rest of the card.

To create the main panel I stamped the All A Flutter butterfly twice in Rose Red, masked it and then stamped En Francais over the top in Pretty In Pink ink.

I was about to assemble the pieces of the card when I took another look at the sketch.  I had forgotten a layer, so I decided to add the scalloped section.


To create the larger scallops I punched a 1 1/4" circle and traced it on the cardstock.  I then cut along the lines and sponged the edges for a bit of pop.

Stamps: All A Flutter, En Francais, Great Friend
Ink: Rose Red, Pretty In Pink
DSP/Cardstock: Sweet and Sour Speciality DSP, Rose Red, Very Vanilla
Other: Dimensionals, Sponge Dauber, Paper Snips, Very Vanilla 3/8" Taffeta Ribbon, Stamp Positioner, 1 1/4" Circle L Punch

Catch you later,

Tina

Friday, 14 January 2011

Rolled Roses

Hi!

Today's card was also a custom order.  I was asked to make a card for a wedding, so I wanted to make an elegant card.  I have seen a lot of rolled roses on projects lately and wanted to have a go at making some, so this card seemed the perfect opportunity.  Here's how it turned out:

 Once again I used the Love Letter DSP and kept to the colour combination.  I stamped En Francais on the card and then heat embossed the word 'cherish' over the top in black embossing powder.
A little hard to see, but I spritzed the roses with Champagne Mist shimmer paint for a touch of glitz.

Stamps: En Francais Background, Baroque Motifs
Ink: Riding Hood Red, Versamark
DSP/Card Stock: Love Letter DSP, Riding Hood Red, Basic Black
Other: Paper Snips, Very Vanilla Taffeta Ribbon, Crystal Effects, Stamp Positioner, Champagne Mist Shimmer Paint, Black Embossing Powder

Catch you later,

Tina

Thursday, 28 October 2010

Stampin' Royalty Take 2

Hi!

I managed to sneak in some crafting time today so I thought I'd have another go at the Stampin' Royalty sketch.  This one is a much closer fit to the sketch!


Although I didn't use the Jolly Holiday DSP I used the colours that are in the DSP.  Probably because they were still on my craft desk!


Stamps: En Francais Background, Baroque Motifs, Curly Cute
Ink: Old Olive, Cherry Cobbler
Card Stock: Cherry Cobbler, Old Olive, Very Vanilla
Other: Rhinestones, 3/8" Very Vanilla Taffeta Ribbon, Oval Cutter, Stamp Positioner

Catch you later,

Tina

Friday, 8 October 2010

Bling for a Cause

Hi!

I'm back again - two posts in a day!  I unexpectedly got some quiet time this afternoon as Rob took Alex and Ada out for the afternoon  and Hudson went down for a sleep.  Naturally I headed for my craft table and set to work on Just Add Ink's new challenge.  Their challenge is to Just Add Bling... and Pink in honour of Breast Cancer Awareness.  Now when I think pink my mind automatically jumps to the Pink Ladies, but I have a little secret to confess.  I love Grease 2 more than the original Grease.  In fact, Grease 2 is one of my all time favourite movies!  So I put on the DVD and started creating.


I was after a soft, feminine feel for the card so I used Blushing Bride rather than one of the brighter pinks.  Here's a side view showing the raised bird panel.


I used the Scallop Square punch to create the sentiment panel by cutting a strip of cardstock 11/16" or 1.7cm wide and inserted the ends into the corner of the square from the bottom of the punch.  Nice and easy!

Stamps: En Francais
Ink: Blushing Bride, Pear Pizzazz
DSP/ Card Stock: Blushing Bride Hostess DSP, Blushing Bride, Certainly Celery, Whisper White
Other: Rhinestones, Two Step Bird Punch, Eyelet Border Punch, Scallop Square Punch, Sponge Daubers, Dimensionals, Certainly Celery Twill Ribbon (2010 SAB), Chit Chat Rub Ons (retired)

Catch you later with the next Cool Moves card I promised for tomorrow,

Tina

Wednesday, 8 September 2010

Just Add Ink 33

Hi!

I've just managed to get this card posted in time for the current Just Add Ink challenge.  This week the girls have given us a beautifully elegant sketch for inspiration.


Isn't it lovely?  I hope I've done it justice with my card.


I've used the new Greenhouse Gala DSP on the card.  I'm not such a fan of the big floral designs of the paper, but I'm totally loving the brocade-type patterns in the pack.  The colour combinations are lovely too, and with 6 colours it's easy to pick just 2 or 3 to work with.

Here's a closer look at the sentiment panel:


I used the En Francais Background stamp on the bottom layer, and the Thanks stamp from Perfect Punches for the sentiment, which was raised on dimensionals.  The Chocolate Chip oval was added for a little extra interest.

Stamps: En Francais Background, Perfect Punches
Ink: Baja Breeze, Chocolate Chip
DSP/Card Stock: Greenhouse Gala DSP, Baja Breeze, Chocolate Chip, Whisper White
Other: Chocolate Chip ribbon (retired), Scallop Oval and Wide Oval Punches, Paper Snips, Sponge Daubers, Dimensionals.

Catch you later,

Tina

Saturday, 19 June 2010

Sisters Together Forever

Hi!

Last night I decided to work on a layout incorporating a photograph of 4 of my nieces. The photo was taken of them while they were at the races, so they were all glammed up. They are such beautiful girls. The layout started off as an 8x8 layout:


It didn't look quite finished though, so I decided to incorporate it into a 12x12 layout.


Here's a close up of the top left hand corner. I clear embossed the En Francais BG stamp to give the page a little more elegance. Unfortunately it's a bit hard to see in the photo.


I wanted to colour the large flower from the Pretties Kit, but I don't have a Melon Mambo reinker. Instead I used my Aqua Painter to watercolour the flower. It gives a bit of a softer look and you can be a bit more selective about how you colour the flower and give it highlights. It's a bit brighter in real life than the photo shows.

Stamps: En Francais Background, Together Forever
Ink: Versamark, Black Stazon, Melon Mambo
Card Stock: Basic Black, Melon Mambo, Whisper White Textured
Other: Scallop Edge Punch, Melon Mambo 1/2" Polka Dot Grosgrain Ribbon, White Signo Gel Pen, Stamp-a-ma-jig, Clear Embossing Powder, Mini Glue Dots, and Flower, Pearl, Rhinestone Brads, Beads and Hat Pins from the Pretties Kit.

Catch you later,

Tina

Saturday, 29 May 2010

Beautiful Zoe Part Two

Hi!

I'm back with the second page of my 'Beautiful Zoe' layout. Brooke had sent me a few pictures of Zoe in her gorgeous flower girl dress and so I felt it needed a second page.


I tried to keep the same design elements happening as before, but because I was using more photos the placement of the strips was a bit more random than the first page. I'd also run out of Felt Fusion flowers, so I used the flowers from the Pretties kit and added a button to keep the Baja Breeze theme going. A few more half pearls and I was done!


Stamps: En Francais Background Stamp
Ink: Sahara Sand, So Saffron, Ruby Red
DSP/Card Stock: Ski Slope DSP (retired), So Saffron Patterns DSP, Sahara Sand, Ruby Red, Baja Breeze
Other: Pretties Kit, Black Brad, Sponge Daubers, Button Bouquet Designer Button

Catch you later,

Tina

Friday, 28 May 2010

Beautiful Zoe

Hi!

I finally finished my big uni assignment last night and I desperately needed some creative time so I decided to have a go at the latest Stamp A Memory creative challenge. We were challenged to create a shaped layout, not the usual square or rectangle. I was originally going to do a house shape as we have just started an extension to our house, but one of the other entrants beat me to it! I decided to do a circular layout instead.


This is my beautiful niece Zoe. She was recently a flower girl for a debutant ball and had a fabulous time dressing up like a princess (including a tiara!) and being spoiled rotten all day. The photo was taken by my very talented sister, and Zoe's mum, Brooke. To help Zoe stand out a bit more from the background I printed two copies of the photo. I mounted the first on Sahara Sand card stock and then used my paper snips and scalpel to carefully cut around Zoe and the butterfly she is holding. I raised the cut out on dimensionals and layered it directly over the whole photo.


A subtle effect, but it really gives the photo a bit more oomph!

I used lots of pieces of the Pretties Kit, Flower Fusion Too felt flowers and a Filigree brad to dress up the layout.


I love how the accents give a soft feel to the page without overwhelming the photograph.


I got my colour inspiration from the Sweet Slumber Speciality DSP. Even though I didn't use the DSP I was able to use the colours. It's one of the things I love most about Stampin' Up - how easy they make it to colour coordinate and to come up with stylish colour combinations. They've already done the hard work for me.

Stamps: En Francais Background Stamp
Ink: Sahara Sand, So Saffron
DSP/Card Stock: Ski Slope DSP (retired), So Saffron Patterns DSP, Sahara Sand, Ruby Red, Baja Breeze
Other: Big Shot, Timeless Type Junior Alphabet Die, Pretties Kit, Flower Fusion Too felt flowers, Filigree Brad, Black Brad, Clear Rhinestone Brad, Paper Snips, Scalpel, Sponge Daubers, Dimensionals

I have a few more pictures of Zoe as a flower girl, so I'm hoping to complete another page to make it a double page layout over the weekend. I'll post it when I'm done!

Catch you later,

Tina