Pages

Showing posts with label All Dressed Up Dies. Show all posts

Sunday, 12 December 2021

CTC 348: CASE The Sketch

 Hi!


Thanks again for joining me for the new CASEing The Catty Sunday Challenge Blog Hop. This is our second last challenge for the yer before we take a short break over the Christmas/New Year period. It's a busy time of year, but I hope that you can find the time to join us.
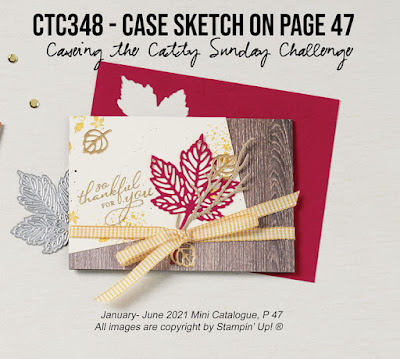
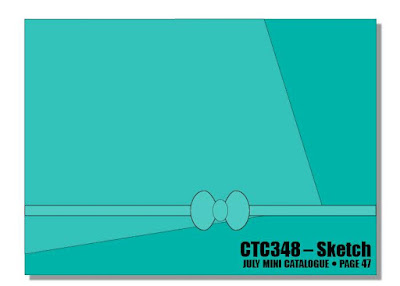
This week we have chosen this card, from page 47 of the Mini Catalogue, to CASE. Here's a simplified version so that you can have a better look at the elements of the card.

I quite like the diagonal panel, and contemplated doing that clever technique where you make two cuts in a 6x6 piece of DSP and get enough of those panels for four cards. I can't think of the name - can you? In the end, though, I had a busy weekend and only had time to make one card.
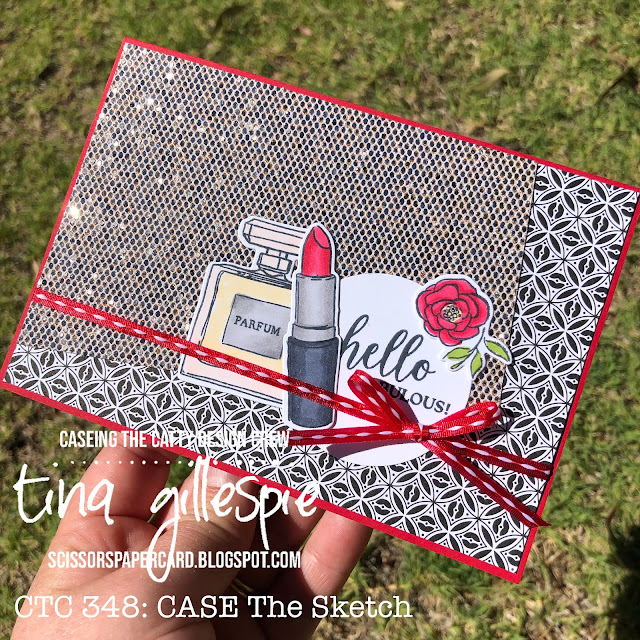
scissorspapercard, Stampin' Up!, CASEing The Catty, Dressed To Impress Bundle, Be Dazzling SP, Pattern Party Host DSP, Stampin' Blends

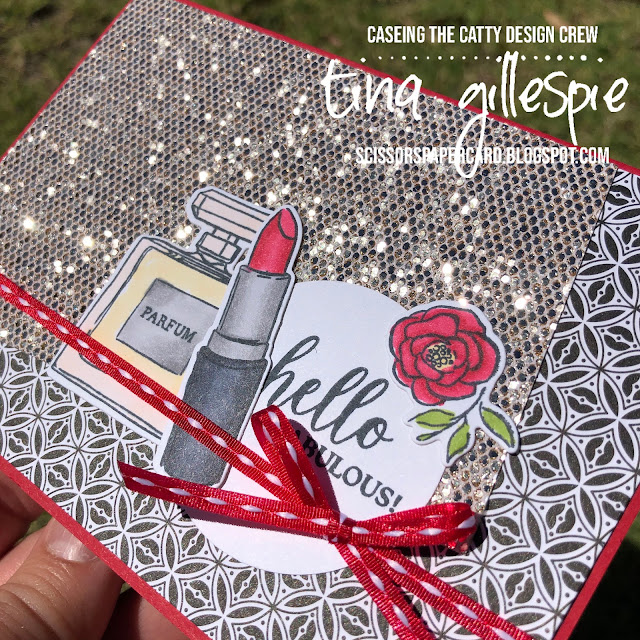
Are you the same as me and hoard the pretty paper while it's current and then don't use it until it's retired? Sigh. The Be Dazzling paper was like this for me!! I cut a 3 1/2" x 6" piece and then glued it to the Pattern Party Host DSP on the core angle. When dry, I just trimmed away the excess from the back. I used my Dressed To Impress Bundle to decorate the front.
scissorspapercard, Stampin' Up!, CASEing The Catty, Dressed To Impress Bundle, Be Dazzling SP, Pattern Party Host DSP, Stampin' Blends

The dazzling paper is delightfully sparkly, don't you think? The perfect match for the Dressed To Impress stamps!
scissorspapercard, Stampin' Up!, CASEing The Catty, Dressed To Impress Bundle, Be Dazzling SP, Pattern Party Host DSP, Stampin' Blends

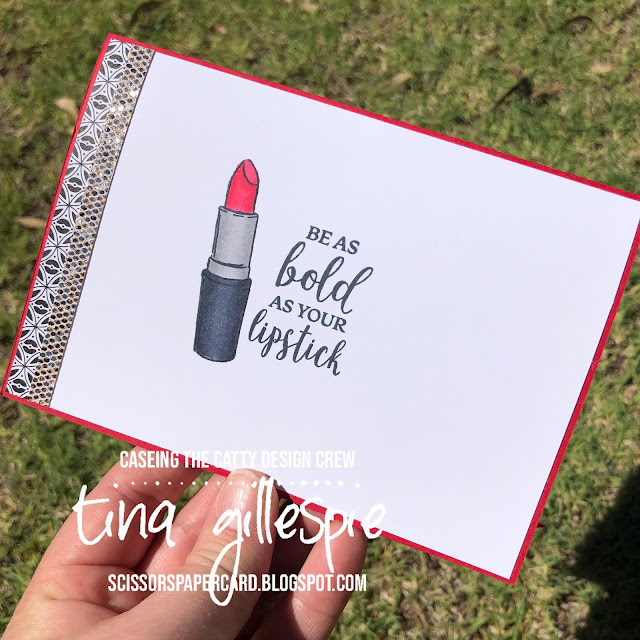
I couldn't resist adding another strip of the Be Dazzling paper to the inside of the card - there can never be too much bling!

To join in with our challenge, all you need to do is join our Facebook group and post a photo of your card in the group before the Sunday evening deadline. It's that easy! We'd love to see what you make each week.

Next up is my lovely friend, Sandra Collett. She's made a gorgeous card, with a very fancy tilted panel!!

Bye for now,

Tina

Wednesday, 13 October 2021

Colour Creations: Granny Apple Green

 Hi!


Thanks for joining me for this week's Colour Creations Blog Hop. This week we are looking at Granny Apple Green. It's a lovely, happy green from the Brights colour family. I have broken my feature colour only rule for this blog hop, as I wanted to show you a very special card that I made recently for my youngest son Hudson's birthday. He loves Shaun The Sheep, and his favourite episode is called 'Still Life'. When I saw the Counting Sheep stamps and the coordinating Sheep Dies in the recent Sale-A-Bration catalogue, I decided I would recreate the scene below for his card.


In the episode, the farmer wants to do some painting, but when he goes off in search of some more white paint, the sheep have a lot of fun. They recreate some famous artworks, but with a 'sheepish' perspective. The canvas ends up as a riot of colour, so that's the one I chose to create for Hudson's card.

scissorspapercard, Stampin' Up!, Colour Creations, Counting Sheep, Music From The Heart, Sweet AS A Peach, All Dressed Up Dies, Sheep Dies, Stampin' Blends, Multi-Tier Pop Up Card

This fold is called a Multi-Tiered Pop Up card, and I thought that the layers and dimension suited my purposes perfectly. After I created the card base from Granny Apple Green card, I used Dimensionals to adhere some Early Espresso die cut fence panels to the card. The sentiment is from Music From The Heart, cropped with an All Dressed Up Die. The die cut clouds and sun were adhered to some strips of Window Sheet before being adhered to the base.

scissorspapercard, Stampin' Up!, Colour Creations, Counting Sheep, Music From The Heart, Sweet AS A Peach, All Dressed Up Dies, Sheep Dies, Stampin' Blends, Multi-Tier Pop Up Card

The sheep were stamped with Memento ink and then I coloured the legs and face with my Dark Basic Black Blend. To achieve the look of paint splatters, I stamped the little flower from Blossoms In Bloom in a range of bright colours over the flower, and the square of Whisper White that is the 'canvas'. I then adhered them to the base, some directly to the front or back of each layer, and some with Dimensionals, so that I could get the maximum out of the layering.

scissorspapercard, Stampin' Up!, Colour Creations, Counting Sheep, Music From The Heart, Sweet AS A Peach, All Dressed Up Dies, Sheep Dies, Stampin' Blends, Multi-Tier Pop Up Card

I repeated the same ideas on the back, however, looking at the photo, I realise that I forgot to give this sheep some paint splatters. Oh well!! The easel was created by chopping up another die cut fence piece, this time in Crumb Cake. I had a lot of fun making this card, and Hudson seemed to love it - he hooted at it in the way he does when he likes something, and gave it a bog long look. I was happy! 

A very big thanks to my lovely friend Andrea for the loan of the stamps and dies so that I could make this special card. You're now off to he blog to see what gorgeousness she has created for us tonight.


Another lovely friend, Catherine Proctor, is our host for tonight, so pop on over to her blog if you run into trouble with any of the links, or if you'd like to see a full list of tonight's Hoppers.

Bye for now,

Tina

Sunday, 18 July 2021

CTC 327: Holiday Section

 Hi!


Welcome back to this new CASEing The Catty Sunday Challenge Blog Hop. We are celebrating our seventh anniversary this evening. How exciting! I've been part of the team for around two and a half years, and have enjoyed every moment.


This week for our challenge, we are asking you to CASE  a card from the Holiday Section of the Annual Catalogue. Have you started making Christmas cards yet? I've been making them for around a month now, with the hope that I won't have to madly rush to get enough made in December.


I chose this card from page 95, as the simple design really appealed to me and I liked how the branch hung over the sides of the main panel.

scissorspapercard, Stampin' Up!, CASEing The Catty, Penguin Playmates DSP, Christmas To Remember, All Dressed Up Dies, Christmas Card

I started by rotating the orientation of the card. The main panel stretched to become the long, thin strip that the sentiment sit on, and the polar bear still overhangs each side of the panel. Sort of the same, but also very different!

scissorspapercard, Stampin' Up!, CASEing The Catty, Penguin Playmates DSP, Christmas To Remember, All Dressed Up Dies, Christmas Card

The DSP I have used is a cute new Sale-A-Bration option, called Penguin Playmates. You can earn it free in August and September with a $90 catalogue spend. To jazz up the images a little, I coloured the polar bear's scarf and nose with Wink Of Stella. Some trees in the background DSP also got the same treatment. It's an overcast day here, so no sun to help capture the sparkle in a photo - you'll just have to imagine!

scissorspapercard, Stampin' Up!, CASEing The Catty, Penguin Playmates DSP, Christmas To Remember, All Dressed Up Dies, Christmas Card

The sentiments I've used are from a stamp set in the new Mini Catalogue, called Christmas To Remember. It's a lovely sentiment only set that I'm sure I will use a lot. The tree is fussy cut from the Penguin Playmates DSP.

That's all from me tonight, but your part in our seventh anniversary challenge is just beginning! Choose a card to CASE from the Holiday Section, and after you've made it, just upload a photo to our Facebook group. Easy!


Please do continue on with our blog hop before you dash off to get inky. Next up is my lovely friend, Rachel.


Bye for now,

Tina

Wednesday, 7 July 2021

Colour Creations: Blushing Bride

 Hi!


Thanks for joining me for this week's Colour Creations Blog Hop. We are looking at Blushing Bride this week, which is a dusty pink from the Subtles colour family.  Pink is not really a colour I find myself reaching for a lot, so I had to think hard about what I was going to make this week.

scissorspapercard, Stampin' Up!, Colour Creations, Pierced Blooms Dies, All Dressed Up Dies, Sweet As A Peach

To keep it simple, I decided upon a bouquet of flowers using the Pierced Blooms Dies. I started the card with a wash of Blushing Bride ink on Shimmery White cardstock. I knew I wanted to mix in some white flowers with the pink, so this was a way to avoid them getting lost in the background.

scissorspapercard, Stampin' Up!, Colour Creations, Pierced Blooms Dies, All Dressed Up Dies, Sweet As A Peach

Once it dried I adde the flowers and stems over the top. The flower centres have a little Wink Of Stella added, but it was hard to photograph on the gloomy day I took the photo. The sentiment is from Sweet As A Peach, and is cropped using the label die from the All Dressed Up Dies. I often forget I have that label - it's a good size for those slightly larger small sentiments.

scissorspapercard, Stampin' Up!, Colour Creations, Pierced Blooms Dies, All Dressed Up Dies, Sweet As A Peach

I had a few flowers left over, so they were put to good use on the inside of my card, along with another sentiment from Sweet As A Peach.

Next up on tonight's Blog Hop is my lovely Victorian friend, Theresa Gerrard, with what is bound to be a gorgeous card!

If you find a broken link or have come to this blog hop from a different entry point, you can view the full list of participants on Catherine Proctor’s blog.

Bye for now,

Tina

Sunday, 21 March 2021

CTC 310: CASE A Layout

 Hi!


Oh, goodness, this weekend has gone so quickly! Sunday evening really snuck up on me! I had a really lovely night last night at the Adelaide Fringe Festival with some school mums, which meant that today was a bit slower of a day. Luckily I already had my card made, I just needed to do the photography and blogging.


Anyway, on with the show! This week at CASEing The Catty we are challenging you to CASE the layout of the card with the three bow ties - isn't it a fun card? Here's a sketch to help you see the different elements.
I liked the three repeated elements, but I decided to go for blocks rather than shapes. I won a sample pack of the Fine Art Floral DSP a while back and hadn't used any yet, so this was a great opportunity to finally crack it open.

scissorspapercard, Stampin' Up!, CASEing The Catty, Fine Art Floral DSP, Pretty Perennials, Itty Bitty Birthdays, All Dressed Up Dies, Stitched Rectangles Dies, Subtle 3DEF

I used my Stitched Rectangles Dies to crop the DSP into three panels, and layered them on some Old Olive card. The three panels were then layered over a piece of Petal Pink card, which I'd embossed with the Subtle 3DEF.

scissorspapercard, Stampin' Up!, CASEing The Catty, Fine Art Floral DSP, Pretty Perennials, Itty Bitty Birthdays, All Dressed Up Dies, Stitched Rectangles Dies, Subtle 3DEF

The sentiments are from Pretty Perennials. The 'birthday' part is stamped on a strip that was cropped using one of the All Dressed Up Dies. It's meant to be the handbag strap, but I use it a lot for adding sentiments!

scissorspapercard, Stampin' Up!, CASEing The Catty, Fine Art Floral DSP, Pretty Perennials, Itty Bitty Birthdays, All Dressed Up Dies, Stitched Rectangles Dies, Subtle 3DEF

I used the same die to crop a long, thin strip of the DSP to decorate the inside of my card. It's a great way to give a scrap a pretty edge to jazz up the inside of your card.

That's all from me tonight, but this is where is just begins for you! We'd love to see what you do with this sketch, so please pop on over to our Facebook Group, where all you need to do it add a photo of your creation to enter our challenge. 


Before you go, please do finish our hop! Next up is the wonderful Julia - I adore her card, especially as it features my favourite colour!

Bye for now,

Tina
Wednesday, 17 March 2021

Colour Creations: Real Red

 Hi!


Thanks for joining me for Real Red week in the Colour Creations Creative Showcase series. Are you a red person? I love red, but I find it very hard to create with sometimes. I especially dislike stamping sentiments in red, and I only do it if there are no other possible choices. Maybe it goes back to my days as a High School teacher!

scissorspapercard, Stampin' Up!, Colour Creations, All Dressed Up Dies, Perennial Petals Dies, Gift Bag

My favourite accessory is my red handbag, and so I felt compelled to make a little handbag gift bag using my Real Red cardstock and All Dressed Up Dies. The dies make it so ease to create a stylish gift bag, complete with stitched details.

scissorspapercard, Stampin' Up!, Colour Creations, All Dressed Up Dies, Perennial Petals Dies, Gift Bag

Many handbags have a little dangly embellishment, so I felt the need to add one to my bag too. I used the dies from the perennial Petals set to create the flower. I cropped two flowers from Thick Whisper White and layered them back to back with Dimensionals. The Baker's Twice was looped around the handle of the bag and also around one of the Dimensionals so that it stayed in place.

scissorspapercard, Stampin' Up!, Colour Creations, All Dressed Up Dies, Perennial Petals Dies, Gift Bag

The pocket on the front is just glued around three edges so that I can pop a tiny message in it if I choose. I will decide when I know who is going to get a little gift from me 😊

Please pop on over to Cathy's Blog, where you'll find the rest of this week's Real Red cards - I'm sure you'll be in for a treat!

Bye for now,

Tina

Thursday, 4 March 2021

JAI 544: Just Add L

 Hi!


Thanks for joining me for the new Just Add Ink Challenge. Hopefully you have time to play along with us. It's a long weekend here in Adelaide, which always means a little extra crafting time for me. I'm hoping to get the next block in the quilt top I am working on done - what about you?


If you're paper crafting, why not join in our Just Add L challenge? Your card just needs to have one thing that starts with L on it. Maybe a stamp set, or a colour, technique, embellishment, theme, whatever you can think of that starts with L!

scissorspapercard, Stampin' Up!, Just Add Ink, Dressed To Impress, All Dressed Up Dies, Best Dressed DSP, Stitched So Sweetly Dies, Subtle 3DEF, Peaceful Moments, Mother's Day

I went for Lipstick! I haven't used my Dressed To Impress stamps much lately, so this was a good excuse to pull them out. I stamped the lipstick with Memento ink and coloured it with my Watercolour Pencils and Wink Of Stella. It's lovely and shimmery in real life!

scissorspapercard, Stampin' Up!, Just Add Ink, Dressed To Impress, All Dressed Up Dies, Best Dressed DSP, Stitched So Sweetly Dies, Subtle 3DEF, Peaceful Moments, Mother's Day

For a bit of added texture, I ran my DSP through the Big Shot with the Subtle 3DEF. It's such a pretty effect, and makes the paper look like fabric.

scissorspapercard, Stampin' Up!, Just Add Ink, Dressed To Impress, All Dressed Up Dies, Best Dressed DSP, Stitched So Sweetly Dies, Subtle 3DEF, Peaceful Moments, Mother's Day

The DSP on the inside got the same treatment as on the front. And I'm happy, because I now have one of the two Mother's Day cards that I need for this year made. Now just to put it in a safe spot where it won't get lost!

Time now to pop on over to the Just Add Ink blog, where you can see the rest of this week's Design team cards. I love these alphabet challenges, as everyone is so creative in interpreting them.

Bye for now,

Tina

Wednesday, 10 February 2021

Colour Creations: Pool Party

 Hi!


Thanks once again for joining me for this week's Colour Creations Creative Showcase. It's time for Pool Party to shine! This blue-green colour always makes me think of Tiffany Blue, so I went with that girly theme for my card.

scissorspapercard, Stampin' Up!, Colour Creations, Dressed To Impress, Pretty Perennials, Joy To The World Paper Pumpkin, Forever Gold SP, Stitched Rectangles Dies, Stampin' Blends

I started by using my Stitched Rectangles Dies to cut an opening in the card front, and then adhered a piece of the Forever Gold Laser Cut DSP to the back. I popped the piece up over the top of my card base using Dimensionals. I probably should have added a piece of Window Sheet behind the laser cut, as it's a little more saggy than I'd like. Hopefully it's one of those tiny details that only the creator of a card would notice!

scissorspapercard, Stampin' Up!, Colour Creations, Dressed To Impress, Pretty Perennials, Joy To The World Paper Pumpkin, Forever Gold SP, Stitched Rectangles Dies, Stampin' Blends

I used my All Dressed Up Dies to cut a strip of Pool Party card to go across the front of the card as a base for me to glue all of the other elements to the card. The perfume and flowers are from the coordinating Dressed To Impress stamp set. The perfume had a very light wash of Pool Party ink, and the flowers were coloured with Blends. A swish of Wink Of Stella finished it all off.

scissorspapercard, Stampin' Up!, Colour Creations, Dressed To Impress, Pretty Perennials, Joy To The World Paper Pumpkin, Forever Gold SP, Stitched Rectangles Dies, Stampin' Blends

The shoes and flowers on the inside were also coloured with the Blends, and then given the Wink Of Stella treatment. I figured that a girly, Tiffany inspired card couldn't be too glittery!

Time now to pop on over to Cathy's blog, where you'll find the rest of this week's Pool Party cards.

Bye for now,

Tina

Thursday, 17 December 2020

JAI #536: Just Add Inspiration

 Hi!


Welcome back to the new Just Add Ink challenge - the last one for 2020. We have an Inspiration Challenge that will run for two weeks. How cute is this picture that Nikki has found for us to use?


It is super cute - but very Northern Hemisphere! I started wondering what a similar decoration would look like for the Southern Hemisphere's summery Christmas, and that's the theme I ended up using on my card.

scissorspapercard, Just Add Ink, Sun-Lovin' Santa, Joy To The World Paper Pumpkin, Rectangle Stitched Dies, All Dressed Up Dies, Tropical Escape DSP, Stampin' Blends

I pulled out my Sun Lovin' Santa stamp set and stamped and coloured a whole lot of images. I really had no plan for a card at that point. By a happy coincidence, the colours I used worked perfectly with the retired Tropical Escape DSP.

scissorspapercard, Just Add Ink, Sun-Lovin' Santa, Joy To The World Paper Pumpkin, Rectangle Stitched Dies, All Dressed Up Dies, Tropical Escape DSP, Stampin' Blends

I love the bright, fresh feel of the card, provided by the Flirty Flamingo card base. Santa looks pretty cool in his Flirty Flamingo Hawaiian Shirt too!

scissorspapercard, Just Add Ink, Sun-Lovin' Santa, Joy To The World Paper Pumpkin, Rectangle Stitched Dies, All Dressed Up Dies, Tropical Escape DSP, Stampin' Blends

There's that Joy To The World Paper Pumpkin stamp again - I am getting so much use out of it!

I had a lot of images left over from my stamp and colour session, so I decided I would make another card rather than let them float around on my craft desk until next Christmas.

scissorspapercard, Just Add Ink, Sun-Lovin' Santa, Joy To The World Paper Pumpkin, Rectangle Stitched Dies, All Dressed Up Dies, Tropical Escape DSP, Stampin' Blends

I used the exact same colours, DSP and layout, I just switched it to portrait orientation rather than landscape. I sort of wished that I'd coloured a few more palm trees to put behind the vehicle, but it was getting late and I was feeling a little lazy by that point!

scissorspapercard, Just Add Ink, Sun-Lovin' Santa, Joy To The World Paper Pumpkin, Rectangle Stitched Dies, All Dressed Up Dies, Tropical Escape DSP, Stampin' Blends

Hehehe, I couldn't resist adding the flamingo to the inside - coloured with Flirty Flamingo, of course!


Here's the two cards together. They were very fun to make - I will definitely have to use this stamp set way more next year!

As always, you can find the rest of this week's Design Team cards over on the Just Add Ink Blog, where you can also link up your card for this challenge - remember that it goes for two weeks!

Have a wonderful Christmas and New Year. I will be taking a blogging break until early January so that I can spend some quality time with my family.

Bye for now,

Tina