Hi!
It seems a little strange to be posting something on a Friday that isn't a Just Add Ink challenge. The Design Team are having a well-earned break and will return later in the month, but I'm just getting back into the swing of regular blogging and I didn't want to stop the momentum. So today I have for you a card I made as a RAK for a friend. What's a RAK? It's a Random Act of Kindness - a card out of the blue for no reason at all other than to let someone know you are thinking of them. Guaranteed to put a smile on the recipient's face!
This was the first card I made when I received my Work Of Art stamp set. I've seen cards like this around the 'net heaps, so I can't remember which specific one I CASEd unfortunately.
I really love the effect of the 'halo' around the centre of the flower. Not quite sure how I managed that, but hey, I think it's great!
I used the Hostess set Hello There to create another, far smaller sunflower on the inside. I had someone in mind when I made this card who loves sunflowers so it was really a no-brainer to include as many as I could on the card!
By the way, she loved the card.
Bye for now,
Tina
Showing posts with label Hello There. Show all posts
Friday, 9 January 2015
Friday, 5 December 2014
JAI #243: Just Add Colour!
Hi!
Wow, where did that week go? It seems like only yesterday that I was sitting at my computer typing up last week's Just Add Ink post. I swear that time goes faster at this end of the year. Anyway, this week at Just Add Ink Kim has challenged us to use a colour combination in our papercrafting.
Now, I don't know about you, but I was always taught that you don't mix red and pink, or blue and green for that matter. The best part of being a grown up is that you get to break the rules whenever you like, and this combination ended up being really fun to work with.
I should add that I'm really not much of a rebel, so when I break the rules it's more like I bend them, or dip a toe over the line. In this case I decided to opt for a tiny splash of Real Red, Strawberry Slush and Wild Wasabi. By keeping most of the card Tempting Turquoise and Whisper White I was able to avoid the colours clashing with each other.
The card didn't look quite finished with just the hearts and the sentiment on the circle, so I added a row of piercing to the circle and some rhinestones to the hearts. Done!
So I guess I cheated a little by leaving the Strawberry Slush and Wild Wasabi out of the middle, but I was nearly in hives over my rule breaking on the front of the card so I decided to go simple on the inside.
How are you going to bend or break the rules? Are you a rebel or not? I can't wait to see over at Just Add Ink.
Bye for now,
Tina
Wow, where did that week go? It seems like only yesterday that I was sitting at my computer typing up last week's Just Add Ink post. I swear that time goes faster at this end of the year. Anyway, this week at Just Add Ink Kim has challenged us to use a colour combination in our papercrafting.
Now, I don't know about you, but I was always taught that you don't mix red and pink, or blue and green for that matter. The best part of being a grown up is that you get to break the rules whenever you like, and this combination ended up being really fun to work with.
I should add that I'm really not much of a rebel, so when I break the rules it's more like I bend them, or dip a toe over the line. In this case I decided to opt for a tiny splash of Real Red, Strawberry Slush and Wild Wasabi. By keeping most of the card Tempting Turquoise and Whisper White I was able to avoid the colours clashing with each other.
The card didn't look quite finished with just the hearts and the sentiment on the circle, so I added a row of piercing to the circle and some rhinestones to the hearts. Done!
So I guess I cheated a little by leaving the Strawberry Slush and Wild Wasabi out of the middle, but I was nearly in hives over my rule breaking on the front of the card so I decided to go simple on the inside.
How are you going to bend or break the rules? Are you a rebel or not? I can't wait to see over at Just Add Ink.
Bye for now,
Tina
Monday, 1 September 2014
Curvy Bordering Blooms
Hi!
Have you noticed that Stampin' Up! have introduced Photopolymer stamps in the new Catalogues? They are a fabulous new stamping option. You may have tried photopolymer stamps before and been unimpressed with the results, but you won't be unimpressed with our new range. They have been specifically designed to work with our inks, so you can wave goodbye to splotchy, patchy stamped images. Yay!
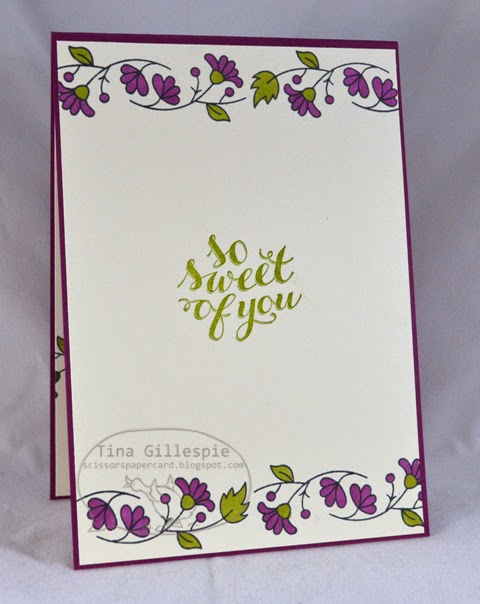
Another great advantage of the photopolymer stamps is that they are flexible and can be bent into different shapes. On this card I bent the floral border stamp into a curve to wrap around the Thanks sentiment. I think it looks great, and was certainly a 'wow' amongst the ladies who made this card with me.
We stamped the image in Momento ink and coloured the image with Blendabilities. One thing to be careful of when you bend the stamp is to make sure it doesn't buckle, as it means you will probably end up with ink on the buckle which will transfer to your cardstock.
On the inside I reverted the stamp back to it's original, straight form. Which way do you like the stamp? Bent or straight?
Bye for now,
Tina
Have you noticed that Stampin' Up! have introduced Photopolymer stamps in the new Catalogues? They are a fabulous new stamping option. You may have tried photopolymer stamps before and been unimpressed with the results, but you won't be unimpressed with our new range. They have been specifically designed to work with our inks, so you can wave goodbye to splotchy, patchy stamped images. Yay!
Another great advantage of the photopolymer stamps is that they are flexible and can be bent into different shapes. On this card I bent the floral border stamp into a curve to wrap around the Thanks sentiment. I think it looks great, and was certainly a 'wow' amongst the ladies who made this card with me.
We stamped the image in Momento ink and coloured the image with Blendabilities. One thing to be careful of when you bend the stamp is to make sure it doesn't buckle, as it means you will probably end up with ink on the buckle which will transfer to your cardstock.
On the inside I reverted the stamp back to it's original, straight form. Which way do you like the stamp? Bent or straight?
Bye for now,
Tina
Labels:
Blendabilities,
Bordering Blooms,
Hello There,
Hip Hip Hooray
Friday, 11 July 2014
JAI #222: Just Add Colour
Hi!
It's Friday so I'm here with the new Just Add Ink Challenge. This week we have a gorgeous colour combination for you courtesy of Mae.
It took me a little while to think of what to do with this card, but once I got an idea it came together pretty quickly. I used a lot of retired product on this card - some recently retired, some has been retired for a while.
I started with the DSP on the base. It's from the long retired Twitterpated DSP - a favourite of mine. I didn't have enough to cover the entire front so I trimmed it into four pieces. To soften the gaps I covered the bottom one with the retired Flower Trim and the top ones with the leaf die cuts.
I was a little worried that the Bermuda Bay would be too strong a colour for the rest of the card so I stamped it off once before I stamped on the card.
I liked the leaves so I added a few more to the inside to finish it off.
I hope you can play along with us at Just Add Ink this week - it's a great colour combination.
Bye for now,
Tina
It's Friday so I'm here with the new Just Add Ink Challenge. This week we have a gorgeous colour combination for you courtesy of Mae.
It took me a little while to think of what to do with this card, but once I got an idea it came together pretty quickly. I used a lot of retired product on this card - some recently retired, some has been retired for a while.
I started with the DSP on the base. It's from the long retired Twitterpated DSP - a favourite of mine. I didn't have enough to cover the entire front so I trimmed it into four pieces. To soften the gaps I covered the bottom one with the retired Flower Trim and the top ones with the leaf die cuts.
I was a little worried that the Bermuda Bay would be too strong a colour for the rest of the card so I stamped it off once before I stamped on the card.
I liked the leaves so I added a few more to the inside to finish it off.
I hope you can play along with us at Just Add Ink this week - it's a great colour combination.
Bye for now,
Tina
Subscribe to:
Posts (Atom)