Pages

Showing posts with label Number Of Years. Show all posts

Thursday, 25 April 2024

JAI 699: Just Add Colour

Hi! 


Thanks for joining me for the new Just Add Ink challenge. This week we have a colour challenge for you, suggested to us by Di.


I really love this combo, and I feel like, depending on how you use the colours, it could be either masculine or feminine. This is a bit of a last hurrah for Starry Sky, as it retires at the end of the month.

scissorspapercard, Just Add Ink, Stampin' Up! Amazing Phrasing, Number Of Years, Alphabet A La Mode Dies, Stitched Stars Dies

My oldest son recently turned 21, and so he needed a special card. I decided to make a Double Z Fold card for him. On the front I stamped a combination sentiment from a long-retired SAB set, called Amazing Phrasing. I used three separate stamps for the sentiment, mixing and matching from the options available in the set. A couple of Coastal Cabana Stitched Star die cuts finished off the front.

scissorspapercard, Just Add Ink, Stampin' Up! Amazing Phrasing, Number Of Years, Alphabet A La Mode Dies, Stitched Stars Dies

I used the Alphabet A La Mode Dies for the foil numbers, and Number Of Years (also long-retired) to stamp around them. Another Stitched Stars foil star finished off the front of the card.

scissorspapercard, Just Add Ink, Stampin' Up! Amazing Phrasing, Number Of Years, Alphabet A La Mode Dies, Stitched Stars Dies

I decided to add an extra panel to the back of the card to give us plenty of room to write our messages to Alex. I couldn't resist dressing it up with yet another foil star.

We'd love to see what you make with this week's colours. I think they are gorgeous, and hopefully you do too. Pop on over to the Just Add Ink blog, where you'll see what the rest of the Design team have made with them. You can also add your card to our Linky to enter the challenge.

Bye for now,

Tina

Thursday, 23 September 2021

JAI 573: Just Add A Sketch

 Hi!


Welcome back to a new week of Just Add Ink, and a fresh challenge for you to sink your teeth into. This week Jan has designed a sketch for us to work with.


I like this one! The strip down the side adds a little touch of something extra to an already versatile sketch, don't you think? My son, Alex was invited to a birthday party, and so I used the sketch to create a fun card for the birthday boy.

scissorspapercard, Stampin' Up!, Kindred Stamps, Just Add Ink, Building Blocks, Number Of Years, Label Me Bold, Subtle 3DEF, Stitched Shapes Dies, Pop Culture Card

I started with that cheeky strip down the side. I purchased the paper many, many years ago, and this was one of the last strips left from it. I don't have any information about which company made it, sorry! The rest of the card base was Basic Black card, embossed with the Subtle 3DEF folder. I popped it up over the strip of Lego paper.

scissorspapercard, Stampin' Up!, Kindred Stamps, Just Add Ink, Building Blocks, Number Of Years, Label Me Bold, Subtle 3DEF, Stitched Shapes Dies, Pop Culture Card

The little figure was from a Kindred Stamps set, called Building Blocks. I coloured him with my Copic Markers and popped him up over the stamped Number Of Years numbers, finishing with a sentiment from Label Me Bold. Lots of retired products on this card!

scissorspapercard, Stampin' Up!, Kindred Stamps, Just Add Ink, Building Blocks, Number Of Years, Label Me Bold, Subtle 3DEF, Stitched Shapes Dies, Pop Culture Card

I stamped the figure on the inside, but this time I gave him glasses. I did this because Alex wears glasses, but the birthday boy does not. It was probably too subtle a touch for either of them to notice, but it tickled my funny bone!

That's all from me for the new challenge, but please do pop on over to the Just Add Ink blog, where you will find the rest of this week's Design team cards. They've done an amazing job with this sketch! You can also link up your card in our challenge. I can't wait to see what you create.

Bye for now,

Tina

Thursday, 13 February 2020

JAI #492: Just Add A Sketch

Hi!


Hello, and welcome to the new Just Add Ink challenge! This week we have a sketch for you, designed by the lovely Jackie.


There's so much that could be done with this sketch, don't you think? I have a nephew that turned 14 this month, and the sketch worked perfectly for the card I wanted to make for him.

scissorspapercard, Stampin' Up!, Just Add Ink, Play Ball, Itty Bitty Birthdays, Number Of Years, Sending You Thoughts SAB, Subtle 3DEF, Stampin' Blends

I used a long-retired SU stamp set, called Play Ball, as the main feature of the card. In case you couldn't guess, he's a keen cricket player, so the cricket ball was the perfect image for his card. There are so many different colour cricket balls, but in the end I settled on the deep red of a Test Match ball.

scissorspapercard, Stampin' Up!, Just Add Ink, Play Ball, Itty Bitty Birthdays, Number Of Years, Sending You Thoughts SAB, Subtle 3DEF, Stampin' Blends

I stamped the ball all over the Cherry Cobbler cardstock in matching ink, and then ran the whole piece through my Big Shot with the Subtle Embossing Folder. I also stamped the ball in Memento ink so that I could colour it with my Cherry Cobbler Blends. I left one tiny spot of light to help give the impression of a round ball.

scissorspapercard, Stampin' Up!, Just Add Ink, Play Ball, Itty Bitty Birthdays, Number Of Years, Sending You Thoughts SAB, Subtle 3DEF, Stampin' Blends

I repeated the ball on the inside, also coloured with my Cherry Cobbler Blends. I hope my nephew likes it!

The Design Team have had lots of fun with this sketch. You can see their cards over on the Just Add Ink blog, where you can also link up your card for this sketch challenge. See you there!

Bye for now,

Tina

Thursday, 4 October 2018

JAI #429: Just Add Vellum

Hi!


Let's finish off the week with the newJust Add Ink challenge! This week Di has challenged us to Just Add Vellum to our cards.


My first thought was to use the Graceful Glass Vellum on my card, but then my son, Alex, got invited to a birthday party. I decided to kill tow birds with the one stone and use vellum on the card. As lovely as the Graceful Glass Vellum is, it certainly isn't suitable for a 16th birthday card for a young man!

scissorspapercard, Stampin' Up!, Kindred Stamps, Plumber Brothers, Building Blocks, Pick A Pennant, Number Of Years, Large Numbers, Copics

I started by sponging some Frost White Shimmer Paint through a Kindred Stamps stencil onto Poppy Parade cardstock. The stencil featured a scattering of stars of all different sizes. I layered a large vellum circle over the top so that the stars could still be seen.

scissorspapercard, Stampin' Up!, Kindred Stamps, Plumber Brothers, Building Blocks, Pick A Pennant, Number Of Years, Large Numbers, Copics

The stamp set I used was also a Kindred Stamps set called Plumber Brothers. The party Alex was going to was a go-karting party, so if you know the character, you know why it was perfect for this card! The retired Large Numbers dies and Number Of Years stamps were used for the 16. I wanted the number to be prominent, but not the main element, so I tucked them under the sentiment.

scissorspapercard, Stampin' Up!, Kindred Stamps, Plumber Brothers, Building Blocks, Pick A Pennant, Number Of Years, Large Numbers, Copics

Alex thought the card was fantastic, except I was chastised for colouring the mushroom the 'wrong' colour - apparently the 1UP mushrooms should be green! Oh well - green just didn't work with the rest of the card. I'm pleased to say that the birthday boy (young man!) liked the card too.

You can see what the rest of the team has done with the vellum challenge at the Just Add Ink blog. Will you join in the fun with us this week?

Bye for now,

Tina

Saturday, 26 May 2018

Butterfly Basics No Longer

Hi!

I'm squeezing in an extra blog post this week so that I can show you some more cards that use very soon to be retired products. As is usual lately, I have two cards for you today. This pair both use the retiring Butterfly Basics stamp set. There were a lot of shocked people when they realised all of the current butterfly stamps and dies were being retired, me included. After a little thought though, I was OK with it, as it means new stuff, and the new butterfly die is gorgeous! Time for a change!

scissorspapercard, Stampin' Up!, Painted Harvest, Butterfly Basics, Layering Squares Framelits

On to today's cards! The first card is a CASE of this card by Jenny Hall. I had a request from one of my class ladies to do it in a class, and I was happy to comply. There's not much I changed, apart from locating my main panel a bit higher on the card, and using the sentiment from Butterfly Basics instead of from Painted Harvest.

scissorspapercard, Stampin' Up!, Painted Harvest, Butterfly Basics, Layering Squares Framelits

Sadly, the Painted Harvest set I used was faulty, so the detail isn't visible in the sunflower petals. Thankfully Stampin' Up! replaced the set with a brand new copy that wasn't faulty.

scissorspapercard, Stampin' Up!, Painted Harvest, Butterfly Basics, Layering Squares Framelits

I also did a different inside to Jenny's card - it was a great excuse to stamp the sunflower again!

scissorspapercard, Stampin' Up!, Number Of Years, Butterfly Basics, Layering Circles Framelits, Stamparatus

This second card was also a class card, designed to show my ladies how to do the wreath technique on the Stamparatus. We used the leaves and flowers from the also retiring Number Of Years stamp set. Can you see a new colour on the card? Grapefruit Grove is an early favourite from the batch of new In Colours.

scissorspapercard, Stampin' Up!, Number Of Years, Butterfly Basics, Layering Circles Framelits, Stamparatus

It's a little easier to see in this photo that I used Soft Sky (retiring) to stamp some scattered dots in the gaps between the leaves. It's a subtle effect, but helps to reduce the stark look of the blank space.

scissorspapercard, Stampin' Up!, Number Of Years, Butterfly Basics, Layering Circles Framelits, Stamparatus
 I really love the mix of fonts in the Butterfly Basics sentiments, especially the script font. It's so deliciously like old fashioned hand writing.

Bye for now,

Tina

Monday, 29 January 2018

A Sweet Day

Hi!

Sometimes even though you have a heap of new stuff to play with, you find yourself drawn to something that's been in your stash for a while. Do you ever find that? In this case I found myself pulling out Cool Treats to play with.

scissorspapercard, Stampin' Up!, Number Of Years, Cool Treats, Frozen Treats, Cupcake Cutouts

It probably had something to do with the 'sweet' die cut. I'd purchased the Cupcake Cutout Framelits during a promotion last month and hadn't used them yet! I'm a bit of a sucker for word die cuts, I think it's the scrapbooker in me.

scissorspapercard, Stampin' Up!, Number Of Years, Cool Treats, Frozen Treats, Cupcake Cutouts

Despite the Framelits not being the 'match' for this stamp set, they work together well. It was easy to chop up the stamped sentiment to replace the stamped 'sweet' with the die cut. You may be able to see the glitter over the die cut as well - there's that Wink Of Stella pen in action again!

scissorspapercard, Stampin' Up!, Number Of Years, Cool Treats, Frozen Treats, Cupcake Cutouts

I also used the WOS on the ice-cream for a bit of fun!

Bye for now,

Tina

Thursday, 21 September 2017

AWH Blog Hop: Fancy Folds

Hi!


Welcome to another Art with Heart Team blog hop where we are focusing on fancy folds. You will find loads of creative inspiration tonight, showcasing different folding techniques and projects. Don't be afraid of trying some Fancy Fold cards; they may look intimidating, but in fact, they are not that difficult to create.


scissorspapercard, Stampin' Up!, Art With Heart, Wood Textures, Number Of Years, Milestone Moments, Tabs For Everything, Bunch Of Blossoms

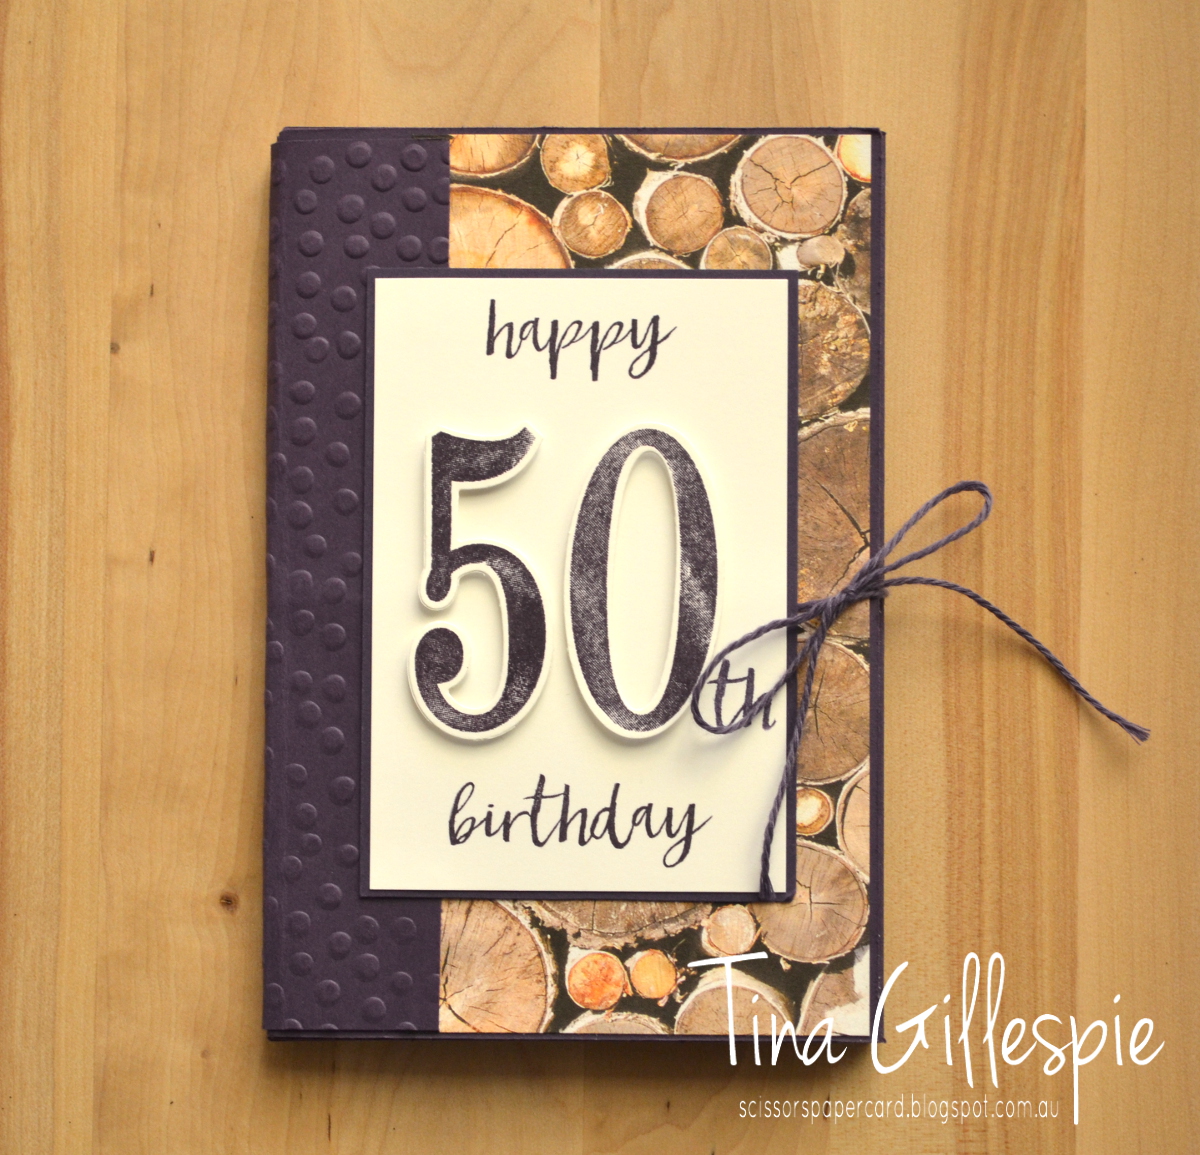
I was recently asked to make a birthday card for a woman turning 50, but it had to be big enough for around 30 people to sign. My first thought was to make a super-sized card, but I thought about how annoying that would be to store, so I decided to make something that was the size of a regular card, and add some extra pages for the guests to write on.

scissorspapercard, Stampin' Up!, Art With Heart, Wood Textures, Number Of Years, Milestone Moments, Tabs For Everything, Bunch Of Blossoms

I'm not sure of the name of the fold, but you pretty much take a sheet of cardstock that is double the height of the finished card and 3-4 times the width. In this case I used a sheet of 12x12 cardstock in Elegant Eggplant. I should mention at this point that my brief included using purple and no flowers - the recipient is a really outdoorsy kind of person who enjoys camping, etc.

scissorspapercard, Stampin' Up!, Art With Heart, Wood Textures, Number Of Years, Milestone Moments, Tabs For Everything, Bunch Of Blossoms

I scored the 12x12 at 4 and 8 inches, and then turned it 90 degrees and cut at 6 inches from the edge and stopping at the second score line from the edge. I also cut two extra pieces of cardstock that were 6x4, with an additional flap on one 6 inch side. Here's a diagram that shows what I did. Dashed lines are scored, solid are cutting lines, and all measurements are in inches.

scissorspapercard, Stampin' Up!, Art With Heart, Wood Textures, Number Of Years, Milestone Moments, Tabs For Everything, Bunch Of Blossoms

I adhered the to extra flaps to the edges of b and c. I then adhered A to a, B to b and C to c using Tear And Tape Adhesive. This creates a little book with 8 pages. You could leave the top of each page open, so that you could have extra tags in the pockets too.

I decorated the front and back cover with Wood Textures DSP and used another piece of cardstock to act as a spine, hiding all of the folds. I added a length of twine to the cover before adding the spine, so that the card can be tied shut.

scissorspapercard, Stampin' Up!, Art With Heart, Wood Textures, Number Of Years, Milestone Moments, Tabs For Everything, Bunch Of Blossoms

Each of the pages was decorated with a little more of the DSP, and I also added a few stamps from the Tabs For Everything set to give it a bit more colour. I heard that the card was a hit, so I was very pleased!

Well, that's it for me, so now you're hopping off to visit Kate Morgan's blog. She always has something fabulous that is bound to inspire.
If you find a broken link or have come to this blog hop from a different entry point, you can view the participants below:


Bye for now,

Tina

Thursday, 13 July 2017

JAI #368: Just Add A Twist

Hi!

Here we are again, another Friday, and another Just Add Ink challenge. I love Fridays for that very reason!


This week the challenge is from Kelly. She's dared us to make a Christmas card, with a twist! The twist is that we needed to use a Birthday stamp set to create the Christmas card. What fun!


After perusing my stamp sets, I decided I'd attempt a wreath using stamps in Happy Birthday Gorgeous.


I very lightly traced a circle on the card front and then stamped the leaf around it, overlapping the ends of the branch. I was very pleased with how well the circle turned out. To fill out the spaces between the leaves, I used the dotty stamp from Number Of Years to stamp over the leaves. I really love the effect it gives - a bit of an Australian wattle type look to the wreath.


It still didn't look quite finished, so I scattered some retired Candy Dots in Real Red around the wreath. It gave the card a lovely lift.


I quite happily used all of my Candy Dots on the outside, and then realised I hadn't saved any for the inside. Ooops! Luckily a pencil eraser inked in Real Red ink gives a similar effect, so I was able to recreate parts of the wreath on the inside of the card.

I think the team have had a fun week with Kelly's challenge. You can hop on over to the Just Add Ink blog to see what they've created and to join in the fun.

Bye for now,

Tina

Thursday, 8 June 2017

JAI #363: Just Add An Anniversary

Hi!

Are you ready for a new Just Add Ink challenge? I am!

http://just-add-ink.blogspot.com/2017/06/just-add-ink-363anniversary.html

This week Chantell has challenged us to Just Add Anniversary. It could be the anniversary of anything you like, as long as it celebrates an Anniversary.


I recently hosted an ATC swap, and I had a stamped and cut butterfly left over, as well as a 'love' die cut from vellum. I decided to put them to good use for this challenge while they were still floating on the surface of my desk. If I left them too long, they may have been lost forever!


The butterfly was stamped using the solid stamp from Watercolour Wishes in Powder Pink ink. I then inked the flourish from Timeless Textures in Berry Burst ink and 'kissed' the two stamps together. I then repeated on the other wing before stamping the butterfly image on my cardstock. It's such a pretty look, isn't it?


Do you have an upcoming Anniversary to celebrate? I've only just celebrated mine, so this card will go into my stash until such time as I require an anniversary card. They are always handy to have on hand. Why don't you pop on over to the Just Add Ink blog so that you can join in the fun?

Bye for now,

Tina

Monday, 29 May 2017

A 30th Birthday Underground

Hi!


Sometime around the time that the Retiring List comes out, I go into a bit of a panic in regards to the amount of DSP I still haven't used. This card was a class sample that was an attempt to use up some more of the DSP before it retires.


The paper is from the Urban Underground Specialty DSP pack. It's a Specialty pack because some of the papers have a silver foil design. I've used the hexagon foil patterns on this card.


There's three layers of DSP on this card - it certainly fills the brief of using it up!


Are you a DSP user or hoarder? I know which side of the fence I fall on!


Bye for now,


Tina
Sunday, 12 June 2016

Happy 13th Birthday Tyson!

Hi!


We have just got back from a birthday party for one of Hudson's friends, Tyson. As you can tell by the post title, he turned 13.  Such a milestone! I made a card for him last night using my new favourite colour - Dapper Denim.


Inspiration for this card came from a card on page 22 of the new Annual Catalogue. It's the Sweet Sugarplum card on the right. I quite liked the idea of stamping the cake multiple times on the background. My cakes were a bit more widely spaced though, and looked a little funny, so I added the sentiment to fill each gap. What a happy accident!


The largest scribble swirl was cut from the Silver Foil Paper. It's such a cool die cut, I've used it heaps! It helps to make the '13' stand out more from the background also.


LOL, when I use the 'hip hip hooray' on my cards, I'm always cheering it in my head as I read it - what about you?


I'm entering this card in the CASEing the Catty monthly challenge. It's been ages since I've been able to play along with another challenge, so it's great to finally find the time.


Bye for now,


Tina