Pages

Showing posts with label Make A Wish. Show all posts

Friday, 20 June 2014

JAI #219: Just Add Inspiration

Hi!

Here we are again at the end of another busy week.  I don't know about you, but I'm hanging out for some time in my crafting space to get inky!  If you are too, why don't you give our latest challenge at Just Add Ink a go?


This week Trish has put together this Inspiration Board as a focus for our challenge.  What do you see in it?  I went with both the colours and the shapes for my card.
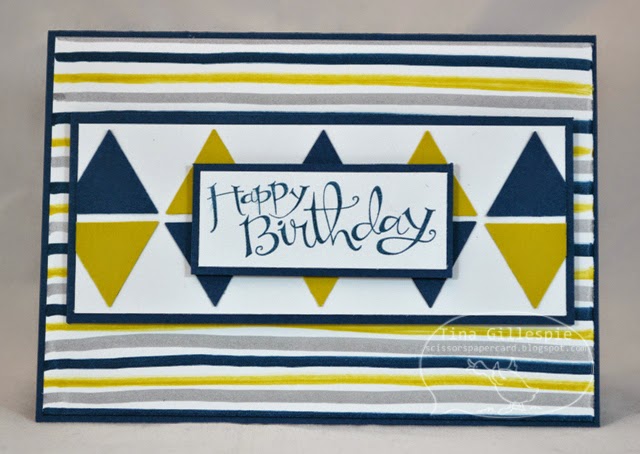

I was asked to make a birthday card for a man turning 25.  I wanted to make something that was a bit edgy and masculine, and I think I've achieved the look.


The base panel was created using my markers.  I just hand drew the lines across the piece of cardstock using my Summer Starfruit, Smokey Slate and Midnight Muse Stampin' Write Markers.  The lines are a bit wobbly and some are thicker than others, but that was exactly the look I was going for.


I also drew a few stripes on the inside and overlaid them with some left over triangles from the front of the card.

What are you going to pull from the Just Add Ink Inspiration Board to inspire your cardmaking?  I can't wait to see!

Bye for now,

Tina

Monday, 2 June 2014

Farewell Coredinations Card Stock

Hi!

The retiring lists came out on Friday and one of the first things I noticed that was retiring is the entire range of Coredintations Cardstock.  I don't use it a lot, but it is a product that I will miss.

This card is a CASE of a card from the current Annual Catalogue.  You can see the original on page 33.  It's a card I've CASEd a few times as I really love the design.


I love that you can get such a 'wow' effect so easily and quickly.  On this card I used the Real Red Coredinations, embossed it with the Chevron Embossing Folder and then sanded it.  So pretty!


The stamp set I used for the sentiment is retiring also - it's a Hostess set called Simply Sketched.  Another fabulous set that will be missed - until I find another fantastic set in the new catalogue to replace it!


The inside sentiment also comes from another stamp set that didn't make it into the upcoming Annual Catalogue - Make A Wish.  So many lovely things going, to be replaced by even more lovely things.

Bye for now,

Tina

Wednesday, 28 May 2014

Quick and Easy Happy Birthday with Simply Stars

Hi!

Today I have a quick and easy Birthday card for you featuring the Simply Stars stamp set and Retro Fresh Washi Tape.  The two in combination are fabulous for bright, cheerful cards.


I stamped on the base card first using the small splatter stamp from Gorgeous Grunge.  I love the way it adds some extra interest tot he card without being too out there.


I kept the inside fairly simple, but I think I added a few stamped stars before I mailed it for a bit of extra oomph.


Bye for now,

Tina

Friday, 21 February 2014

JAI #203: Just Add A Sketch

Hi!

Time for another Just Add Ink Challenge. Yay!  This week Paula has designed a fantastic sketch for us to use.


I made this card a few weeks ago when I was playing around with the Good As Gold kit.  I was looking for more ways to use the kit apart from the standard cards.


The spotty panel was one half of a card base from the kit and the gold panel was cut from one of the envelope liners.  The flag is one of the foreign language ones that would otherwise go unused.


I used the three circular panels instead of the fancier shape in the sketch.  I think it's a great substitute, and best of all, it was the right shape to hide the writing on the flag!


I sometimes forget that I can leave a larger border around the edge of my cards.  It's a great look - very effective.

How will the sketch inspire you? See you over at Just Add Ink!

Bye for now,

Tina

Thursday, 30 January 2014

CPC Challenge #31

Hi!

It's been a while since I entered a card challenge, so I thought it was time to do just that! The challenge is over at Craft Project Central and it's a lovely sketch challenge.


Isn't it a great sketch? Here's my take on it.


The washi tape is the new Retro Fresh designs from the Occasions Catalogue.  It's so lovely and bright, a great focal point for this card.


The Essentials Wooden Elements are also new in the Catalogue.  There are a heap of great shapes in the pack.  I just have to let myself use them rather than hoard them!


Of course I had to finish off the inside of the card to match the outside!

Stamps: Off The Grid, Teeny Tiny Sentiments, Make A Wish
Ink: Baked Brown Sugar, Tangerine Tango
Cardstock: Baked Brown Sugar, Whisper White
Other: Retro Fresh Designer Washi Tape, Essentials Wooden Elements, Star Punches (retired), Glue Dots

Bye for now,

Tina

Wednesday, 30 October 2013

Epic Day Male Card

Hi!

On Monday I showed you a card I'd made as a sample for a Masculine Cards class that I'd run recently.  Here is one of the other cards we made at that class.


This card showed a great way to use up the multitued of little scraps of patterned paper you always seem to end up with.  I just cut them to the same height and adhered them to a piece of backing cardstock. The widths don't matter, in fact I think different widths look better than uniform widths.


A bit tricky to see, but I scored some lines between the sentiment and the DSP panel.  Scor
ing is a great way to add some interest to a card.


We used the Soda Pop Tops (now retired) to add a feature to the card.  We stamped the compass from The Open Sea to go into the Soda Pop Top and then covered it with a layer of Crystal Effects.  In hindsight I would have stamped it in a darker ink.


Bye for now,

Tina

Monday, 28 October 2013

Foil Embossing

Hi!

Today's card has some retired product on it, but I thought I'd show you anyway.  It shows a great technique, and it was one we made in a Masculine Cards class a few months back.


Isn't the metallic background awesome?  So simple too - it's just kitchen foil adhered to some cardstock and embossed in the Big Shot.  Easy peasy!


Fabulous technique for male cards as it adds a really industrial look to the card.


Bye for now,

Tina

Wednesday, 11 September 2013

Layered Daydream Medallions

Hi!

Today's card is one I made as a sample for a couple of parties I did in July. 


I got my inspiration for this card from the Annual Catalogue.  You can see the card I CASEd on page 114.  I loved the style of the card and the colour scheme so I adapted it to make it a little easier to put together.


The card in the catalogue layered all the stamping, but I decided to stamp and die cut each layer individually. I also changed the card to a standard A6 size.


The inside of mine is very plain, but the ladies at my parties stamped some more of the Medallions inside their cards.

Stamps: Daydream Medallions, Sassy Salutations, Make A Wish
Ink: Pool Party, Crisp Cantaloupe, Baked Brown Sugar
Cardstock: Pool Party, Very Vanilla
Other: Big Shot, Floral Frames Framelits, Vintage Faceted Button, Linen Thread, Dimensionals, Glue Dots

Bye for now,

Tina

Wednesday, 28 August 2013

A Daydream medallions CASE

Hi!

Woops!  Looks like Wednesday snuck up on me and I forgot about blogging this morning!

Today's card is one I used for a couple of parties I ran in July.  It's a CASE from the Annual Catalogue.  You can find the original card on page 114.


I kept the colour scheme and stamp set but I changed a few things.  Instead of stamping each layer onto the one piece of cardstock we stamped each layer separately and then cut them using the coordinating Floral Frames Framelits.


Every second layer was popped up on Dimensionals.  I also used Vintage Faceted Buttons for the centre.  It is such a pretty card and I think everyone enjoyed making it.


The inside of my card is fairly plain, but at the parties we stamped some of the smaller Medallions stamps.

Stamps: Daydream Medallions, Sassy Salutations, Make A Wish
Ink: Pool Party, Baked Brown Sugar, Crisp Cantaloupe
Cardstock: Pool Party, Very Vanilla
Other: Big Shot, Floral Frames Framelits, Vintage Faceted Buttons, Linen Thread, Dimensionals, Glue Dots

Bye for now,

Tina

Friday, 23 August 2013

JAI #179: Just Add A Sketch

Hi!

Friday once more, so another Just Add Ink challenge!


This week Mae has designed a sketch for us to use.  Interpret it how you'd like, but the sketch must be the inspiration for your card.


I chose to make a very literal interpretation of the sketch using some of my new goodies from the new Annual Catalogue.


This was my first play with Gorgeous Grunge, Off The Grid and Smoky Slate.  Love them all!


I cut the arrow shape from the Smoky Slate layer using a punchie for a template and then popped it up on Dimensionals to give it a better effect.


Some complimentary stamping on the inside.  The clock was originally meant for the front, but I felt it needed more than just the red hands.  I restamped one for the front that had the red body, but didn't want to waste the grey one, so I used it on the inside.

Stamps: Gorgeous Grunge, Off The Grid, Clockworks, Make A Wish, For My Family (retired)
Ink: Basic Black, Basic Grey, Smoky Slate, Real Red
Cardstock: Smoky Slate, Basic Grey
Other: Paper Snips, Dimensionals, Corner Rounder Punch, Fiskars Arrow Punch

What do you think you'll do with Mae's sketch?

Bye for now,

Tina

Friday, 28 June 2013

JAI #171: Just Add A Sketch

Hi!

The weeks are sneaking past so quickly!  The Winter Solstice occurred last week, which means we are on the downhill run to Summer.  Yay!


But let's not wish the year away too quickly, first it's time for a new Just Add Ink Challenge.  This week Mae has designed a fab sketch to use.


I flipped the sketch sideways for my card as I wanted to use some more bits of the Artisan Embellishments Kit that I have been hoarding using.  Papercrafters never hoard, do they?!? lol


The tags from the Kit are just gorgeous!  I used the Crumb Cake side on this card and popped the whole tag up using dimensionals.


The Primrose Petals Seam Binding Ribbon is also from the Artisan Embellishment Kit, which is retiring at the end of the month.


After cutting the Print Poetry DSP for the front of the card there were a few strips left over, so I used one of them on the inside of the card, and the other on the envelope.  A great way to use up those scraps!


I also had a scrap of the Seam Binding left that I couldn't bring myself to throw out so it got used on the inside too.

Stamps: Make A Wish, Happiest Birthday Wishes (retired)
Ink: Raspberry Ripple
DSP/Cardstock: Print Poetry DSP Stack, Raspberry Ripple, Very Vanilla, Crumb Cake
Other: Artisan Embellishment Kit Tag and Seam Binding, Linen Thread, Corner Rounder Punch, Dimensionals

The Just Add Ink Design Team have used this sketch in a heap of different ways - how will you use it?

Bye for now,

Tina

Wednesday, 26 June 2013

Farewell Print Poetry Stack

Hi!

Another farewell - this time to one of my favourite new products from Stampin' Up!, the smaller sized paper stacks. Perfect for cardmakers, the stacks are an ideal size for covering the fronts of cards with a few strips left over to decorate the inside with.


This card was a larger size - 5 inches square.  I used four different patterns from the masculine papers in the stack to cut the squares for the front of the card. 


The inside sentiment is from the Make A Wish Stamp Set from the current Seasonal Catalogue.  I was so excited to discover that it has carried over to the upcoming Annual Catalogue as it is one I have been using a lot lately.

Can't wait to see the new DSP stacks in the next Occasions Catalogue - I'll be waiting a while though as it's not until September!!

Stamps: Sassy Salutations, Make A Wish
Ink: Midnight Muse
DSP/Cardstock: Print Poetry DSP Stack, Midnight Muse, Crumb Cake, Very Vanilla
Other: Dimensionals

Bye for now,

Tina

Wednesday, 10 April 2013

A Party Card

Hi!

I have been posting some photos of cards all made using the same design. You can see the previous card here. Today I have one more in the series.

 
This card was made for a party I did for a lovely group of ladies recently. I made a few more changes, such as changing the DSP. It's still the Tea For Two DSP, just a different paper in the pack. I also left off the stitching - I wasn't going to lug my sewing machine to the party! I did keep the style of ribbon from the last version, I just switched the ribbon to suit my cardstock better.
 

Speaking of cardstock, the matting layer is now made from the Primrose Petals Coredinations cardstock, embossed with the Lacy Brocade Embossing folder and then sanded to give the lovely texture and design a lift.


We kept the inside simple by stamping some butterflies.

Stamps: Make a Wish, Bloomin' Marvelous (retired SAB)
Ink: Primrose Petals, Lucky Limeade
DSP/Cardstock: Tea For Two DSP, Primrose Petals Coredinations, Early Espresso, Very Vanilla
Other: Big Shot, Ovals Collection Framelits, Lacy Brocade Embossing Folder, Bitty Butterfly Punch, Primrose Petals Stitched Satin Ribbon, Basic Jewels Jumbo Pearls, Dimensionals, Sanding Blocks

I still have one more card in my series, so come back soon!

Bye for now,

Tina

Monday, 8 April 2013

Tea For Two Birthday Card

Hi!

Last week I posted some photos of a card I had made for a swap. You can see that card here. Today I have a second card I made using the same design. I made it for my niece's birthday.

 
As you can see I made a few small changes. I added a strip of the Very Vanilla Seam Binding Ribbon across the card and an extra layer of Calypso Coral cardstock.


I also skipped the distressing on the Honeycomb panel using Crumb Cake ink.


Here's the inside of the card. Fairly simple, but it really adds something to the card.

Stamps: Make A Wish, Sassy Salutations, Bloomin' Marvelous (retired SAB)
Ink: Early Espresso, Pretty In Pink, Calypso Coral
DSP/Cardstock: Tea For Two DSP, Early Espresso, Calypso Coral, So Saffron, Very Vanilla
Other: Big Shot, Ovals Collection Framelits, Honeycomb Embossing Folder, Bitty Butterfly Punch, Very Vanilla Seam Binding Ribbon, Calypso Coral Baker's Twine, Basic Jewels Pearls, Dimensionals.

I still have two more versions of this card, so stay tuned for more!

Bye for now,

Tina