Pages

Showing posts with label Birthday. Show all posts

Thursday, 31 March 2022

JAI 597: Just Choose Two

 Hi!


Thanks for joining me for the new Just Add Ink challenge. I've missed creating for JAI over the past couple of weeks, as my whole family contracted COVID. We are mostly over it all now, so I was ready to pick up my stamps and ink pads again!

This week Annie has challenged us to Choose Two to add to our cards. I don't naturally gravitate towards flowers, so for me it had to be Paper and Pattern.

scissorspapercard, Stampin' Up!, Just Add Ink, Light The Candles Kit, Sunshine & Rainbows DSP, Kid's Card

I really hadn't played much with the SAB DSP, Sunshine & Rainbows, before it retired, so I pulled it out for my card today. I really needed the happiness that the paper brings! Polka dots (my Pattern element) always make me feel happy, and when they are in gorgeous, bright colours, the happiness is multiplied.

scissorspapercard, Stampin' Up!, Just Add Ink, Light The Candles Kit, Sunshine & Rainbows DSP, Kid's Card

My Paper element is the rainbow and the clouds. The rainbow was fussy cut from the DSP, and the could were cropped using the Cloud Punch. In exciting news, the Cloud Punch is carrying over to the upcoming Annual Catalogue - hooray!!

scissorspapercard, Stampin' Up!, Just Add Ink, Light The Candles Kit, Sunshine & Rainbows DSP, Kid's Card

Speaking of hooray, the two sentiments that I have used on my card are from the new Light The Candles card kit. The kit is cute, but I mostly purchased it for the stamps - I think that they are a great font and sayings for young kid's cards.

We'd love to see which two you choose for our challenge. I'm always interested to see which options people gravitate towards. You can see what the Design team chose over on the Just Add Ink blog, where you'll also find the linky for our challenge.

Bye for now,

Tina

Sunday, 25 July 2021

CTC 328: CASE The Sketch

 Hi!


Welcome to the new CASEing The Catty Sunday Challenge Blog Hop. This week we have chosen this card from page 33 to CASE, using the layout to guide our creativity.


Isn't it cute? Here it is, converted to a simple sketch so that you can more easily see the main elements of the card.


I looked at the rectangle layer and had the idea to extend the layer to the bottom of the card, so that's what I did! You'll see why soon 😊

scissorspapercard, Stampin' Up!, CASEing The Catty, Sweet As A Peach, Bloom Where You're Planted DSP, Peach Dies, Tasteful Textile 3DEF

I fussy cut a large plant from the Bloom Where You're Planted DSP to use as the feature image on my card. The tall, thin shape suits the front perfectly. I used a few scraps of DSP and Cinnamon Cider and Just Jade cardstock to layer underneath, with a sentiment from Sweet As A Peach over the top.

scissorspapercard, Stampin' Up!, CASEing The Catty, Sweet As A Peach, Bloom Where You're Planted DSP, Peach Dies, Tasteful Textile 3DEF

Here's why I extended the panel to the bottom of the card - so that I could make it a partial front card. The DSP on either side of the main panel is actually adhered to the inside part of the card, but because the front is thinner, it can be seen from the front, too.

scissorspapercard, Stampin' Up!, CASEing The Catty, Sweet As A Peach, Bloom Where You're Planted DSP, Peach Dies, Tasteful Textile 3DEF

To decorate the inside, I fussy cut another plant from the DSP. The sentiment is also from the Sweet As A Peach stamp set.

We'd love for you to play along with our challenges, which are run through our Facebook Group. All you need to do is join the group and upload a photo of your card each week. Too easy!


Before you dash off to get creating, please do finish our blog hop - there's lots more inspiration to be seen! Next up is my lovely friend, Rachel, who is sure to have a visual treat for your eyes!


Bye for now,

Tina


Sunday, 24 January 2021

CTC #302: CASE Any Floral Project

 Hi!


Phew! Are you sweltering today? It's about day four of really hot weather here in Adelaide, but thankfully a cooler change (and hopefully some rain) is due tomorrow. My craft space is on the south east corner of the house, so thankfully it stays cool during the day.


But, let's get on with the show! This week we are asking you to CASE and Floral Project from ANY catalogue - the Annual, Mini or SAB. There are lots and lots of projects to choose from, so definitely no shortage of inspiration.


Just for a change, I found my inspiration at the front of the Mini Catalogue! This card is featured on both the front cover and on page 2. I'm not a big one for florals, but there were a few elements on this one that appealed to me - the blue background behind the flowers, the gold border and the sentiment on a narrow strip.

scissorspapercard, Stampin' Up!, CASEing The Catty, Pretty Perennials, Joy To The World Paper Pumpkin, Perennial Petals Dies, Stitched Rectangles Dies, Smooshing Technique

I started my card with a Gold Foil Card. I purchased a heap of packs of these cards when they were on the Clearance Rack recently, as they are a great (and cheap!) way to add a Gold Foil layer to a card. For my card background, I used the Smooshing Technique with Pool Party ink on Shimmery White card. It's such a fun technique, and in this heat it dries very quickly!!

scissorspapercard, Stampin' Up!, CASEing The Catty, Pretty Perennials, Joy To The World Paper Pumpkin, Perennial Petals Dies, Stitched Rectangles Dies, Smooshing Technique

I then stamped a heap of flowers and leaves from the Pretty Perennials stamp set on Whisper White cardstock and die cut them with the coordinating dies. I find it's easier to stamp a few more images that you think you'll need, as invariably you will need more after you've cleaned and put away your stamps! I just layered them on the front until I was happy and glued them down, some with Dimensionals. The colours I used were the colours in the Fine Art Floral DSP.

scissorspapercard, Stampin' Up!, CASEing The Catty, Pretty Perennials, Joy To The World Paper Pumpkin, Perennial Petals Dies, Stitched Rectangles Dies, Smooshing Technique

Some of the left over flowers and leaves were used to decorate the inside of the card. I layered a Stitched Rectangle die cut over a piece of Night Of Navy card, as an echo to the front of the card.

It's been great seeing more entries in our challenges lately, and I hope that you will join in too! All you need to do is join our Facebook group and post a photo of your card to the group. Easy!


Next up on this week's blog hop is the lovely Rebecca. Her card is so pretty - you won't want to miss it!

Bye for now,

Tina

Wednesday, 6 January 2021

Colour Creations: Night Of Navy

 Hi!


Welcome back to the Colour Creations Creative Showcase for 2021. We are continuing our alphabetical tour through the Stampin' Up! colour range, resuming with Night Of Navy. It's a lovely dark blue, with purple undertones, and is a part of the Neutrals family.

scissorspapercard, Stampin' Up!, Colour Creations, Creative Showcase, Pretty Perennials, Joy To The World, Perennial Petals Dies, Painted Labels Dies

I had yet to play with any of my new catalogue goodies, so I pulled out the Pretty Perennials Bundle for my card. I was keen to see how the flowers would go with the blue and white colour scheme - and I love it! I stamped the three watercolourish flowers on the front of my card in Night Of Navy ink and layered it over a Night Of Navy base.

scissorspapercard, Stampin' Up!, Colour Creations, Creative Showcase, Pretty Perennials, Joy To The World, Perennial Petals Dies, Painted Labels Dies

The sentiment label is from the Painted Labels dies, with the Silver Foil layer hand-cut to match the corner notches. I also cut the leaf spray from the Perennial Petals Dies from Silver Foil. The full die cut is to the left of the label, with just a single leaf to the bottom right.

scissorspapercard, Stampin' Up!, Colour Creations, Creative Showcase, Pretty Perennials, Joy To The World, Perennial Petals Dies, Painted Labels Dies

A few more flowers were stamped on the inside to finish off the card. Do you recognise the sentiment? I used it a *lot* at the end of last year! I was very excited to realise that the font in Pretty Perennials nearly perfectly matches the font in the Joy To The World Paper Pumpkin kit stamp set. Yay!

scissorspapercard, Stampin' Up!, Colour Creations, Creative Showcase, Pretty Perennials, Joy To The World, Perennial Petals Dies, Painted Labels Dies

I simply masked off the word 'Christmas' before stamping the sentiment. The single word 'Birthday' fits in the gap perfectly. I'm so excited to realise that the sentiment works equally as well for Birthdays as it does for Christmas! If you missed it last year, the Joy Of Christmas Paper Pumpkin kit is still available 😉

Thanks for joining me tonight, please head on over to the very lovely Catherine's blog, where you'll find the rest of this week's Night Of Navy links.

Bye for now,

Tina

Sunday, 22 November 2020

CTC #295: CASE The Inside AC Cover

 Hi!


Thanks for joining me on a hot and thundery Sunday evening for the new CASEing The Catty Sunday Challenge Blog Hop. Was it hot and thundery where you were? It certainly was here in Adelaide!


This week for our challenge, we are CASEing these In Colour cards from the inside cover and page 1 of the Annual Catalogue. 


I quite liked the split in this card, with the sentiment stamped in the gap, so that's what I took from the sample card to make mine.

scissorspapercard, Stampin' Up!, CASEing The Catty, Seaside Notions, Whale Of A Time DSP

I've only recently purchased the Whale Of A Time DSP, so this was a good excuse to play with it again.I chose the seahorse paper, as it was a pretty, all-over pattern like the floral on the original card. However, I decided to split my paper horizontally rather than on the diagonal. I adhered the DSP to some pieces of Thick Whisper White, leaving a small border as there was a similar border on the original.

scissorspapercard, Stampin' Up!, CASEing The Catty, Seaside Notions, Whale Of A Time DSP

The sentiment from Seaside Notions was heat embossed in White on the card base. I felt that the card was too plain, so I also heat embossed a seahorse from the same stamp set on Watercolour Paper and coloured it with Just Jade ink.

scissorspapercard, Stampin' Up!, CASEing The Catty, Seaside Notions, Whale Of A Time DSP

I used the left over piece of DSP on the inside of the card. I normally wouldn't use such a big piece, but I didn't want to lose the Seahorses by cutting it in half. I will just have to write my message a little smaller!

We'd love to see which of the five cards inspires you to CASE it. Will you CASE the whole card, or just elements of it? When you've made your card, please post it in our Facebook group. We'd all love to see it.


For now though, please do continue on with the Blog Hop. Next up is my lovely friend, Rachel. Her lovely projects are what convinced me that I had to have the Whale Of A Time DSP!

Bye for now,

Tina

Thursday, 29 October 2020

JAI #529: Just Add Colour

 Hi!


Welcome back to the new Just Add Ink challenge. This week we have a fabulous colour combo for you, suggested by Kelly.


I never would have thought of pairing Misty Moonlight with Magenta Madness, but I think it's a lovely combo now that I've tried it. And with my favourite metallic, it's just spectacular!

scissorspapercard, Stampin' Up!, Just Add Ink, Blossoms In Bloom, Many Layered Blossoms Dies, Stitched Rectangles Dies,

I started with one of the retired Silver Foil card bases and added a piece of Misty Moonlight cardstock that I'd cropped with the largest of the Stitched Rectangles Dies. I realised after I'd glued it down that I'd also planned to emboss it with the Subtle 3DEF. Oops!

scissorspapercard, Stampin' Up!, Just Add Ink, Blossoms In Bloom, Many Layered Blossoms Dies, Stitched Rectangles Dies,

The flower layers were cut from Magenta Madness and Silver Foil using the Many Layered Blossoms Dies. Thank goodness for the adhesive sheets especially the the foil layer! I popped up the whole piece over the Moonlight layer. It took a lot of Dimensionals, but it's worth it so that it doesn't sag. The sentiment is from the coordinating stamp set, Blossoms In Blooms, cropped using another Stitched Rectangle Die.

scissorspapercard, Stampin' Up!, Just Add Ink, Blossoms In Bloom, Many Layered Blossoms Dies, Stitched Rectangles Dies,

The inside was made with off cuts from the front! I had a spare corner in the sheets of Magneta and Foil, so I popped one of the single flowers in the space, to be die cut at the same time as the main flowers. It looked a little bare sitting straight over the Whisper White card, so I ended up stamping the flower in Misty Moonlight underneath. The Misty Moonlight frame around the writing panel is just the off cut from the front piece, with an extra Whisper White die cut in the middle.

That's all from me for now, so it's time to pop on over to the Just Add Ink blog, where you'll find the rest of this week's Design team cards. You can also add your card to our challenge linky. I can't wait to see what you make using this week's colours.

Bye for now,

Tina

Thursday, 10 September 2020

AWH September Bog Hop: Masculine Cards

 Hi!


Welcome to the AWH Monthly Creative Showcase. From this month forward, we will be running the Showcase as a Blog Share, rather than a Bog Hop. This means that you will find all the links to the participants over on Rachel's blog, all in one place.

For this month's Creative Showcase, we are all making Masculine Cards. Father's Day may be done and dusted for 2020, but there is always a need to celebrate the males in our lives, for reasons other than Father's Day. The littlest (and cheekiest!) male in my family is turning thirteen soon, so I decided that tonight's card would be for his birthday.


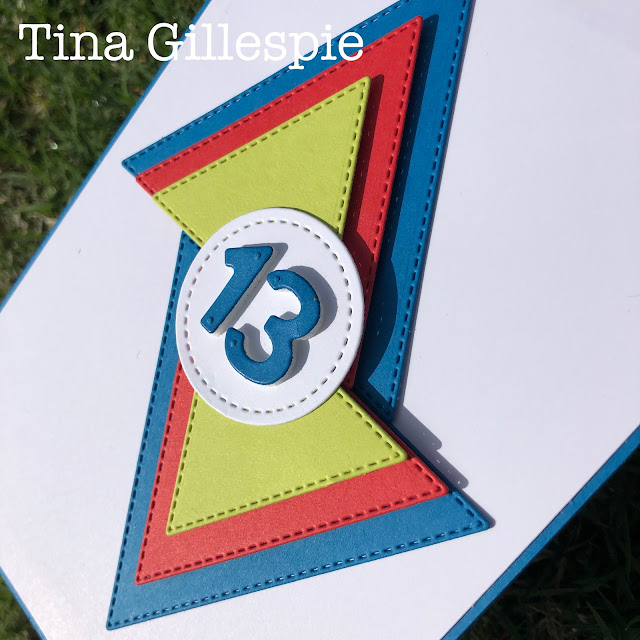
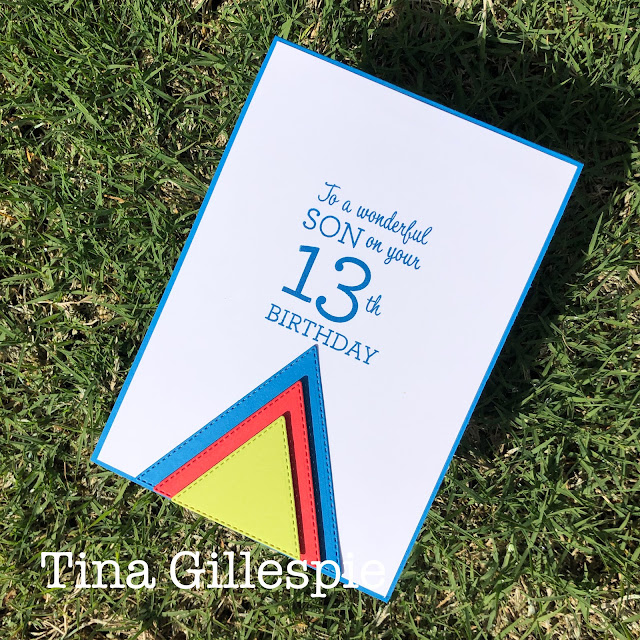
Hudson's favourite toys are his plastic bowling pins. They are always within reach, and when we go to appointments or respite he often takes a pair with him. His favourite are the blue pair, but the red and lime pairs get a fair work out too! He always has to hold two at a time - the blue pair never get mixed up, but sometimes he will mix the red and lime. I decided to use the colours of the bowling pins to create his card.

scissorspapercard, Stampin' Up!, Creative Showcase, Stitched Triangles Dies, Stitched Shapes Dies, Playful Alphabet Dies, Family Party,

I hope you'll forgive me for using a little bit of a retired colour - Lemon Lime Twist. It was the best match to the colour of his bowling pin. Anyway, I used my Stitched Triangles Dies to cut three sizes of Equilateral Triangles in Pacific Point, Poppy Parade and Lemon Lime Twist. I also cropped a Stitched Shapes Circle and the number 13 from the Playful Alphabet Dies. I adhered some Foam Adhesive Sheet to the back of the cards tock so that the 13 would be popped up.

scissorspapercard, Stampin' Up!, Creative Showcase, Stitched Triangles Dies, Stitched Shapes Dies, Playful Alphabet Dies, Family Party,

In fact, nearly all of the layers are popped up - luckily I don't need to post this card! Each of the triangles are popped up over the one below, with the circle adhered flat and the 13 popped up, as I mentioned before. I offset the two sets of triangles for a bit of quirkiness.

scissorspapercard, Stampin' Up!, Creative Showcase, Stitched Triangles Dies, Stitched Shapes Dies, Playful Alphabet Dies, Family Party,

I had a third set of triangles for the inside. I got a bit Dimensionals happy, though, and popped each layer up as I did for the front. I contemplated redoing them, but decided that as I wasn't posting it, it didn't really matter. The sentiment is from the Family Party stamp set. I love that it's a heap of different names, words, numbers and phrases that can be mixed and matched to create a personalised sentiment.

That's all from me tonight. Don't forget the changed format - you now need to head on over to Rachel's Blog to find the rest of the links for this month's Creative Showcase. I can't wait to see what Masculine Cards the AWH Team have made.

Bye for now,

Tina

Thursday, 23 April 2020

JAI #502: Just Add A Sketch

Hi!


It's Friday again, which means it's nearly the weekend, but first it's time for the new Just Add Ink challenge. This time it's a sketch designed by me!


I must have designed it a while ago, as I didn't remember it at all! I really like it though, there's lots of fun stuff you could do with it. I actually flipped the sketch and then pushed the layers off-center, as it suited my plan better.

scissorspapercard, Stampin' Up!, Ink Road Stamps, Just Add Ink, Game On, Minecraft, Stitched Rectangle Dies

My oldest child, Alex, turned 17 this month. He had a quiet birthday while sheltering at home, but I made up for it by ordering him an Oreo cake from the Cheesecake Shop. We also toasted some marshmallows around our fire pit, so overall he enjoyed his birthday.

scissorspapercard, Stampin' Up!, Ink Road Stamps, Just Add Ink, Game On, Minecraft, Stitched Rectangle Dies

Today's card is an attempt to replicate one of his favourite games, Minecraft. To make the background, I just cut a heap of 1/2 inch squares from brown, grey and green cardstock. I then arranged them on a piece of Smokey Slate cardstock using Tombow glue. The stamps are from an Ink Road Stamps set called Game On. I stamped them in Call Me Clover, to match the vibrant green of Minecraft.

scissorspapercard, Stampin' Up!, Ink Road Stamps, Just Add Ink, Game On, Minecraft, Stitched Rectangle Dies

I had some left over squares, so they were perfect for the inside of the card. According to Alex, the sentiment on the inside belongs to a sneaky character called a Creeper, that sneaks up on you and explodes! They are hard to see, so all you usually get as warning is the sssss before the boom! Have you learnt something - I certainly did!

That's it from me today - I'm off to practice the Last Post so that I can play it on my driveway tomorrow morning for Anzac Day. Hopefully I don't mess it up too badly! While I'm practicing, why don't you pop on over to the Just Add Ink blog, where you can see the rest of this week's Design team cards? You can also link up your own for the challenge. I can't wait to see what you do with my sketch.

Bye for now,

Tina

Thursday, 16 April 2020

JAI #501: Just Add Inspiration

Hi!


Hello, and welcome back to the latest Just Add Ink challenge. This week Jackie has found this fabulous picture to inspire our creativity. I'd love one of these set ups in the backyard right now! Actually, maybe the side yard, as we back onto a golf course and a little privacy while lounging would be better!

The look and colours makes me think of India and the Middle East - what about you? They also remind my of some DSP that we used to have, probably 7-8 years ago, that was Pumpkin Pie and Melon Mambo. I decided to use colours inspired by the photo - Mango Melody, Melon Mambo, Early Espresso, Call Me Clover and Whisper White.

scissorspapercard, Stampin' Up!, Uniquely Creative, Just Add Ink, Sweet Sentiments

They are bold colours, so I just used a touch of each on my card. The Mango, Espresso and Mambo strips were popped up over my Whisper White card base.

scissorspapercard, Stampin' Up!, Uniquely Creative, Just Add Ink, Sweet Sentiments

The stamps and dies are a bundle from Uniquely Creative, called Sweet Sentiments. I cut the larger 'birthday' die cut in Clover and layered it under the smaller Whisper White die cut. I tried the combo the other way around to show the Clover more, but it didn't pop against the background. Oops, I just noticed I've lost the dot on my 'i'!

scissorspapercard, Stampin' Up!, Uniquely Creative, Just Add Ink, Sweet Sentiments

I used the stamps again on the inside for my sentiment. I think we all need a year full of laughs right now!

What do you see in the Inspiration Photo? There's a great stamp set in the current Mini Catalogue that would work for the pavilion. So many ideas! When you've made your card, you can link it up for the Challenge over on the Just Add Ink blog. You can also see the rest of this week's Design team cards.