Pages

Showing posts with label Brightly Gleaming SDSP. Show all posts

Sunday, 6 December 2020

CTC #297: CASE A 3D Project

 Hi!


It's the end of another busy week, which means it's time for the new CASEing The Catty Sunday Challenge Blog Hop! What a great way to end the week.


This week Bec has set us the challenge of CASEing a 3D project from either of the two current catalogues. I'm still very much in Christmas card making mode, so I went straight for my August-December Mini Catalogue and started flipping from the back.


It didn't take too long to find this cute little gift box using the Christmas Gleaming bundle, seen on page 72 of the Mini. I loved the way that the two baubles overlapped each other, and also the two fonts in the sentiment. I don't actually own this bundle, so I had to look through my stash for something to substitute.

scissorspapercard, Stampin' Up!, CASEing The Catty, Cherish The Season, Joy To The World Paper Pumpkin, Brightly Gleaming SDSP, Stitched Nested Labels Dies

Cherish The Season had the perfect substitute with the bells that overlapped! I stamped them on Whisper White with Memento and coloured them with my Petal Pink Blends. I had the plan of using the same Petal Pink ribbon on my card as is on the box, but the bows were far too big! Instead I had to make do with pink bells and a pink layer under the DSP.

scissorspapercard, Stampin' Up!, CASEing The Catty, Cherish The Season, Joy To The World Paper Pumpkin, Brightly Gleaming SDSP, Stitched Nested Labels Dies

Speaking of the DSP, I used the same DSP as in the sample - Brightly Gleaming SDSP. I just chose a different pattern with the gorgeous Copper designs, hence the extreme sideways photo trying to get a good image of the copper! The sentiment is from the Joy To The World Paper Pumpkin kit, and it stamped in both Mossy Meadow and the retired Celestial Copper Delicata ink. The bows were the last scraps of some copper trim I had left over from a kit a year or so ago - the name escapes me!

scissorspapercard, Stampin' Up!, CASEing The Catty, Cherish The Season, Joy To The World Paper Pumpkin, Brightly Gleaming SDSP, Stitched Nested Labels Dies

I stamped and coloured two of the smaller individual bells for the inside so that it matched the front. Those bows sure were tricky to tie!!

As always, you can play along with our challenge by simply taking a photo of your card or project and upload it into our Facebook group. It really is that easy!


Before you do, please finish the Blog Hop, as there's lots more to see! Next up is Peta and her wonder-cat, Marvi. I wonder what he thinks of Peta's 'pawsome' projects this week?

Bye for now,

Tina

Sunday, 27 September 2020

CTC #286: CASE A Leaf Or Tree Project

 Hi!


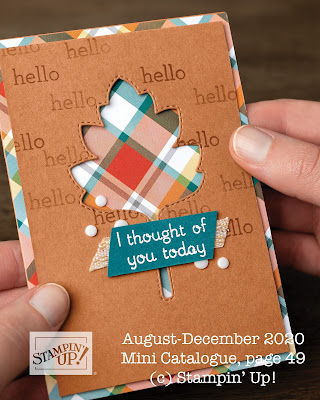
Thanks for joining me once again for the new CASEing The Catty Sunday Challenge Blog Hop. This week we are challenging you to find a Leaf Or Tree Project from the August-December Mini Catalogue and CASE it.


For these kinds of challenges, I always start at the back of the catalogue and flick forwards. I kinda assume that most people start at the front, and I don't want the back of the catalogue to feel unloved! I got to page 49 before I found a suitable candidate for CASEing.


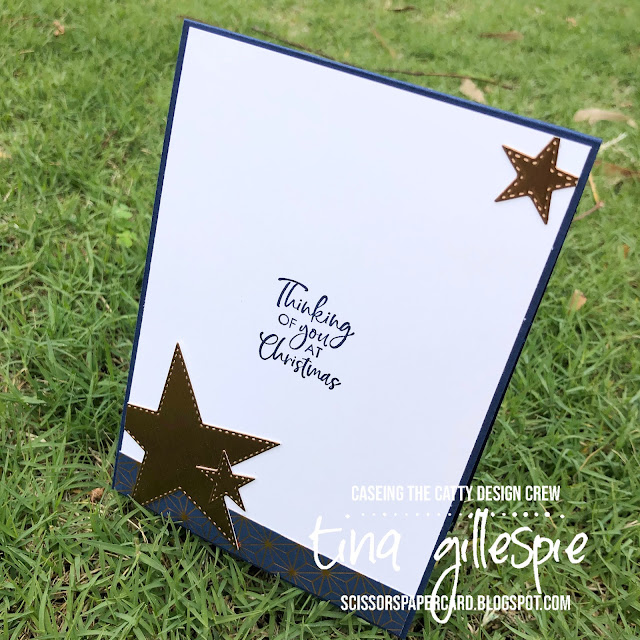
Part of the reason that it took quite a few pages was that I don't really have a lot of leaf or tree stamps or dies, so I had to find something that would translate to the products I do have. In this instance I liked the DSP that both framed the main panel and peeked through the leaf opening. I also liked the stitched detail around the leaf, so when it came time to reach for my supplies, I pulled out my Stitched Stars Dies.

scissorspapercard, Stampin' Up!, CASEing The Catty, Brightly Gleaming SDSP, Peace & Joy Bundle, Stitched Stars Dies, Stitched Rectangles Dies, Itty Bitty Christmas, Brushed Foil, Christmas Card

I die cut three star windows, because that suited my layout better. The Brushed Copper Foil, layered over some Night Of Navy and Copper DSP from the Brightly Gleaming SDSP pack, is so lush for a Christmas card.

scissorspapercard, Stampin' Up!, CASEing The Catty, Brightly Gleaming SDSP, Peace & Joy Bundle, Stitched Stars Dies, Stitched Rectangles Dies, Itty Bitty Christmas, Brushed Foil, Christmas Card

The hardest part of this card was getting the 'on Earth' part of the sentiment. I didn't want to add another colour to the mix as it would have been really glaring. Embossing with Copper powder on Night Of Navy cardstock was a fizzer, as was the retired Delicata inks. I ended up using Bright Copper Shimmer Paint. The paint pooled into the letters, which I was trying not to do, but in the end I actually preferred how it looked. Gotta love those happy accidents!

scissorspapercard, Stampin' Up!, CASEing The Catty, Brightly Gleaming SDSP, Peace & Joy Bundle, Stitched Stars Dies, Stitched Rectangles Dies, Itty Bitty Christmas, Brushed Foil, Christmas Card

I had a tiny strip of DSP left from the front, and the three stars cut from the main panel. I may as well use them on the inside, alongside a sentiment from Itty Bitty Christmas.

Our challenge is hosted in our Facebook group. It's super easy to participate - just join the group and post your photo. Easy!


Next up on our Blog Hop is the lovely Julia, who has made a stunning Christmas card for the challenge.


Bye for now,

Tina

Monday, 21 September 2020

Heart Of Christmas: September

 Hi!


Welcome to September's Heart Of Christmas Creative Showcase. Each month, bloggers from the Art With Heart team bring you some gorgeous Christmas inspiration. The card I have for you tonight is based entirely around a left over piece from the letter board card that I blogged yesterday.

scissorspapercard, Stampin' Up!, Heart Of Christmas, Playful Alphabet Dies, Brightly Gleaming SDSP, Itty Bitty Christmas, Brushed Foil, Stitched Rectangle Dies

I used the letters on he previous card, so I had the negative left to use for tonight's card. Thankfully I'd had the foresight to cut the piece with a Stitched Rectangle Die before cutting the letters from it. I also added a piece of Foam Adhesive to the back. All I had to do when I popped out the letters was to make sure that I didn't lose all of the little pieces from within the letters.

scissorspapercard, Stampin' Up!, Heart Of Christmas, Playful Alphabet Dies, Brightly Gleaming SDSP, Itty Bitty Christmas, Brushed Foil, Stitched Rectangle Dies

I layered it up over some Brushed Copper Foil from the Mini Catalogue and some Brightly Gleaming SDSP on a Night Of Navy card base.

scissorspapercard, Stampin' Up!, Playful Alphabet Dies, Technique

Here's a little trick for keeping the dies lined up: use your grid paper to line the dies up in a straight line (cutting side down) and then use a fully adhesive sticky note to pick them up. It must be a fully adhesive sticky note, as it has adhesive covering most of the back. You can then flip them over and use the sticky note to hold the dies to the cardstock while you run it through your die cutting machine. This trick is especially useful if you're making multiples, as the dies will stay lined up perfectly.

scissorspapercard, Stampin' Up!, Heart Of Christmas, Playful Alphabet Dies, Brightly Gleaming SDSP, Itty Bitty Christmas, Brushed Foil, Stitched Rectangle Dies

Once again, I used an offcut from the Brightly Gleaming SDSP on the front of my card to decorate my inside. A sentiment from Itty Bitty Christmas finished off the card.

Each month, the Heart Of Christmas is hosted by my lovely friend, Judy May. Please pop on over to her blog, where you will find the rest of the links for tonight's Creative Showcase.

Bye for now,

Tina

Monday, 17 August 2020

Heart Of Christmas: August

Hi!


Welcome to August's Heart Of Christmas Showcase! The Art With Heart team are participating in a Monthly event in the lead up to Christmas. It's never too early to start on our Christmas cards, and so we hope we can inspire you to get creating!

This month I have a group of four cards that were once again inspired by my friend, Rachel Palmieri. She's been amazing at getting out of her comfort zone and doing Facebook videos, and I saw this technique in one of her videos.

scissorspapercard, Stampin' Up!, Heart Of Christmas, Brightly Gleaming SDSP, Joy Dies, Painted Labels Dies, Subtle 3DEF, Christmas Card

Basically, you take a 6 inch (15cm) square piece of DSP (non-directional is best), and measure in about 1 3/4 inch (3-4cm) from each side. You then cut the piece in half twice, from mark to mark, skipping one mark. You end up with four pieces of DSP that are a fun shape, ready to glue onto a card base. I went one step further and cut some cardstock the same way (but slightly bigger) to matt the DSP.

scissorspapercard, Stampin' Up!, Heart Of Christmas, Brightly Gleaming SDSP, Joy Dies, Painted Labels Dies, Subtle 3DEF, Christmas Card

I embossed the Thick Very Vanilla card base with my Sublte 3DEF before gluing on the DSP. I then used my Painted Labels and Joy Dies to create the sentiment panel. The label was cut from Copper Foil, which matches the DSP. I cut the word 'Joy' from the inside of the label, where I knew it would be covered by the layered die cuts. You can see that on the inside I used a little strip of the same DSP and Pretty Peacock cardstock as decoration.

scissorspapercard, Stampin' Up!, Heart Of Christmas, Brightly Gleaming SDSP, Joy Dies, Painted Labels Dies, Subtle 3DEF, Christmas Card

The best part about this cutting method is that, for not much more effort than it would take to make one card, you get four cards! It's a great way to boost your card stash very quickly. I will certainly be trying it with other papers. This paper is the gorgeous Brightly Gleaming SDSP, which has carried over from last year's Holiday Catalogue.

Tat's all from tonight, but please do pop on over to my lovely friend, Judy's blog, where you can find the rest of this month's cards.

Bye for now,

Tina

Sunday, 24 November 2019

CTC #256: Annual Catalogue With A Holiday Twist

Hi!


Welcome to this week's CASEing The Catty Sunday Challenge Blog Hop. They are such a nice way to end the weekend, don't you think? The blog before mine was the lovely Shannon's - are you coming from there or starting here? Either way, just keep going until you get back to where you started.


This week our challenge is to choose a card from the Annual Catalogue to CASE, but to give it a Holiday Catalogue Twist.  After opening the Annual Catalogue at a few random pages, I decided to stop on this card from page 158.


The banner, and the layers underneath, was what caught my eye. I think it's because it reminds me a little of some of the new stuff about to come out. However, the challenge is to use Holiday Catalogue products, so I pulled out my trusty So Many Stars bundle.

scissorspapercard, Stampin' Up!, CASEing The Catty, Labeler Alphabet, Greatest Part Of Christmas, Brightly Gleaming SDSP, Stitched Stars Dies, Christmas, Copper Foil

I started by creating the banner. It's just the retired Labeller Alphabet stamped and then cropped using the Classic Label punch. I then folded it over a length of Whisper White Baker's Twine, adhered the two sides with a glue dot, and snipped the back to match the front.

scissorspapercard, Stampin' Up!, CASEing The Catty, Labeler Alphabet, Greatest Part Of Christmas, Brightly Gleaming SDSP, Stitched Stars Dies, Christmas, Copper Foil

The large starry swirl piece was made slightly larger by snipping it in half under the Copper star and pushing the ends out. I like that you can see much more of it this way.

scissorspapercard, Stampin' Up!, CASEing The Catty, Labeler Alphabet, Greatest Part Of Christmas, Brightly Gleaming SDSP, Stitched Stars Dies, Christmas, Copper Foil

I had a few stars left from the swirly die cut on the front, so they were put to good use framing the sentiment from the Greatest Part Of Christmas stamp set. I love that font, as it nearly looks hand written.

Don't forget to add your card to our Facebook group once you have made it. You don't need a blog or fancy photography, so it's super easy to join in.


In the meantime though, please do continue the hop! Next up is Rebecca with a very peaceful card.


Bye for now,

Tina

Thursday, 24 October 2019

JAI #480: Just Add A Technique

Hi!


It's Friday, which means it's time for the new Just Add Ink challenge. Yay! This week Jan has set the challenge, which is to add a technique.


Sometimes I'm very glad that Kim does our schedule months ahead, so that I have time to think about what I'd like to do. There are so many fun techniques out there, that it can be difficult to narrow it down to just one. In the end I decided to use my Stamparatus to do some mirror stamping.

scissorspapercard, Stampin' Up!, Just Add Ink, Born To Shine, Brightly Gleaming SDSP, Stamparatus, Mirror Stamping, Watercolour Pencils

Born To Shine was still fresh in my mind, as I made a card with it last week. I decided that the dancer was the prefect stamp to use for the technique. There are lots of tutorials on the internet, but here's a *very* basic outline: to get the mirror image, you position the stamp on your Stamparatus and then stamp the image onto a silicone sheet or window sheet. Place your cardstock face down over the silicone sheet and press down with the stamp on the Stamparatus. You will end up with an image on both sides of the card, that is normal. Your then remove the silicone sheet, flip the cardstock, and stamp again (after reinking the stamp, of course!)

scissorspapercard, Stampin' Up!, Just Add Ink, Born To Shine, Brightly Gleaming SDSP, Stamparatus, Mirror Stamping, Watercolour Pencils

You may be able to see that the right dancer isn't quite as crisp as the left - she's the mirror dancer. It's a very minor difference though. The dancers were both coloured with my Watercolour Pencils in Night Of Navy, Flirty Flamingo and Cajun Craze, using my Wink Of Stella brush to blend the colours.

scissorspapercard, Stampin' Up!, Just Add Ink, Born To Shine, Brightly Gleaming SDSP, Stamparatus, Mirror Stamping, Watercolour Pencils

I stamped the dancer again on the inside, using Night Of Navy that I'd stamped off once. I used this star DSP with copper highlights, from the Brightly Gleaming SDSP pack, as I think it's great for dance cards, despite being Christmas DSP. What do you think?

That's it from me for this week, but your turn is just starting! Check out the Just Add Ink blog for the rest of the techniques that the Design Team have used, and then get stamping! Upload your card into our gallery before Wednesday evening, when the challenge closes. See you there!

Bye for now,

Tina

Wednesday, 16 October 2019

AWH HOC Week 9

Hi!


Welcome once again tot he Art With Heart team's Heart Of Christmas Blog Share. We are rapidly approaching the time to start sending out Christmas cards, ad I am grateful that I have quite the stash already, thanks to the Heart Of Christmas.

scissorspapercard, Stampin' Up!, Art With Heart, Heart Of Christmas, Christmas, Brightly Gleaming SDSP, Greatest Part Of Christmas, Stitched Stars, Copper Foil

I had a lot going on this week, so quick and easy was the order of the day! The stunning Brightly Gleaming SDSP makes quick, easy and fabulous cards so easily! I used the hostess set, Greatest Part Of Christmas. I love a big sentiment that does most of the work for you.

scissorspapercard, Stampin' Up!, Art With Heart, Heart Of Christmas, Christmas, Brightly Gleaming SDSP, Greatest Part Of Christmas, Stitched Stars, Copper Foil

I wanted a bit of extra somethin' somethin' on my card, so I die cut the starry swirl from Stitched Stars from Copper Foil. I chopped it in half and adhered it to my card front so that it stretched from corner to corner. A layered Copper and Navy star finished the front of the card.

scissorspapercard, Stampin' Up!, Art With Heart, Heart Of Christmas, Christmas, Brightly Gleaming SDSP, Greatest Part Of Christmas, Stitched Stars, Copper Foil

The starry swirl die has five star shapes included in the design. They are great for using on the inside of cards to add extra detail. They are perfect for clustering around the inside sentiment, don't you think? I'd rather use them than have them floating around forever on my craft desk, that's for sure!

Time now to pop on over to Claire's Blog, where you'll find the rest of this week's Heart Of Christmas cards.

Bye for now,

Tina

Wednesday, 25 September 2019

AWH HOC Week 6

Hi!


Welcome to Week 6 of the Art With Heart team Heart Of Christmas Blog Share. Can you believe it's week 6 already??? This week I received my new Pine Tree punch. I love the classic tree shape, don't you?

scissorspapercard, Stampin' Up!, Art With Heart, Heart Of Christmas, Merry Christmas To All, Elfie, Brightly Gleaming SDSP, Copper Foil, Pine Tree Punch, Rectangle Stitched Dies, Celestial Copper Delicata Ink

Once again I pulled out my Brightly Gleaming SDSP, for the card. I used my Stitched Rectangles to crop the paper for the front of the card. I chose the rectangle that was about four inches wide and cropped one in Whisper White and one in the Pretty Peacock DSP. I then sliced the DSP rectangle into two pieces. The gap is covered by the WW panel.

scissorspapercard, Stampin' Up!, Art With Heart, Heart Of Christmas, Merry Christmas To All, Elfie, Brightly Gleaming SDSP, Copper Foil, Pine Tree Punch, Rectangle Stitched Dies, Celestial Copper Delicata Ink

I used the punch to crop three trees, two from the DSP and one from Copper Foil. The WW panel looked a little plain with just the trees, so I used my new Celestial Copper Delicata Ink to stamp some of the 'sprinkles' from Elfie across the top of the panel. Another Stitched Rectangle was used to crop and sentiment from Merry Christmas To All.

scissorspapercard, Stampin' Up!, Art With Heart, Heart Of Christmas, Merry Christmas To All, Elfie, Brightly Gleaming SDSP, Copper Foil, Pine Tree Punch, Rectangle Stitched Dies, Celestial Copper Delicata Ink

I replicated the tree and sprinkles on the inside of the card. I quite like the sprinkles behind the tree!

This week my lovely friend, Judy is hosting the Heart Of Christmas blog share, so please do pop on over to her blog to check out the rest of this week's cards.

Bye for now,

Tina

Wednesday, 4 September 2019

AWH HOC Week 3

Hi!


Welcome to Week 3 of the Art With Heart Blog Share for the Heart Of Christmas. Today's an extra special day - the Holiday Catalogue has gone live, so you can finally get your hands on the products you've been seeing SU Demonstrators playing with over the past month or so. I have lots of these new products on my card tonight!

scissorspapercard, Stampin' Up!, Art With Heart, Heart Of Christmas, Christmas, Brightly Gleaming SDSP, So Many Stars Bundle, Copper Foil

I started by chopping into a different sheet in the Brightly Gleaming SDSP. I had to move on from the stars eventually! This gorgeous Pretty Peacock sheet also has the Copper Foil accents in the design, so I used some plain Copper Foil to matt the DSP. The stars paper is also from the Brightly Gleaming pack, but I have used a sheet without the copper. There is such thing as too much of a good thing!

scissorspapercard, Stampin' Up!, Art With Heart, Heart Of Christmas, Christmas, Brightly Gleaming SDSP, So Many Stars Bundle, Copper Foil

The stars were die cut from the new Stitched Stars Dies, and then stamped with a pair of images from So Many Stars. Each of the sections that reaches into the arm of the star is one stamp, so I had to line it up and stamp is 5 times, once in each arm. I then added a small star to the middle, and some Pretty Peacock Rhinestones at the tip of each arm.

Did you notice the sentiment? It's actually a new ribbon from the Holiday Catalogue, and features the two different fonts in Copper Print. I have heard that it can be coloured with Blends, which opens up a whole range of possibilities!

scissorspapercard, Stampin' Up!, Art With Heart, Heart Of Christmas, Christmas, Brightly Gleaming SDSP, So Many Stars Bundle, Copper Foil

I used some DSP and Copper Foil offcuts from the front to decorate the inside, along with a sentiment from So Many Stars.

That's it for me for this week. Judy May is hosting the Blog Share this week, so pop on over to her blog to find the rest of the links.