Hi!
I think that today's card is one of my favourite cards that I have even made. I know - it's a big call! There's just some thing about it that really appeals to me.
I started by stamping some Gorgeous Grunge splatters in the opposite corners on the base card, and then built up the layers from there.
I used the retiring Amazing Birthday stamp for the sentiment. You can see that I used my 1 3/4" Circle Punch to crop the image. I wanted the wider border around it so that I could pierce some holes to add a decorative touch. I also pierced the Lost Lagoon circle.
I really, really love the splatter stamp for adding a little something to the inside of a card also. So glad it's not retiring!
Bye for now,
Tina
Showing posts with label Amazing Birthday. Show all posts
Wednesday, 18 May 2016
Monday, 29 February 2016
A Beautiful Ride in Red
Hi!
I recently purchased the It's My Party DSP Stack. There a lots of bright colours and patterns in the DSP - perfect for happy, celebratory cards. Many of this flip sides have more subdued patterns though, and it's some of these subdued patterns I've used today on my card.
This card took a while to come together. I originally had it in a landscape orientation with the car looking like it was 'driving' along the Basic Black strip. It just wasn't working though. Rob had the idea of switching the orientation to portrait, which I obviously thought worked much better.
The VW was stamped and watercoloured on Shimmer Paper. It's really pretty paper, and handles the water very well. I used Real Red on the car, with a Soft Sky wash over the windows and Sahara Sand on the tires and metal bits of the car.
I used a second strip of the Basic Black DSP in the middle, with another Real Red banner.
Bye for now,
Tina
I recently purchased the It's My Party DSP Stack. There a lots of bright colours and patterns in the DSP - perfect for happy, celebratory cards. Many of this flip sides have more subdued patterns though, and it's some of these subdued patterns I've used today on my card.
This card took a while to come together. I originally had it in a landscape orientation with the car looking like it was 'driving' along the Basic Black strip. It just wasn't working though. Rob had the idea of switching the orientation to portrait, which I obviously thought worked much better.
The VW was stamped and watercoloured on Shimmer Paper. It's really pretty paper, and handles the water very well. I used Real Red on the car, with a Soft Sky wash over the windows and Sahara Sand on the tires and metal bits of the car.
I used a second strip of the Basic Black DSP in the middle, with another Real Red banner.
Bye for now,
Tina
Friday, 26 June 2015
JAI #268: Just Add A Sketch
Hi!
Are you ready for some fabulous Just Add Ink inspiraiton? I am! This week Narelle has designed an awesome sketch to guide our creativity.
Lots and lots of possibilities with this sketch. I decided to make a colourful kids' card using the new Cherry On Top DSP Stack.
I didn't want the fabulous patterns competing with each other so I stuck to a fairly neutral pattern for the background and stepped it up on the next layer.
I used my Bermuda Bay Stampin' Write marker to only ink up the 'happy' bits of the stamp from Amazing Birthday. The birthday on the flag came from Remembering Your Birthday.
I really love the fun colours in the Cherry On Top DSP stack. They are so perfect for kid's cards.
Why don't you pop on over to have a look at the rest of the Design Team at the Just Add Ink blog before you play along with us?
Bye for now,
Tina
Are you ready for some fabulous Just Add Ink inspiraiton? I am! This week Narelle has designed an awesome sketch to guide our creativity.
Lots and lots of possibilities with this sketch. I decided to make a colourful kids' card using the new Cherry On Top DSP Stack.
I didn't want the fabulous patterns competing with each other so I stuck to a fairly neutral pattern for the background and stepped it up on the next layer.
I used my Bermuda Bay Stampin' Write marker to only ink up the 'happy' bits of the stamp from Amazing Birthday. The birthday on the flag came from Remembering Your Birthday.
I really love the fun colours in the Cherry On Top DSP stack. They are so perfect for kid's cards.
Why don't you pop on over to have a look at the rest of the Design Team at the Just Add Ink blog before you play along with us?
Bye for now,
Tina
Wednesday, 12 November 2014
Happy Birthday Hudson!
Hi!
Nearly 2 months ago my not-so-baby boy turned 7. Today I have for you the card I made for him. He did get it on the day, I just haven't blogged it yet!
I saw this card made by Alison Barclay and decided I would CASE it to make Hudson's card. I used similar colours to Alison's card, but changed her star to a 7 for Hudson. I used copy paper and a ruler to make a template to sponge through.
I decided to add some paper piercing to give the card some extra oomph. I pierced 7 holes each time - 1 hole for each year!
I thought this sentiment was great for the inside. It's very cheerful, plus it leaves lots of room for a special message for my boy.
Bye for now,
Tina
Nearly 2 months ago my not-so-baby boy turned 7. Today I have for you the card I made for him. He did get it on the day, I just haven't blogged it yet!
I saw this card made by Alison Barclay and decided I would CASE it to make Hudson's card. I used similar colours to Alison's card, but changed her star to a 7 for Hudson. I used copy paper and a ruler to make a template to sponge through.
I decided to add some paper piercing to give the card some extra oomph. I pierced 7 holes each time - 1 hole for each year!
I thought this sentiment was great for the inside. It's very cheerful, plus it leaves lots of room for a special message for my boy.
Bye for now,
Tina
Friday, 1 August 2014
JAI #225: Just Add Colour
Hi!
Yippee! It's Friday and if I'm really luck I'll get a knock on my door later today that will be my postie with my new order. I'm hoping it arrives tomorrow so I can play over the weekend. Will you get in some crafting time over the weekend? Why not try a card for the new Just Add Ink challenge?
This week Patrice has chosen this gorgeous colour combination to follow.
Isn't it great? I love the neutrals with a soft pop of colour!
I started by stamping Positively Chevron over the top of the grid paper from the new Typeset Specialty DSP. I love the subtle effect this achieved!
The rest of the card was stamped with the Amazing Birthday stamp set. As I was going for a male card I kept the embellishments to a minimum. It was really hard not to add some ribbon, so I settled for some Mini Brads instead!
Nice and simple on the inside, because men really don't appreciate 'fancy'!
I hope you can play along with us this week at Just Add Ink - it's a really fun colour combo and the Design Team have had a lot of fun playing with it.
Bye for now,
Tina
Yippee! It's Friday and if I'm really luck I'll get a knock on my door later today that will be my postie with my new order. I'm hoping it arrives tomorrow so I can play over the weekend. Will you get in some crafting time over the weekend? Why not try a card for the new Just Add Ink challenge?
This week Patrice has chosen this gorgeous colour combination to follow.
Isn't it great? I love the neutrals with a soft pop of colour!
I started by stamping Positively Chevron over the top of the grid paper from the new Typeset Specialty DSP. I love the subtle effect this achieved!
The rest of the card was stamped with the Amazing Birthday stamp set. As I was going for a male card I kept the embellishments to a minimum. It was really hard not to add some ribbon, so I settled for some Mini Brads instead!
Nice and simple on the inside, because men really don't appreciate 'fancy'!
I hope you can play along with us this week at Just Add Ink - it's a really fun colour combo and the Design Team have had a lot of fun playing with it.
Bye for now,
Tina
Monday, 21 July 2014
A Crooked Card
Hi!
Today I have a bit of a shocker of a card to show you. Now, I really should clarify. I love the card itself - the 'shocker' part is the construction and stamping. It's the most crooked card I have put together in a long time!
Can you see just how crooked this card is? That's all I can see now!
Moving on from the crookedness, I thought I'd also show you how I did the multicoloured sentiment. It was as easy as stamping twice in two different colours, trimming one and popping it up on Dimensionals.
I did the same thing on the inside, minus the Dimensionals, just to keep it flat.
Bye for now,
Tina
Today I have a bit of a shocker of a card to show you. Now, I really should clarify. I love the card itself - the 'shocker' part is the construction and stamping. It's the most crooked card I have put together in a long time!
Can you see just how crooked this card is? That's all I can see now!
Moving on from the crookedness, I thought I'd also show you how I did the multicoloured sentiment. It was as easy as stamping twice in two different colours, trimming one and popping it up on Dimensionals.
I did the same thing on the inside, minus the Dimensionals, just to keep it flat.
Bye for now,
Tina
Friday, 27 June 2014
JAI #220: Just Add A Sketch
Hi!
Here we are at the end of another week. They are flying past so quickly! This week for our Just Add Ink challenge Kim has designed a sketch. It's really great - open to interpretation in so many fabulous ways.
The sketch stumped me for a while, but then I was looking through my new Everyday Adventure Project Life Card Collection and found the perfect card!
It works so well with the sketch! I matted it on Basic Black and then created a background for the card using the sentiment stamp from Just Sayin'.
I was pretty pleased with how it turned out, and I love that the cards from the Project Life sets can be used for more than just PL scrapbooking.
I hope you can find time to play along with us the week at Just Add Ink - it's a fabulous sketch!
Bye for now,
Tina
Here we are at the end of another week. They are flying past so quickly! This week for our Just Add Ink challenge Kim has designed a sketch. It's really great - open to interpretation in so many fabulous ways.
The sketch stumped me for a while, but then I was looking through my new Everyday Adventure Project Life Card Collection and found the perfect card!
It works so well with the sketch! I matted it on Basic Black and then created a background for the card using the sentiment stamp from Just Sayin'.
I was pretty pleased with how it turned out, and I love that the cards from the Project Life sets can be used for more than just PL scrapbooking.
I hope you can find time to play along with us the week at Just Add Ink - it's a fabulous sketch!
Bye for now,
Tina
Labels:
Amazing Birthday,
Birthday,
Challenge,
Design Team,
Just Add Ink,
Just Sayin',
Project Life
Wednesday, 11 June 2014
Simply Stars Card In A Box
Hi!
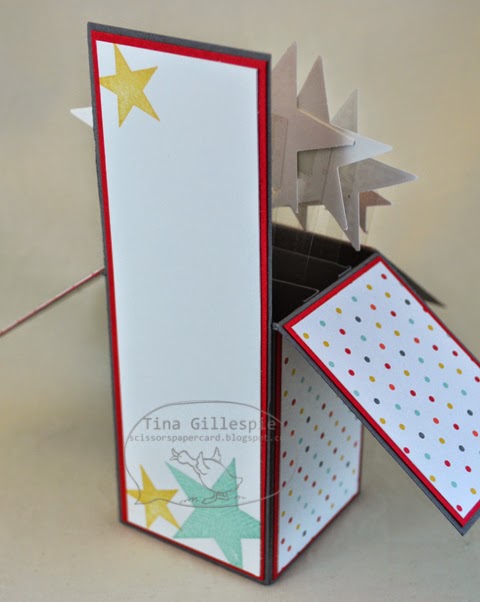
Last month I ran a Card In A Box class and today's card is one of the samples I made to inspire the ladies who attended. It uses the retiring Simply Stars stamp set and I Am Me DSP. Both are favourites of mine that I have enjoyed crafting with over the past year.
It's such a cool concept for a card. I love the fact that it folds flat for posting but pops up into this fabulous 3D card to delight the recipient. Did you notice the sneak peek stamp on the front? I really like the Dymo label look of this stamp.
You can see that I used thin strips of Window Sheet to support the stars. They wave around a little, which adds to the cool effect of the card.
Plenty of room on the back for writing your sentiment.
The most difficult part of making this card is to make sure that your stars (or what ever else you use) don't hang out the sides when the card is folded flat, which isn't really difficult at all!
I will be making another one of these sometime this week - my daughter's BFF is having her birthday party this weekend and Ada has put in an order for a butterfly card after seeing this one on my craft desk!
Bye for now,
Tina
Last month I ran a Card In A Box class and today's card is one of the samples I made to inspire the ladies who attended. It uses the retiring Simply Stars stamp set and I Am Me DSP. Both are favourites of mine that I have enjoyed crafting with over the past year.
It's such a cool concept for a card. I love the fact that it folds flat for posting but pops up into this fabulous 3D card to delight the recipient. Did you notice the sneak peek stamp on the front? I really like the Dymo label look of this stamp.
You can see that I used thin strips of Window Sheet to support the stars. They wave around a little, which adds to the cool effect of the card.
Plenty of room on the back for writing your sentiment.
The most difficult part of making this card is to make sure that your stars (or what ever else you use) don't hang out the sides when the card is folded flat, which isn't really difficult at all!
I will be making another one of these sometime this week - my daughter's BFF is having her birthday party this weekend and Ada has put in an order for a butterfly card after seeing this one on my craft desk!
Bye for now,
Tina
Labels:
3D Projects,
Amazing Birthday,
Birthday,
I Am Me DSP,
Simply Stars,
Technique
Subscribe to:
Posts (Atom)