Hi!
I have been doing a little bit of stamping on candles lately. They have been on commission - my client wanted a set of 4 candles with a card to match.
The brief was pink and floral, so I thought that Wildflower Meadow in Melon Mambo and Old Olive fitted perfectly.
I used my Stampin' Write markers to colour the rubber to get the mulitcoloured image. I also added some Rhinestones to the centres of the flowers.
I like using the sweet little flower stem on the inside - such a perfect little touch for the card, and easy to achieve using the markers to selectively colour the image.
I also used the markers to create the image for the candles, as well as rhinestones to finish off the flowers.
My client loved the gift set, and the recipient does too. Great result!
Bye for now,
Tina
Showing posts with label Sweet Essentials. Show all posts
Wednesday, 9 July 2014
Monday, 7 July 2014
Kinda Eclectic for Twins
Hi!
Today I have a pair of cards to show you that I made for my twin nieces. I usually make them the same cards with different colours, and this year was no exception.
Their favourite colours are pink and yellow, so that was the obvious place to start! The background panel was made by colouring the Positively Chevron stamp with my Daffodil Delight and Melon Mambo Stampin' Write Markers. I made the one wider panel and cut it in half - much quicker and easier than making two!
I preferred the way the large pink/small yellow butterfly combination looked against the yellow starburst, so I decided to make the main panels the same. I just changed the colour of the matt to contrast with the card base.
Here they are side by side so you can see how they are the same, but different - just like my gorgeous nieces.
I forgot to take photos of the cards before they were written on, and I was too lazy to edit the photos to blur the writing, so you'll just have to imagine how the insides might look!
Bye for now,
Tina
Today I have a pair of cards to show you that I made for my twin nieces. I usually make them the same cards with different colours, and this year was no exception.
Their favourite colours are pink and yellow, so that was the obvious place to start! The background panel was made by colouring the Positively Chevron stamp with my Daffodil Delight and Melon Mambo Stampin' Write Markers. I made the one wider panel and cut it in half - much quicker and easier than making two!
I preferred the way the large pink/small yellow butterfly combination looked against the yellow starburst, so I decided to make the main panels the same. I just changed the colour of the matt to contrast with the card base.
Here they are side by side so you can see how they are the same, but different - just like my gorgeous nieces.
I forgot to take photos of the cards before they were written on, and I was too lazy to edit the photos to blur the writing, so you'll just have to imagine how the insides might look!
Bye for now,
Tina
Monday, 9 June 2014
Farewell Sweet Essentials and Beautifully Baroque
Hi!
I'm a bit late with my post today - all out of whack with the long weekend!
Today's card farewells two of my favourite stamp sets from the current catalogue. I especially loved Sweet Essentials, as it was a versatile sentiment set that covered a wide range of occasions.
I love a simple colour scheme for a wedding card - it really adds a touch of class.
This cute little ruffled ribbon is also retiring, even though the Pistachio Pudding colour is still around for another year. I love the look of it just peeking out from the bottom of the Silver Glimmer paper.
I loved that you could get a smaller image from the Beautifully Baroque stamp, just by selectively colouring the inner segment with a marker. So easy, but so effective.
Bye for now,
Tina
I'm a bit late with my post today - all out of whack with the long weekend!
Today's card farewells two of my favourite stamp sets from the current catalogue. I especially loved Sweet Essentials, as it was a versatile sentiment set that covered a wide range of occasions.
I love a simple colour scheme for a wedding card - it really adds a touch of class.
This cute little ruffled ribbon is also retiring, even though the Pistachio Pudding colour is still around for another year. I love the look of it just peeking out from the bottom of the Silver Glimmer paper.
I loved that you could get a smaller image from the Beautifully Baroque stamp, just by selectively colouring the inner segment with a marker. So easy, but so effective.
Bye for now,
Tina
Monday, 19 May 2014
Papillion Potpourri Mother's Day Card
Hi!
I'm back today with another of the Mother's Day cards I made this year. This one was made as a class sample, and was made to be versatile. It could easily be made into a birthday card by changing the sentiment in the middle.
I CASEd this card, not changing much. Why mess with a great card?
I thought the use of the butterflies was perfect for a lovely, soft feminine card.
Bye for now,
Tina
I'm back today with another of the Mother's Day cards I made this year. This one was made as a class sample, and was made to be versatile. It could easily be made into a birthday card by changing the sentiment in the middle.
I CASEd this card, not changing much. Why mess with a great card?
I thought the use of the butterflies was perfect for a lovely, soft feminine card.
Bye for now,
Tina
Monday, 5 May 2014
Sweet Sorbet Watercolouring
Hi!
I know Sale-A-Bration is long gone, but I found 2 projects in my "To Blog" folder that I must have missed before now. I thought I'd show them to you anyway, as I really love both projects. Today's one is a card using the Sweet Sorbet paper.
This card was made as a sample for my Stamping Ladies, who had asked me to show them a watercolour wash background. We achieved the look by simply brushing some ink over watercolour paper using an Aqua Painter. So easy but so effective!
I realised just as I presented the card to the group that I'd stamped the watercolour panel upside down! I used Summer Starfruit, Pistachio Pudding and Crisp Cantaloupe for the watercolouring and I'd intended to have the Summer Starfruit section at the top as a contrast to the Crisp Cantaloupe flower. Oh well, I think it still looks good.
I like using a little snippet of the DSP from the front in the inside of the card. In this case I used some of the ribbon too.
Bye for now,
Tina
I know Sale-A-Bration is long gone, but I found 2 projects in my "To Blog" folder that I must have missed before now. I thought I'd show them to you anyway, as I really love both projects. Today's one is a card using the Sweet Sorbet paper.
This card was made as a sample for my Stamping Ladies, who had asked me to show them a watercolour wash background. We achieved the look by simply brushing some ink over watercolour paper using an Aqua Painter. So easy but so effective!
I realised just as I presented the card to the group that I'd stamped the watercolour panel upside down! I used Summer Starfruit, Pistachio Pudding and Crisp Cantaloupe for the watercolouring and I'd intended to have the Summer Starfruit section at the top as a contrast to the Crisp Cantaloupe flower. Oh well, I think it still looks good.
I like using a little snippet of the DSP from the front in the inside of the card. In this case I used some of the ribbon too.
Bye for now,
Tina
Friday, 4 April 2014
Just Add Ink #209: Just Add Layers
Hi!
Woo hoo! It's Friday and there's only one more day of Daylight Savings to go! I'm so over Daylight Savings right now and when you add that to the end of term.... Anyway, enough of my whinging, let's get on to the Just Add Ink challenge!
This week Delys has challenged us to Just Add Layers to our projects. I had a plan to do a layout, but time got away with me and so I went with a card. I was inspired to make it after coming across some pattern tissue paper that had been used a package my Secret Santa gift last year. I decided I'd try stamping on some and then using the piece to make a faux silk type panel.
I really love the way it turned out! I then used some more of the tissue to create the flower. I simply folded some up and punched it using my scallop circle punch. It didn't really punch too well, if I did it again I'd probably die cut the flower. Not counting the flower, there are 9 layers on this card! I think this fills the brief quite well, don't you?
A few more layers on the inside too :) And there's more of the off center sentiment stamping that I'm loving so much lately!!
I hope you can find time to play along with us at Just Add Ink this week - it's a great challenge!
Bye for now,
Tina
Woo hoo! It's Friday and there's only one more day of Daylight Savings to go! I'm so over Daylight Savings right now and when you add that to the end of term.... Anyway, enough of my whinging, let's get on to the Just Add Ink challenge!
This week Delys has challenged us to Just Add Layers to our projects. I had a plan to do a layout, but time got away with me and so I went with a card. I was inspired to make it after coming across some pattern tissue paper that had been used a package my Secret Santa gift last year. I decided I'd try stamping on some and then using the piece to make a faux silk type panel.
I really love the way it turned out! I then used some more of the tissue to create the flower. I simply folded some up and punched it using my scallop circle punch. It didn't really punch too well, if I did it again I'd probably die cut the flower. Not counting the flower, there are 9 layers on this card! I think this fills the brief quite well, don't you?
A few more layers on the inside too :) And there's more of the off center sentiment stamping that I'm loving so much lately!!
I hope you can find time to play along with us at Just Add Ink this week - it's a great challenge!
Bye for now,
Tina
Monday, 31 March 2014
Zoo Babies Farewell Sale-A-Bration
Hi!
Today I have one final card using Sale-A-Bration products. Well, two cards actually!
This was the sample card I'd made for a series of workshops I was running last month. It uses the Decorative Dots Embossing Folder and some of the Twine from the Sweet Sorbet Accessories Pack.
Love that cute little monkey swinging off the hello! On the way to my first workshop where we were going to be making this card I realised that the Very Vanilla panel was 2 inches (5.1cm) wide - the perfect size for the Scallop Tag Topper Punch. Yay! I gave the ladies the option to play with the punch instead of following my design. They has lots of fun.
I had a leftover kit after I'd finished all my workshops for the month so I decided to make my own alternative using the tag punch. Exact same materials, just trimmed a little!
I punched the Very Vanilla cardstock with the punch, adhered it to the Island Indigo piece and then hand trimmed around the top. I also hand cut the hole so that my ribbon could go through both layers. I added a piece of Very Vanilla ribbon and used the twine to tie around it.
Just to finish off - the two cards side by side.
Don't forget that today is the final day to place an order to take advantage of the Sale-A-Bration promotion. Each $90 spent frome our catalogues gets you a freebie from the Sale-A-Bration catalogue. Bonus!
Bye for now,
Tina
Today I have one final card using Sale-A-Bration products. Well, two cards actually!
This was the sample card I'd made for a series of workshops I was running last month. It uses the Decorative Dots Embossing Folder and some of the Twine from the Sweet Sorbet Accessories Pack.
Love that cute little monkey swinging off the hello! On the way to my first workshop where we were going to be making this card I realised that the Very Vanilla panel was 2 inches (5.1cm) wide - the perfect size for the Scallop Tag Topper Punch. Yay! I gave the ladies the option to play with the punch instead of following my design. They has lots of fun.
I had a leftover kit after I'd finished all my workshops for the month so I decided to make my own alternative using the tag punch. Exact same materials, just trimmed a little!
I punched the Very Vanilla cardstock with the punch, adhered it to the Island Indigo piece and then hand trimmed around the top. I also hand cut the hole so that my ribbon could go through both layers. I added a piece of Very Vanilla ribbon and used the twine to tie around it.
Just to finish off - the two cards side by side.
Don't forget that today is the final day to place an order to take advantage of the Sale-A-Bration promotion. Each $90 spent frome our catalogues gets you a freebie from the Sale-A-Bration catalogue. Bonus!
Bye for now,
Tina
Monday, 24 March 2014
Petite Petals Notecard
Hi!
Today I have for you a sweet little note card that I made as a sample for several classes I ran last month.
The stamp set is such a cute little set, and the coordinating punch makes cropping it a breeze!
I stamped the more solid flower stamp in Pistachio Pudding on the Whisper White cardstock. My aim was to make it look like the leaves on a bush, and I quite like the effect. By overlapping the stamping you get lighter and darker areas, which look a bit more realistic.
I repeated this effect on the inside.
Bye for now,
Tina
Today I have for you a sweet little note card that I made as a sample for several classes I ran last month.
The stamp set is such a cute little set, and the coordinating punch makes cropping it a breeze!
I stamped the more solid flower stamp in Pistachio Pudding on the Whisper White cardstock. My aim was to make it look like the leaves on a bush, and I quite like the effect. By overlapping the stamping you get lighter and darker areas, which look a bit more realistic.
I repeated this effect on the inside.
Bye for now,
Tina
Friday, 21 March 2014
JAI #207: Just Add A Sketch
Hi!
Once again, it's Friday and time for another Just Add Ink Challenge. Don't we all love Friday! This week Kim has designed a sketch for our papercrafting inspiration.
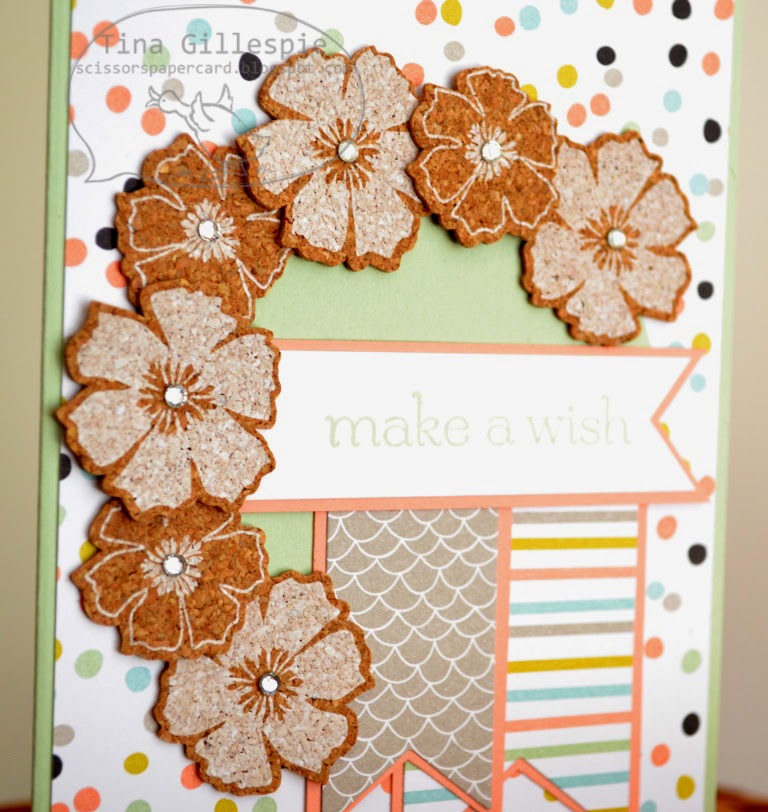
I have used a bit of creative licence with this sketch by rotating it 180 degrees and changing the tags to banners. It's nice to shake things up sometimes!
This sketch also gave me the opportunity to use some of the cork flower stickers that are a Sale-A-Bration freebie. Not much longer left to grab your freebies!
I really love the Sweet Sorbet collection. I'm going to miss it when SAB is over. I reckon I say that just about every year though!
I used another flower on the inside, I just cut it in half to make the most out of it.
How will you play with Kim's fabulous sketch this week over at Just Add Ink?
Bye for now,
Tina
Once again, it's Friday and time for another Just Add Ink Challenge. Don't we all love Friday! This week Kim has designed a sketch for our papercrafting inspiration.
I have used a bit of creative licence with this sketch by rotating it 180 degrees and changing the tags to banners. It's nice to shake things up sometimes!
This sketch also gave me the opportunity to use some of the cork flower stickers that are a Sale-A-Bration freebie. Not much longer left to grab your freebies!
I really love the Sweet Sorbet collection. I'm going to miss it when SAB is over. I reckon I say that just about every year though!
I used another flower on the inside, I just cut it in half to make the most out of it.
How will you play with Kim's fabulous sketch this week over at Just Add Ink?
Bye for now,
Tina
Thursday, 13 February 2014
Good As Gold
Hi!
One of the freebies you can choose this year in Stampin' Up!'s Sale-A-Bration's catalogue is the Good As Gold Simply Sent Kit. It wasn't one that caught my eye straight away, but it somehow found it's way onto my order, and I'm glad it did.
Today's card is one made straight from the kit, as suggested by Stampin' Up! It's very quick and easy to put together - the only thing extra you need is adhesives.
The flags in the kit are all pre cut and pre 'stamped' with the sentiments. There's a few different colours and sentiments to mix and match. You can see in the photo that both the card base and some of the flags are gold foil, which is really lovely.
The kit also comes with some lengths of Baker's Twine and Gold elastic cord. Tying them together like this is great, as I have a tendency to overstretch the gold cord if I don't!
A very simple inside - I used the pop out star from the gold flag to decorate the inside.
I'll be back soon to show you some of the other cards I have made using the elements from the kit.
Bye for now,
Tina
One of the freebies you can choose this year in Stampin' Up!'s Sale-A-Bration's catalogue is the Good As Gold Simply Sent Kit. It wasn't one that caught my eye straight away, but it somehow found it's way onto my order, and I'm glad it did.
Today's card is one made straight from the kit, as suggested by Stampin' Up! It's very quick and easy to put together - the only thing extra you need is adhesives.
The flags in the kit are all pre cut and pre 'stamped' with the sentiments. There's a few different colours and sentiments to mix and match. You can see in the photo that both the card base and some of the flags are gold foil, which is really lovely.
The kit also comes with some lengths of Baker's Twine and Gold elastic cord. Tying them together like this is great, as I have a tendency to overstretch the gold cord if I don't!
A very simple inside - I used the pop out star from the gold flag to decorate the inside.
I'll be back soon to show you some of the other cards I have made using the elements from the kit.
Bye for now,
Tina
Friday, 7 February 2014
JAI #201: Just Add Colour
Hi!
Friday again, and time for another Just Add Ink Challenge. This week Kim has given us this gorgeous colour combination to work with.
These colours, to me, where screaming out to be on a baby boy's card. Funnily enough, that reminded me of a friend that's due to have a baby in a few weeks so instead of making the card I ended up ringing her for a chat. Over an hour later I finally got back to making the card!
I used the Zoo Babies stamp set on the card - the first time I had got it inky. It's a cute little set, I don't know why it took me so long! The Pool Party DSP is from the I Am Me pack. I love how well the blues work together with just a little splash of Real Red and Saraha Sand.
I can't wait to send this to my friend - she let me know that she's having a boy, so this challenge is another case of perfect timing!
Stamps: Zoo Babies, Sweet Essentials
Ink: Pool Party, Island Indigo
DSP/Cardstock: I Am Me DSP, Island Indigo, Whisper White
Other: Postage Stamp Punch, Sahara Sand Candy Dots, Real Red Stitched Grosgrain Ribbon, Dimensionals
Hope to see you at Just Add Ink this week.
Bye for now,
Tina
Friday again, and time for another Just Add Ink Challenge. This week Kim has given us this gorgeous colour combination to work with.
These colours, to me, where screaming out to be on a baby boy's card. Funnily enough, that reminded me of a friend that's due to have a baby in a few weeks so instead of making the card I ended up ringing her for a chat. Over an hour later I finally got back to making the card!
I used the Zoo Babies stamp set on the card - the first time I had got it inky. It's a cute little set, I don't know why it took me so long! The Pool Party DSP is from the I Am Me pack. I love how well the blues work together with just a little splash of Real Red and Saraha Sand.
I can't wait to send this to my friend - she let me know that she's having a boy, so this challenge is another case of perfect timing!
Stamps: Zoo Babies, Sweet Essentials
Ink: Pool Party, Island Indigo
DSP/Cardstock: I Am Me DSP, Island Indigo, Whisper White
Other: Postage Stamp Punch, Sahara Sand Candy Dots, Real Red Stitched Grosgrain Ribbon, Dimensionals
Hope to see you at Just Add Ink this week.
Bye for now,
Tina
Labels:
Challenge,
Design Team,
I Am Me DSP,
Just Add Ink,
Sweet Essentials,
Zoo Babies
Monday, 13 January 2014
Thank You In Blue
Hi!
It's good to be back blogging again after a bit of a break over Christmas and New Year's. I meant to be back a bit sooner, but school holiday play dates and illness scuttled those plans. I received my preorder goodies from the upcoming Sale-A-Bration and Occasions Catalogues and I've been dying to have a play. I finally found some time over the weekend.
Today's card was made on commission. The brief was a thank you card for a girl who likes blue.
Look hard for the sneak peeks! There's a new stamp set, DSP and twine.
The flower was stamped in Coastal Cabana and then given a very gentle wash with Pool Party using an Aqua Painter. I say a very gentle wash because if you use too much water you're just going to end up with a blurry mess. Ask me how I know!
Here's the inside with an old favourite, Sweet Essentials. The orange cardstock is Tangerine Tango. Not colours I would have put together, but I really like the combo with the blues.
Bye for now,
Tina
It's good to be back blogging again after a bit of a break over Christmas and New Year's. I meant to be back a bit sooner, but school holiday play dates and illness scuttled those plans. I received my preorder goodies from the upcoming Sale-A-Bration and Occasions Catalogues and I've been dying to have a play. I finally found some time over the weekend.
Today's card was made on commission. The brief was a thank you card for a girl who likes blue.
Look hard for the sneak peeks! There's a new stamp set, DSP and twine.
The flower was stamped in Coastal Cabana and then given a very gentle wash with Pool Party using an Aqua Painter. I say a very gentle wash because if you use too much water you're just going to end up with a blurry mess. Ask me how I know!
Here's the inside with an old favourite, Sweet Essentials. The orange cardstock is Tangerine Tango. Not colours I would have put together, but I really like the combo with the blues.
Bye for now,
Tina
Tuesday, 17 December 2013
Get Well Card
Hi!
Apologies for the late posting today. School holidays. Christmas. Need I say more?
Edit: I realised today that I actually posted this a day early, not half a day late as I thought! Ooops! I stand by my original comment: School holidays. Christmas. Need I say more? lol
Today's card was one I made for a friend undergoing the biggest battle of her life.
I made the card for a group of us to sign to wish her well for the surgery she was facing.
This was my first use of the Postcard stamp and the Simply Sketched hostess set. I love both stamp sets.
I really liked this combination of sentiments for this card - so appropriate!
Bye for now,
Tina
Apologies for the late posting today. School holidays. Christmas. Need I say more?
Edit: I realised today that I actually posted this a day early, not half a day late as I thought! Ooops! I stand by my original comment: School holidays. Christmas. Need I say more? lol
Today's card was one I made for a friend undergoing the biggest battle of her life.
I made the card for a group of us to sign to wish her well for the surgery she was facing.
This was my first use of the Postcard stamp and the Simply Sketched hostess set. I love both stamp sets.
I really liked this combination of sentiments for this card - so appropriate!
Bye for now,
Tina
Friday, 13 December 2013
JAI #195: Just Add Inspiration
Hi!
Let's get straight into it, shall we?
This week Nikki has found this absolutely gorgeous picture to inspire you for the new Just Add Ink challenge.
So very pretty! These are the colours we have picked out of the image to use.
So many possibilities! I really loved the softness of these colours.
My sister is in India at the moment for a wedding but before she left she asked me to make a Thank You card for the family she is staying with while she is there. I thought about it for a while and then put it to one side. Then one night I dreamed about making this card. When I got up and made it, it turned out exactly as it did in my dream. Love when that happens!
The large bubbles were created using one of the circle offcuts from the Daydream Medallions stamp set. We got the stamp set as a gift at Convention 2 years ago and one of the presenters told us not to throw out those bits as they could be used as stamps. The smaller dots were stamped using the eraser on the top of a pencil. I couldn't decide where to put the sentiment, so I stamped it on some vellum. I wrapped it around the card and adhered it to the back. That way you don't have to worry about hiding the adhesive and it makes the sentiment appear to float on your card. Such a neat trick!
The bubbles continue through to the inside. I really loved this card, so I think I'm going to have to make some more.
I'll see you over at Just Add Ink!
Bye for now,
Tina
Let's get straight into it, shall we?
This week Nikki has found this absolutely gorgeous picture to inspire you for the new Just Add Ink challenge.
So very pretty! These are the colours we have picked out of the image to use.
So many possibilities! I really loved the softness of these colours.
My sister is in India at the moment for a wedding but before she left she asked me to make a Thank You card for the family she is staying with while she is there. I thought about it for a while and then put it to one side. Then one night I dreamed about making this card. When I got up and made it, it turned out exactly as it did in my dream. Love when that happens!
The large bubbles were created using one of the circle offcuts from the Daydream Medallions stamp set. We got the stamp set as a gift at Convention 2 years ago and one of the presenters told us not to throw out those bits as they could be used as stamps. The smaller dots were stamped using the eraser on the top of a pencil. I couldn't decide where to put the sentiment, so I stamped it on some vellum. I wrapped it around the card and adhered it to the back. That way you don't have to worry about hiding the adhesive and it makes the sentiment appear to float on your card. Such a neat trick!
The bubbles continue through to the inside. I really loved this card, so I think I'm going to have to make some more.
I'll see you over at Just Add Ink!
Bye for now,
Tina
Subscribe to:
Posts (Atom)


