Hi!
I've had a little burst of scrapping lately, mostly back to the more traditional 12x12 instead of Project Life. It's been a while since I've done any 12x12 and I'm really enjoying it.
Rob took the kids Trick or Treating last week. They really enjoy the dressing up part of it. Ada plans her outfit for weeks, while Alex just throws something together at the last minute! Lucky he and Rob had built a 'Steve' head (from Minecraft) for a birthday party earlier in the year, so it wasn't too difficult for him to put together his outfit.
The house is from the Set Holiday Homes. You can purchase it as a Photopolymer set out of the current Holiday Catalogue, or you can do as I did and purchase the MDS download. I opted for the download as I wanted the flexibility of being able to resize the images. In this case I printed the house at approximately 3 1/2 inches by 4 1/2 inches, printed it and then coloured it with my Blendabilities.
I did a lot of soft collage stamping in the background of my layout. I deliberately used softer colours so that I didn't take too much focus away from the photos and the house. A bit different from more traditional Halloween colours, but I love the effect. I used Soft Sky, Crumb Cake and Daffodil Delight and Pumpkin Pie.
Bye for now,
Tina
Showing posts with label Flowering Flourishes. Show all posts
Saturday, 8 November 2014
Friday, 7 November 2014
JAI #239: Just Add Colour
Hi!
Today we have a new challenge for you at Just Add Ink. It's a gorgeous colour combination out forward by Nikki. I really love this combination, it's so classic and can be either masculine or feminine.
I had been asked to make a sympathy card, so I thought I'd use the challenge colours.
I used some DSP from the Trim The Tree Stack, which is in the current Holiday Catalogue as the base of my card. I like that this DSP has a mix of Christmassy patterns and plainer patterns that could be used for a range of cards.
I like the combination of Flowering Flourishes and Petite Petals. The coordinating punch makes cropping the flowers so easy!
I hope you can play along with us at Just Add Ink this week. The Design Team have made a gorgeous range of cards for your inspiration.
Bye for now,
Tina
Today we have a new challenge for you at Just Add Ink. It's a gorgeous colour combination out forward by Nikki. I really love this combination, it's so classic and can be either masculine or feminine.
I had been asked to make a sympathy card, so I thought I'd use the challenge colours.
I used some DSP from the Trim The Tree Stack, which is in the current Holiday Catalogue as the base of my card. I like that this DSP has a mix of Christmassy patterns and plainer patterns that could be used for a range of cards.
I like the combination of Flowering Flourishes and Petite Petals. The coordinating punch makes cropping the flowers so easy!
I hope you can play along with us at Just Add Ink this week. The Design Team have made a gorgeous range of cards for your inspiration.
Bye for now,
Tina
Friday, 4 April 2014
Just Add Ink #209: Just Add Layers
Hi!
Woo hoo! It's Friday and there's only one more day of Daylight Savings to go! I'm so over Daylight Savings right now and when you add that to the end of term.... Anyway, enough of my whinging, let's get on to the Just Add Ink challenge!
This week Delys has challenged us to Just Add Layers to our projects. I had a plan to do a layout, but time got away with me and so I went with a card. I was inspired to make it after coming across some pattern tissue paper that had been used a package my Secret Santa gift last year. I decided I'd try stamping on some and then using the piece to make a faux silk type panel.
I really love the way it turned out! I then used some more of the tissue to create the flower. I simply folded some up and punched it using my scallop circle punch. It didn't really punch too well, if I did it again I'd probably die cut the flower. Not counting the flower, there are 9 layers on this card! I think this fills the brief quite well, don't you?
A few more layers on the inside too :) And there's more of the off center sentiment stamping that I'm loving so much lately!!
I hope you can find time to play along with us at Just Add Ink this week - it's a great challenge!
Bye for now,
Tina
Woo hoo! It's Friday and there's only one more day of Daylight Savings to go! I'm so over Daylight Savings right now and when you add that to the end of term.... Anyway, enough of my whinging, let's get on to the Just Add Ink challenge!
This week Delys has challenged us to Just Add Layers to our projects. I had a plan to do a layout, but time got away with me and so I went with a card. I was inspired to make it after coming across some pattern tissue paper that had been used a package my Secret Santa gift last year. I decided I'd try stamping on some and then using the piece to make a faux silk type panel.
I really love the way it turned out! I then used some more of the tissue to create the flower. I simply folded some up and punched it using my scallop circle punch. It didn't really punch too well, if I did it again I'd probably die cut the flower. Not counting the flower, there are 9 layers on this card! I think this fills the brief quite well, don't you?
A few more layers on the inside too :) And there's more of the off center sentiment stamping that I'm loving so much lately!!
I hope you can find time to play along with us at Just Add Ink this week - it's a great challenge!
Bye for now,
Tina
Monday, 14 October 2013
A Wedding Card
Hi!
Another one of my nieces got married a couple of weeks ago so the card I have for you today is the card I gave her and her new husband on their happy day.
It was also a card I'd made as a sample for a recent "Hatches, Matches and Dispatches" class. We stamped the Flowering Flourishes image in Illuminate Ink to give a lovely, subtle shimmer to the top of the card. The embossing along the bottom adds an elegant touch.
I really love white on white wedding cards, and the touch of silver in the sentiment and card base adds a little touch of class.
I kept the inside fairly simple as I usually like to write a fair bit on wedding cards.
Stamps: Flowering Flourishes, Sweet Essentials
Ink: Illuminate Glimmer Watermark, Platinum Shimmer Paint (retired)
Cardstock: Whisper White, Brushed Silver
Other: Big Shot, Delicate Designs Embossing Folder, Large Scallop Edgelit, Organza Ribbon
Bye for now,
Tina
Another one of my nieces got married a couple of weeks ago so the card I have for you today is the card I gave her and her new husband on their happy day.
It was also a card I'd made as a sample for a recent "Hatches, Matches and Dispatches" class. We stamped the Flowering Flourishes image in Illuminate Ink to give a lovely, subtle shimmer to the top of the card. The embossing along the bottom adds an elegant touch.
I really love white on white wedding cards, and the touch of silver in the sentiment and card base adds a little touch of class.
I kept the inside fairly simple as I usually like to write a fair bit on wedding cards.
Stamps: Flowering Flourishes, Sweet Essentials
Ink: Illuminate Glimmer Watermark, Platinum Shimmer Paint (retired)
Cardstock: Whisper White, Brushed Silver
Other: Big Shot, Delicate Designs Embossing Folder, Large Scallop Edgelit, Organza Ribbon
Bye for now,
Tina
Monday, 26 August 2013
Epic Day This And That Journal: This Is 38
Hi!
I was pretty excited when Stampin' Up! released the Epic Day Smash Album. I bought one as soon as I could, and then thought "OK, now what am I going to do with it?" There was a part of me thinking it was too pretty to use, but I squashed her back in her box. I had a few ideas, but in the end I decided to use it as a kind of diary for a year of my life.
I sat down last week to decorate the front. And then I got a blank. I ended up starting with the numbers. I turned 38 last week, so it was a good starting point. I wanted them to stand out, so I covered them with some of the brighter paper from the Epic Day DSP pack.
I love the coordinating Hexagon punch for stress free creating! I simply punched a few, sponged them and adhered them onto the cover. I had previously stamped Off The Grid over the cover, and also Flowering Flourishes.
I used Notable Alphabet to stamp the rest of the title. I chose the title "This Is 38" as I want this book to be a keepsake of my life this year, so my family can look back and know what I was like at 38. I will aim to keep it about me - not the kids, not Rob, just me. It will be a challenge, as most mums love talking about their kids and family!
This is the inside of the front cover. I took a selfie photo on my birthday so when I print it, it will go here and I will write some bits about myself. I'm really looking forward to completing this album all about me!
Bye for now,
Tina
I was pretty excited when Stampin' Up! released the Epic Day Smash Album. I bought one as soon as I could, and then thought "OK, now what am I going to do with it?" There was a part of me thinking it was too pretty to use, but I squashed her back in her box. I had a few ideas, but in the end I decided to use it as a kind of diary for a year of my life.
I sat down last week to decorate the front. And then I got a blank. I ended up starting with the numbers. I turned 38 last week, so it was a good starting point. I wanted them to stand out, so I covered them with some of the brighter paper from the Epic Day DSP pack.
I love the coordinating Hexagon punch for stress free creating! I simply punched a few, sponged them and adhered them onto the cover. I had previously stamped Off The Grid over the cover, and also Flowering Flourishes.
I used Notable Alphabet to stamp the rest of the title. I chose the title "This Is 38" as I want this book to be a keepsake of my life this year, so my family can look back and know what I was like at 38. I will aim to keep it about me - not the kids, not Rob, just me. It will be a challenge, as most mums love talking about their kids and family!
This is the inside of the front cover. I took a selfie photo on my birthday so when I print it, it will go here and I will write some bits about myself. I'm really looking forward to completing this album all about me!
Bye for now,
Tina
Monday, 10 June 2013
Thinking Of You With Flowering Flourishes
Hi!
Last week I was asked to make a card for my daughter's teacher. Her husband had been very unwell and she had been off work for a long time looking after him. The mums just wanted to let her know that we were thinking of her.
I wanted the card to be pretty and elegant, but most of all the Thinking Of You sentiment to stand out. I really love the Raspberry Ripple and Basic Black combination, and the splash of Old Olive helps give the sentiment panel a lift.
I incorporated some bling into the stamped Flowering Flourish image by adhering some Basic Jewels Rhinestones.
I continued the same theme on the inside of the card with more stamping and more bling. From all accounts she loved the card.
Stamps: Flowering Flourishes, Thoughts And Prayers
Ink: Raspberry Ripple
DSP/Cardstock: First Edition Specialty DSP, Raspberry Ripple, Old Olive, Basic Black, Very Vanilla
Other: Big Shot, Paper Doily Sizzlit, Decorative Label Punch, Basic Jewels Rhinestones, Very Vanilla Satin Ribbon (retired)
Bye for now,
Tina
Last week I was asked to make a card for my daughter's teacher. Her husband had been very unwell and she had been off work for a long time looking after him. The mums just wanted to let her know that we were thinking of her.
I wanted the card to be pretty and elegant, but most of all the Thinking Of You sentiment to stand out. I really love the Raspberry Ripple and Basic Black combination, and the splash of Old Olive helps give the sentiment panel a lift.
I incorporated some bling into the stamped Flowering Flourish image by adhering some Basic Jewels Rhinestones.
I continued the same theme on the inside of the card with more stamping and more bling. From all accounts she loved the card.
Stamps: Flowering Flourishes, Thoughts And Prayers
Ink: Raspberry Ripple
DSP/Cardstock: First Edition Specialty DSP, Raspberry Ripple, Old Olive, Basic Black, Very Vanilla
Other: Big Shot, Paper Doily Sizzlit, Decorative Label Punch, Basic Jewels Rhinestones, Very Vanilla Satin Ribbon (retired)
Bye for now,
Tina
Sunday, 2 June 2013
JAI Scrap #18: Just Add Milestones.
Hi!
I have been busy scrapping again, just in time for the new Just Add Ink Scrapping Challenge.
This month Ruthy has challenged us to scrap a milestone. A milestone can be defined as an important event in your life. I have chosen my Grandma turning 100 as the milestone I scrapped. She's pretty amazing - these pictures were taken over a year ago and she is now 101!
I chose to scrap a double page as I had too many photos for just one page. The three square photos were taken at her party. Sadly she was unable to attend her own party as she was unwell. The photos on the right side of the layout are the following day when we were able to talk to her through the window of the nursing home. We all sang Happy Birthday and blew her kisses.
This photo was taken a week later. We were able to travel back to see her when she was well and able to have visitors. She's such a remarkable woman and someone I really admire.
You can see that in the top corner I stamped the large flourish from Flowering Flourishes using the Illuminate Inkpad. I stamped the same image in each of the corners for a subtle little lift.
This is one of my favourite bits of the layout. At her party I was asked to make a speech with only about 10 minutes notice. My sisters helped me come up with some points to make and I scribbled them on a scrap of paper. The scroll is that scrap of paper.
Stamps: Flowering Flourishes
Ink: Illuminate, Lucky Limeade, So Saffron, Pretty In Pink
DSP/Cardstock: Tea For Two DSP, So Saffron, Early Espresso, Lucky Limeade
Other: Big Shot, Typeset Alpha Dies, Tasteful Trims Die, Little Leaves Sizzlit, Petals A Plenty Embossing Folder, Soda Pop Tops, Paper Doilies, Early Espresso Baker's Twine, Crystal Effects, Vanilla Flower Trim
I hope you can find time to play along with us this month at Just Add Ink.
Bye for now,
Tina
I have been busy scrapping again, just in time for the new Just Add Ink Scrapping Challenge.
This month Ruthy has challenged us to scrap a milestone. A milestone can be defined as an important event in your life. I have chosen my Grandma turning 100 as the milestone I scrapped. She's pretty amazing - these pictures were taken over a year ago and she is now 101!
I chose to scrap a double page as I had too many photos for just one page. The three square photos were taken at her party. Sadly she was unable to attend her own party as she was unwell. The photos on the right side of the layout are the following day when we were able to talk to her through the window of the nursing home. We all sang Happy Birthday and blew her kisses.
This photo was taken a week later. We were able to travel back to see her when she was well and able to have visitors. She's such a remarkable woman and someone I really admire.
You can see that in the top corner I stamped the large flourish from Flowering Flourishes using the Illuminate Inkpad. I stamped the same image in each of the corners for a subtle little lift.
This is one of my favourite bits of the layout. At her party I was asked to make a speech with only about 10 minutes notice. My sisters helped me come up with some points to make and I scribbled them on a scrap of paper. The scroll is that scrap of paper.
Stamps: Flowering Flourishes
Ink: Illuminate, Lucky Limeade, So Saffron, Pretty In Pink
DSP/Cardstock: Tea For Two DSP, So Saffron, Early Espresso, Lucky Limeade
Other: Big Shot, Typeset Alpha Dies, Tasteful Trims Die, Little Leaves Sizzlit, Petals A Plenty Embossing Folder, Soda Pop Tops, Paper Doilies, Early Espresso Baker's Twine, Crystal Effects, Vanilla Flower Trim
I hope you can find time to play along with us this month at Just Add Ink.
Bye for now,
Tina
Wednesday, 8 May 2013
Clean and Simple Flowering Flourishes
Hi!
Today I have a very quick and easy card that I made as a sample for my stamping ladies.
I love the simplicity, but also the drama in the stamping. I used Midnight Muse on Very Vanilla cardstock.
A closer look at the sentiment shows that I used 4 different punches. The layering adds just a little extra to the card. You could jazz it up a bit further if you wished by adding rhinestones or pearls to the punchies.
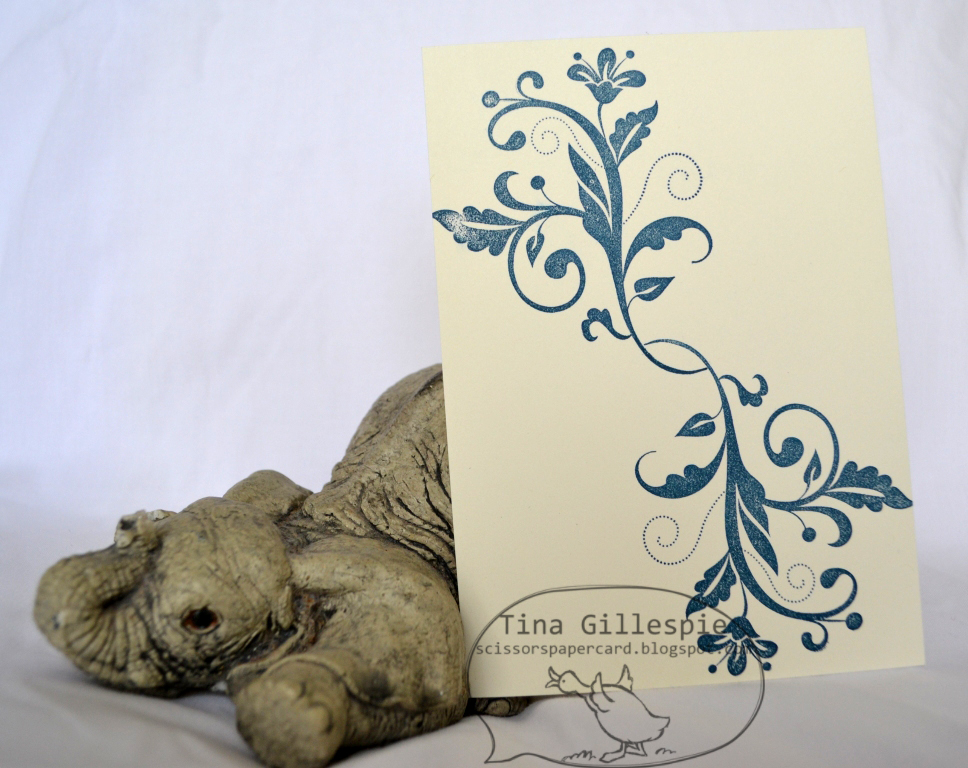
This panel was the first one I stamped, but I rejected it as I felt it didn't flow across the card as well as the panel on the final card. The lines in the flourish are too vertical - they look much better when they are more diagonal.
Stamps: Flowering Flourishes, Just Believe
Ink: Midnight Muse
Cardstock: Midnight Muse, Very Vanilla
Other: Decorative Label Punch, Circle Punch, Modern Label Punch, Word Window Punch
Bye for now,
Tina
Today I have a very quick and easy card that I made as a sample for my stamping ladies.
I love the simplicity, but also the drama in the stamping. I used Midnight Muse on Very Vanilla cardstock.
A closer look at the sentiment shows that I used 4 different punches. The layering adds just a little extra to the card. You could jazz it up a bit further if you wished by adding rhinestones or pearls to the punchies.
This panel was the first one I stamped, but I rejected it as I felt it didn't flow across the card as well as the panel on the final card. The lines in the flourish are too vertical - they look much better when they are more diagonal.
Stamps: Flowering Flourishes, Just Believe
Ink: Midnight Muse
Cardstock: Midnight Muse, Very Vanilla
Other: Decorative Label Punch, Circle Punch, Modern Label Punch, Word Window Punch
Bye for now,
Tina
Subscribe to:
Posts (Atom)


