Pages

Showing posts with label Project Life. Show all posts

Wednesday, 23 November 2016

MKPLxSU Blog Share: Hello December

Hi!


This month at MKPLxSU we have decided to try something different - instead of all posting our pages on one day, we are spreading them out through the month. Today it's my turn to share my pages.


https://www.facebook.com/groups/757002674331278/

This month we have decided to focus on the Hello December 2016 kit that you can find in the Holiday Catalogue. While it's mainly designed to be used for a December Daily type project, you could really use the kit in any way you'd like! As a bonus, it is also among the products discounted this week in the Online Extravaganza. Nice!


This is the fifth year I have started (and completed!) a December Daily album, so for me it was a no-brainer to get the kit and plunge straight in. I usually leave the title page until last, but I was so excited by the 2016 transparency card that I just had to make it first.


The kit didn't come with sequins this year, so I used some from the Metallics and Brights packs in my stash. I also managed to find some sequins that were pretty close to Emerald Envy among my hoarded bits and pieces. I think they came from a kit that Ada had where you push pins through the sequins and into a foam board to make a picture. I sealed the pocket with my Fuse tool to ensure they stayed put.


I usually have a page or two at the front of my album from November, as we often attend some Christmas events that are held early. In this case, the second page of my DD documents the Adelaide Christmas Pageant. Rob, his mum and the big kids took some silly selfies while they were waiting for the pageant to start. I think these kinds of memories are the best kind to preserve!


The very next day Rob, his mum and the big kids went to a Christmas party at the Adelaide Zoo. They had far too much of a good time to remember taking photos, so all I had was this one of Alex playing Pokémon Go as they walked around. He's so obsessed with it at the moment, and it was far more interesting to him than the animals!


I should point out that I would usually go to these events with the rest of the family, but as I was still recovering from my ankle surgery it was best for me and Hudson to stay home and let the more energetic members of the family enjoy a couple of special days out without having to worry about us keeping up. Hud and I had some fabulous mother-son bonding time at home.


This is my last page for now! Usually the Christmas tree would go up on Pageant day, but we had such a huge weekend that we just didn't get time. I was going to wait for Dec 1, but Ada nagged until we gave in on Sunday. It's not decorated yet, but as it's a fibre optic tree it still looks great at night with the lights glowing.

Did you see that I created another transparent pocket? I used one of the metal paper clips that come in the kit, as well as some more sequins. I didn't actually realise it was a paper clip until after I'd sealed the pocket. Oh well, it still looks great floating around in the pocket with the sequins!

Are you planning a DD album this year? Have you started it, like me? Please join us in the Facebook group and post your pages for us to see and enjoy!

Bye for now,

Tina
Monday, 12 September 2016

MKPLxSU September Blog Share

Hi!


Welcome to another Memory Keeping With Project Life by Stampin' Up! blog share. We are a group of SU Demonstrators from all around the globe who share a love of Project Life and Stampin' Up!


This month we have an open theme for our blog share - we could use any collection which took our fancy. I decided to use the Moments Like These collection.


The page I created documents my daughter, Ada, and her recent hair cut. She's very proud of her very long hair, and it had grown to waist length. You can probably see this in the 'before' photos down the left side of the page. A few factors came into play and required her hair to have a trim, the most pressing of which was dance competitions. Her hair needed to be in a ponytail for the comps, but the weight and length made it both difficult to get her hair into a high pony, but also to keep it in the ponytail.


I really loved this simple journaling card. I used my Watermelon Wonder marker to colour the heart and the strip that separated the two parts of the card. I  also used it to highlight a few words here and there in the journaling to add a bit of interest to the page.


I used one of the 2 inch square cards from the coordinating Accessory Pack to create this little feature on the page. I trimmed the card a little though, as I didn't want it to cover too much of the photo underneath. A tiny paperclip from the pack holds it in place.


You can see what the rest of the team have done by clicking on the links to their blogs.


Julie Kettlewell
Constanze Wirtz
Anna Pickering
Sandra Korten
Delys Cram
Linda Dalke
Elizabeth Peterson
Allison Okamitsu


Bye for now,


Tina

Friday, 26 August 2016

JAI #326: Just Add Project Life

Hi!


I hope you've had a fabulous week - I certainly did! I celebrated a birthday earlier in the week and was very spoiled! But enough about me - it's time for the new Just Add Ink challenge!


This week Rochelle has challenged us to Just Add Project Life. I do a lot of PLing, so creating a page sounded like fun. Strangely though, when I sat down to create I actually made a card!


The cute little 2 inch card came from the Hello Lovely PL Accessory Pack. I'm often a bit stumped on how to use the cards, but this pre-cut card was just screaming 'Shaker Card!', so I went with the flow! The Soft Sky sequins are also from the same pack.


It is really, really hard to see in the photos, but I also stamped the dandelion type stamp from the accessory pack on the front of the card - just a sprinkle of them from top left to bottom right. If you look closely you may be able to see one just below the shaker part of the card. They look gorgeous in real life.


The dandelions might be easier to see in the inside of the card - this time some in the top right and bottom left.


Project Life is so versatile - as you can see it's not just for scrapping. What will you create? Link your projects over at the Just Add Ink blog for us all to see!


Bye for now,


Tina

Saturday, 2 July 2016

Let's Get Away to Matilda

Hi!


Do you like Project Life scrapbooking? I'm sure you know by now that I love it! I also love making mini albums, and now I've combined the two.


I used a retired kit for these, as it suited the theme of the album. The kit is Let's Get Away, and the purpose of the album was to spring a surprise trip to Melbourne on my daughter and her bestie.


I made the album to act as a Flip Book. On each page I wrote a little bit of information about the trip, and they needed to flip through each page to get the whole story. We took the girls to a café and got them to read the book out loud while I took photos and the other mum filmed them. It was very cute to see their reactions as they read each page of the book. You can see my layout about that here.


I made the girls a book each - thankfully there were enough cards in the kit to be able to make similar books.


I will take more cards from the kit on the trip so that the girls can write anything they'd like about the trip while it's still fresh. When we get home I will print off some of their photos to add to the book and they will have a mini album each to remember the trip. It's so easy!


Bye for now,


Tina
Monday, 20 June 2016

MKPLxSU Blog Share: Hello Lovely

Hi!


Welcome to another Memory Keeping with Project Life by Stampin' Up! Blog Share!


This month we are all using the brand spanking new Hello Lovely Collection for our layouts. Have you checked out the new PLxSU Collections in the Catalogue yet? I certainly have, and I'm loving them all!

I have scrapped a very recent event for my family, in fact it happened last Friday. Nothing like scrapping while the memory is still fresh.


My daughter, Ada, and her best friend, Hannah, are a bit obsessed by 'Matilda' lately. Unbeknown to them, Hannah's mum, Rachael and I organised a girl's weekend to Melbourne with them to see the musical production. We did it about 2 weeks ago, and have been bursting to tell them ever since. We finally sat them down in a café and gave them a little flip book I'd made, and got them to read it out loud. I love that in the photos on this page the girls bend closer over the page as they go, and as their excitement levels increased.


The second page shows the news really sinking in. They were so happy, but kept asking if it was really true. Ada was especially excited as she's never been on a plane before. Now we just have to wait the 6 weeks or so for the trip!


I really liked this 2 inch card, as it really sums up what the girls have been thinking lately - they wished they could see the musical, and now their wishes have come true. I matted it in Basic Black to really make it pop. There are lots of cards that use Basic Black in this collection, and it adds that little bit of boldness or drama to a page.


I used a new stamp set, Labeler Alphabet on the main journaling card, but also on each photo. The number on the card refers to the number on the photo, and the journaling describes what the girls were doing/saying/thinking in each photo. It's a neat way to guide the reader through the layout, especially as each of the photos is pretty much the same.

Well, that's it from me this month, but you can check out the rest of the MKPLxSU Design Team by clicking on the links below:


Don't forget that you can join the MKPLxSU group on Facebook, too! There's lots of PLxSU inspiration and chatter in the group.

Bye for now,

Tina


Monday, 9 May 2016

MKPLxSU BLog Share: Retiring Kits

Hi!


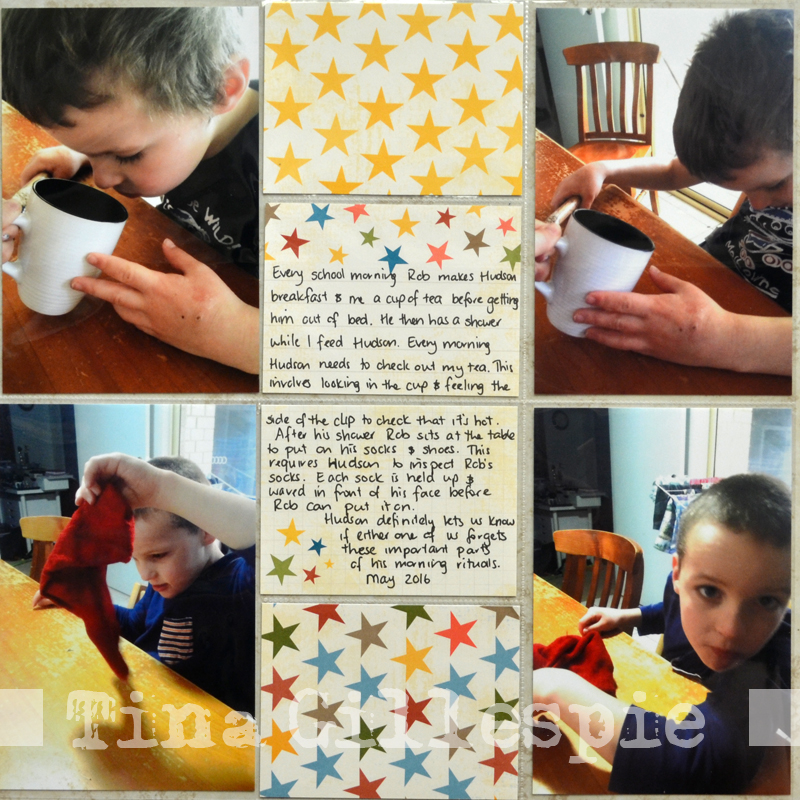
This month the MKPLxSU Design Team have decided to focus on Retiring PLxSU Kits for our Blog Share. Sadly, all of the kits I have are retiring, so I was spoiled for choice. In the end I went with the Happy Times Collection. I quite like the slightly grungy, masculine look of the kit.


I used the kit to complete a double page layout of my youngest son's morning rituals. Hudson has a severe Intellectual Disability, so he is quite fixated on certain routines. Project Life is fabulous for documenting things like this! The photos aren't perfect - they are just snapped on my iPhone so the lighting and composition aren't great - but that really doesn't matter. The important thing is getting the story told.


Here's the left side of the layout. I was originally going to put the tea pictures on one side and the sock pictures on the other, but I found that I preferred the tea pictures across the top and the sock pictures along the bottom. It helps to link the two pages a little better. That's the beauty of PL - it's so easy to rearrange the different photos and cards on the page, as they are not fixed in place.


Here's the right side of the double page. You can see that I selected stars as the theme of my PL cards. There weren't enough 3x4 cards for each slot, so I ended up cutting two 4x6 cards in half to use in the top and bottom slots on each page.


This journaling card didn't have stars on it - so I changed that by adding a sticker banner from the Happy Times Accessory Pack that had stars on it. Easy!


Do you record these funny little rituals that your family members have? I think it's important before they get lost in the fog of time and poor memory. This is why I scrap.


Here are the other Design Team Blogs. They've used a variety of Retiring Kits to create their gorgeous layouts. Happy hopping!


Sandra Korten
Constanze Wirtz
Julie Kettlewell
Patty Bennett
Linda Dalke
Caroline van der Straaten
Delys Cram
Elizabeth Peterson
Janet Wakeland


Bye for now,


Tina


Friday, 22 April 2016

JAI #308: Just Add M

Hi!


I nearly forgot to submit my Just Add Ink Challenge project this week. Oops! School holidays have a way of making the days run away - I nearly always seem to lose track of where we are up to. I guess that's the point of holidays though!


This week it's my challenge at Just Add Ink, and I am challenging you to Just Add M to your projects. It can be anything to do with M - a colour, theme, stamp set, anything! I have incorporated a few M's into my project, as I'm Memory Keeping using the Moments Like These PL Collection, which includes Metallic accents.


Ada, my daughter, won a Jamberry party in a raffle recently, so we held it on Tuesday night. She got to invite several of her friends, and so did I! The girls has a blast applying their wraps and then painting the rest of their nails with polish. Can you imagine how giggly it got with 4 very excited 10 year old girls? It was such a fun night!


Sigh, my title card didn't quite work the way I'd hoped. The circle in the middle has a little heart, but chopping it down the middle has made it look a bit funny. Oh well! The Metallic Gold stickers I used for the title were from the Moments Like These Accessory Kit.


What M's will you use in your project? There's so much you could use! Melon Mambo, Mother's Day, Made With Love stamp set, markers, masking..... the possibilities are endless! See you over at Just Add Ink.


Bye for now,


Tina

Monday, 14 March 2016

MKPLxSU Blog Share: Metallics

Hi!


Welcome to the March 2016 Memory Keeping With Project Life by Stampin' Up! Blog Share. This month we are focusing on the use of Metallics in our projects. I chose to do this by using both the Gold stickers in the Memories in the Making PL Collection and also some of our Gold Foil paper.

Apologies for the glare on the photos - I really should get organised so I'm photographing the layouts in the daylight rather than trying to use my light box at night!


I started putting together a 6x8 Album a year or so ago that documented my daughter, Ada's dancing. I only got as far as the title page before setting it aside to work on other things. As soon as I found out we were doing the metallics Blog Share I immediately thought of it again and decided it was a great opportunity to get more done. On this first page I used some of the Gold Foil paper to create the numbers for the journalling card. As this album will span many years, I wanted the year to stand out as people flick though the album.


You can see that I used one of the gold heart stickers to add a cute little touch to the flag at the bottom of the card.


I have to honestly say that I'm not a big user of metallics normally, which is probably why only one tiny gold heart sticker found it's way onto this page!


On the page above, I originally adhered the small square card directly onto the larger card. I wasn't happy with it though, as one just blended into the other. Solution - a matt of the Gold Foil paper under the smaller card to help separate the two and highlight the journalling.


For consistency, I am using the Little Numbers Framelits with the Gold Foil paper on each page that starts a new year in the album.


On this final page (for now), I used the Gold Foil paper to adjust the photo. The photo originally had Ada smack bang in the middle, which didn't leave me enough room to add in the small card. I decided to chop about an inch off the left hand side of the photo and then add the Gold Foil strip to the right hand side. This pushed Ada to the left, leaving enough room to adhere the small card for journalling. Problem solved!

Here are the links to the other ladies participating in this month's Blog Share. I hope you can find time to click on their links and enjoy some wonderful metallic Project Life by Stampin' Up! inspiration.


Bye for now,

Tina

Wednesday, 24 February 2016

PLxSU: January 2016

Hi!

Are you a Project Lifer? Have you heard about it, but not sure what it is? Are you wanting to know what all the fuss is about? Why don't you come along to one of my new Project Life by Stampin' Up! classes and find out all about it? For the past few years I have been completing a double page layout each month that is a look into the everyday things we did that month.


Now I really should confess that I often don't complete my pages in a timely manner - in fact I only finished 2014 over the weekend! I haven't even started 2015 yet, although I have sorted the photos ready to print. Does this sound like you? If so, my monthly class is perfect for you. Each month we will complete the previous month's layout. I ran the first class yesterday, where we completed January's double page.


It really is so easy - choose 10-14 photos, print them (you can do this for a small fee at the class), pop them in the pockets and then complete a title and journalling card.  Done! The actual scrapbooking isn't the difficult part at all, the hard part is often making the time to do it. Another reason why my class is a great solution - by having a set time each month to get it done, it will be easy to keep on top of it and stay up to date. Plus, you get to make a mess at my house, and not yours!


You can find more information about the classes here, which just takes you to the Project Life tab at the top of my blog. If you're super keen, but the times I have listed don't suit please get in touch, as I'm sure I can come up with a solution.

Bye for now,

Tina

Monday, 8 February 2016

MKPLSU Blog Share: Sale-A-Bration

Hi!

Are you ready for some Memory Keeping with Project Life by Stampin' Up! inspiration? I hope so, because it's Blog Share day!


This month the MKPLxSU Design Team are sharing their Project Life pages done with the Memories In The Making Project Life Specialty Card Collection, which is one of the current Sale-A-Bration offerings. It is designed to coordinate with the Memories In The Making Collection featured in the current Occasions Catalogue.


As you can see, I chose to complete a double page of my oldest son's first week at High School. I was originally going to do a single page of his first day, but I ended up with too many photos for one page but not enough for two, so I decided to cover the whole week in the layout.


The MITM Specialty Card Collection consists of two types of cards - acetate and UV resist. In the photo above I've used a printed acetate card to highlight Ada waiting at the bus stop for Alex to come home. I had the wrong lens on my camera with no time to change it, so I couldn't get a closer photo of her waiting. This is a great way to highlight the fact that there is something in this photo to see!


I've use another printed acetate card to highlight Alex in his uniform. Some of the cards, like this one, are silver on one side and gold on the other, making them even more versatile. The journalling card is from the MITM PL Card Collection. Yes, the photo above the card is meant to look funny - Alex was playing around with a photo distorting app on his iPad!


Here I've used another acetate card to frame this selfie Alex took on his iPad on his first day.


The title card is from the MITM PL Specialty Card Collection.  It is one of the UV resist cards. I used my Aqua Painter and Crushed Curry inkpad to very roughly wash the yellow ink over the card. The pattern in the card (in this case stripes) resists the ink. Once it was dry I stamped some of the splatters from Gorgeous Grunge over the card in Basic Black and Tempting Turquoise to match the journalling card in the previous photo. The letter stickers are from the MITM PL Accessory Pack.

I had a lot of fun playing around with the Memories In The Making Project Life Specialty Card Collection.  Have you made a layout using them? You can see the Design team layouts on the links below, or check out our Facebook group.

Julie Kettlewell
Caroline van der Straaten
Linda Higgins
Delys Cram
Constanze Wirtz
Janet Morrow Wakeland

Bye for now,

Tina

Monday, 11 January 2016

MKPLxSU Blog Share: Memories In The Making

Hi!

I hope you didn't think I'd forgotten about my little blog! I was having a bit of a break over the Christmas/New Year period, but now I'm back and ready to get straight back into blogging.  What better way to start than with a Blog Share with the Memory Keeping with Project Life by Stampin' Up! team? We are a part of a Facebook group with a focus on scrapbooking using PLxSU products.  This month we are showcasing a brand new collection, called Memories In The Making.  You can find the collection in the new Occasions Catalogue.


One of the things we did over the holiday break was go home and visit my family in country NSW. My hometown is on the Murrumbidgee River, and this summer we decided to do a River Float. This pretty much involved gathering as many lifejackets and inflatable devices as we could find, jumping in the river at the boat ramp and floating along (hopefully as a group!) until we reached the beach further down the river.

I didn't actually get to float this time, I was a driver.  Someone had to meet the floaters at the other end and bring them home!


The title was made using the alphabet stickers in the Accessory Pack. The 'FUN' banner was also from the Accessory Pack, I simply cut one of the 5.1 x 5.1cm cards that said 'FUN FUN FUN' into thirds and used on third on the layout. I sometimes struggle to use those tiny cards, so this was a perfect way to use one.


I ran out of space on the main journalling card to write the names of all the people floating, so I decided to use another of the tiny cards to include this detail. I adhered it to the photo using some of the washi tape from the Accessory Pack.

So there you have my layout for the month. How did you spend your Christmas break?

There are several other blogs for you to check out this month:

Delys Cram, NZ
Elizabeth Richards Peterson, USA
Julie Kettlewell, UK
Constanze Wirtz, Germany
Janet Morrow Wakeland, USA - http://remarkablycreated.com/
 Linda Higgins, Australia

Bye for now,

Tina