Pages

Showing posts with label Layered Leaves 3D Dynamic TIEF. Show all posts

Thursday, 20 February 2020

JAI #493: Just Choose Two

Hi!


Welcome back to a new Just Add Ink challenge! This week Patrice has challenged us to Just Add Two to our creations. Which two? Any of these two:


Now, for some reason I became a little fixated on having felt on my card. I'm not quite sure why - maybe because, of the three, it's the one that I was least likely to have. Nothing like making it hard for myself! LOL! I was sure I had a felt Christmas ornament that SU retired a long time ago *somewhere* in my craft room. I never found it, but I did find some cheap sheets of felt in the kid's craft stash.

scissorspapercard, Stampin' Up!, Just Add Ink, Varied Vases, Daisy Lane, Poppy Moments Dies, Brick & Mortar EF, Layering Leaves EF, Daisy Punch

I trimmed some green felt and attached it to a piece of Shaded Spruce cardstock with TomBow glue. Before it dried, I ran it through my Big Shot with the Layered Leaves 3D Embossing Folder. I was quite impressed with how well it held the embossed design!

scissorspapercard, Stampin' Up!, Just Add Ink, Varied Vases, Daisy Lane, Poppy Moments Dies, Brick & Mortar EF, Layering Leaves EF, Daisy Punch

To finish the card, I layered a piece of vellum embossed with the Brick & Mortar 3D Embossing folder with some of the Poppy Moments leaves and a Large Daisy. The second of my Two items is a button, the centre of the daisy. I used a Medium Classy Designer Button, which retired a while ago, and coloured it with my dark Pineapple Punch Stampin' Blend to change the colour from vanilla to yellow.

scissorspapercard, Stampin' Up!, Just Add Ink, Varied Vases, Daisy Lane, Poppy Moments Dies, Brick & Mortar EF, Layering Leaves EF, Daisy Punch

The inside was finished off with a So Saffron daisy and a sentiment from Varied Vases.

So which two will you choose? You can check out what the Design Team chose over at the Just Add Ink blog, where you can also link up your Just Choose Two card.

Bye for now,

Tina

Sunday, 12 January 2020

CTC #260 Week 2: January July Mini Catalogue

Hi!


Welcome back to Week Two of the first CASEing The Catty Sunday Challenge for 2020! As I mentioned last week, we have switched to running each challenge over two weeks, with a new blog hop each Sunday as usual. That means you get twice the inspiration for each challenge! Speaking of inspiring, the blog before mine was the fabulous Rebecca's, and you can find the link to the next blog at the end of my post.


This week continues with CASEing any project from the January-June Mini Catalogue. There's so much to choose from! Last week I CASEd a card fairly closely, so this week I went looking for a technique to CASE. I didn't have to go far!


This beauty is on page 3, and uses a watercolour wash on the die cut background. It's such a fun technique, so I was very keen to give it a try!

scissorspapercard, Stampin' Up!, CASEing The Catty, Springtime Impressions Dies, Varied Vases, Itty Bitty Birthdays, Follow Your Art DSP, Layered Leaved 3D Embossing Folder

I don't have the Heart To Heart bundle, so instead I used my Springtime Impressions Dies. I started by washing Highland Heather, Coastal Cabana, Mango Melody and Flirty Flamingo over a piece of Watercolour Paper. Once it dried, I cropped it using the butterfly die.

scissorspapercard, Stampin' Up!, CASEing The Catty, Springtime Impressions Dies, Varied Vases, Itty Bitty Birthdays, Follow Your Art DSP, Layered Leaved 3D Embossing Folder

The rest of the card is just layers of Basic Black cardstock and Follow Your Art DSP. I love how the DSP mimics the look of the butterfly, without all the effort! You might also be able to see that I embossed the largest black layer with the Layered Leaves 3D Embossing Folder.

scissorspapercard, Stampin' Up!, CASEing The Catty, Springtime Impressions Dies, Varied Vases, Itty Bitty Birthdays, Follow Your Art DSP, Layered Leaved 3D Embossing Folder

I used a couple of DSP offcuts to add to the side of the writing panel on the inside. Just a slither - any more takes away from the watercolour wash look from the butterfly.

Have you made your card and posted it to our Facebook group in the last week? If not, you still have another week - get to it! LOL!


For now though, it's time to hop on over to the wonderful Siobhan's blog. Give a little 'rawr!' as you go!


Bye for now,

Tina

Thursday, 19 December 2019

JAI #487: Just Add A Sketch

Hi!


Hello, and welcome to the final Just Add Ink challenge of 2019! This will be a non-competitive challenge, running through until the start of January. So what have we got for you? A sketch challenge, designed by the wonderful  Jackie!


I've been looking forward to this sketch for a while now - I think it's fabulous, and great for a wide range of themes. I toyed for a while with doing a dinosaur card, but in the end I reached for my new Poppy Moments Dies.

scissorspapercard, Stampin' Up!, Just Add Ink, Poppy Moments Dies, Painted Labels Dies, Layered Leaves Embossing Folder,  Peaceful Poppies DSP, Happy Birthday Too You, Sale-A-Bration

The poppy dies have three layers - the solid base, the outline and the centre. I cut the base in Vellum, the outline in Poppy Parade and the centre in Basic Black. I like the translucent look of the vellum - a little more interesting than stark white in this case! I accidentally got the circle elements of the sketch the wrong way around. Ooops! That's what I love about a sketch though - it's open to interpretation, as long as you can still see the original in the card.

scissorspapercard, Stampin' Up!, Just Add Ink, Poppy Moments Dies, Painted Labels Dies, Layered Leaves Embossing Folder,  Peaceful Poppies DSP, Happy Birthday Too You, Sale-A-Bration

I couldn't resist adding the little scallop border piece onto the card, from the new Painted Labels Dies. It's so sweet, but in Basic Black it's a little dramatic too! I think I will be using it lots. The sentiment is from a new Sale-A-Bration set, Happy Birthday To You. I added a couple of leaves to the card, cut from vellum and Mossy Meadow cardstock.

scissorspapercard, Stampin' Up!, Just Add Ink, Poppy Moments Dies, Painted Labels Dies, Layered Leaves Embossing Folder,  Peaceful Poppies DSP, Happy Birthday Too You, Sale-A-Bration

I used another leaf and the smaller poppy on the inside. The large poppy is beautiful, but a little big for the inside! The sentiment is also from Happy Birthday To You. I love the scripty font!

Thanks for joining me for another year of Just Add Ink challenges. I love being a part of the JAI team, and I look forward to more crafty fun with them in 2020. I hope you can join in our challenges, we love seeing what everyone makes for them.

That's all for me on my blog for 2019. I'll be back in early 2020 after a short break with my family. Have a wonderful Christmas and a fabulous New Year. I hope Santa brings you some new crafty goodies to play with!

Bye for now,

Tina

Thursday, 21 February 2019

JAI #445: Just Add Embossing

Hi!


Thanks for joining me for the new Just Add Ink Challenge. This week Rochelle has challenged us to add embossing to our cards. You can use any type of embossing - heat, dry or even the embossing mats.


When planning my card I decided to use heat embossing, but I also ended up using dry embossing too. I recently received the Lovely Lattice stamp set as a Sale-A-Bration freebie and I was keen tp try it out.

scissorspapercard, Stampin' Up!, Just Add Ink, Lovely Lattice, Varied Vases, Layered Leaves DTIEF, Watercolouring

I heat embossed the main image on Shimmery White cardstock using white embossing power. I then watercoloured the image using my ink pads and a pair of Aqua Painters. I used two, as I used the colouring technique where you 'fill' an embossed area with water and then drop a little bit of ink into the water and allow the colour to spread. It's a bit of a cheats way to watercolour.

scissorspapercard, Stampin' Up!, Just Add Ink, Lovely Lattice, Varied Vases, Layered Leaves DTIEF, Watercolouring

I used Granny Apple Green on the leaves and Flirty Flamingo and Crushed Curry on the flowers. I then used Sahara Sand to colour the lattice and Balmy Blue to outline the image to help it pop.

scissorspapercard, Stampin' Up!, Just Add Ink, Lovely Lattice, Varied Vases, Layered Leaves DTIEF, Watercolouring

I used two of the smaller flowers on the inside, this tie using the no line watercolouring technique on them. It was my first time trying that technique and I'm definitely going to give it another go soon!

That's it for me this week. What type - or types - of embossing will you use? You can see what the Design Team chose over at the Just Add Ink blog, where you can also link up your card. See you there!

Bye for now,

Tina

Sunday, 20 January 2019

CTC# 212: Sale-A-Bration

Hi!

It's the end of another busy week, which makes it time for the CASEing The Catty Sunday Challenge Blog Hop!


I do love a good blog hop! The blog before mine belongs to the talented Judy May. You may have started there, or anywhere on the hop - it doesn't matter. Just keep on hopping until you get back to where you started. Hopefully by the end you'll be inspired to enter out challenge.


This week we are back to CASEing the Sale-A-Bration Catalogue. It's got heaps of great cards, so it was hard to narrow it down to just one. I CASEd a card from the front cover last time, so I decided to head for the back of the catalogue for inspiration this time. I decided I's CASE this card, from the bottom of page 18.


I don't have the Lasting Lily stamp set, but a few days ago I saw a card on the FB, where a demonstrator had punched some daisies from the Gingham Gala DSP. I was keen to give it a go, so this card seemed like a great way to do it.

scissorspapercard, Stampin' Up!, CASEing The Catty, Daisy Delight, Fabulous Flamingo, Gingham Gala, Layered Leaves 3DTIEF, Daisy Punch

I used the coordinating Daisy Delight stamp set to create the stem of the daisy. I don't like the tiny little leaves on the stem, so I just used a marker to ink the stem part. I then used the larger leaf stamp and the filler stamp to add the leaves. Much better proportions!

scissorspapercard, Stampin' Up!, CASEing The Catty, Daisy Delight, Fabulous Flamingo, Gingham Gala, Layered Leaves 3DTIEF, Daisy Punch

The daisy centre needed a little something, so I added this huge (retired) Iced Rhinestone. I think it finishes off the card quite nicely! How cute does the gingham daisy look? I just can't get enough of this DSP!

scissorspapercard, Stampin' Up!, CASEing The Catty, Daisy Delight, Fabulous Flamingo, Gingham Gala, Layered Leaves 3DTIEF, Daisy Punch

I often use 3 layers on my daisies, but this time it didn't look right. I'd already punched the third daisy, so I decided to use it on the inside rather than waste it. I just snipped it in half, layered it, and glued to it to corner of the cardstock, trimming it to fit.

That's it for me, now you're off to visit Siobhan's blog to see what fun she's had with the SAB Catalogue.


Don't forget to also pop by our Facebook group, where you can add your card to this week's challenge.  See you there!


Bye for now,

Tina

Wednesday, 21 February 2018

Beautiful Bouquet CASE

Hi!

Today's card is a CASE of this card by BJ Peters. I made it sometime last year as a class sample, and just haven't gotten around to blogging it until now. It's too pretty to stay hidden on my hard drive though!

scissorspapercard, Stampin' Up!, CASE, Beautiful Bouquet, Layered Leaves, Bouquet Bunch, Stitched Shapes

I loved BJ's card so much that I CASEd it nearly exactly. The only thing different is the embossing folder I used. I don't have the Ruffled 3D Dynamic TIEF, so I switched it for the Layered Leaves 3D Dynamic TIEF.

scissorspapercard, Stampin' Up!, CASE, Beautiful Bouquet, Layered Leaves, Bouquet Bunch, Stitched Shapes

Once you've completed all of the Big Shotting, this is actually a fairly quick and easy card to put together. The fiddliest bit is attaching all of the pearls. I've just noticed that one of mine must have fallen off somewhere along the way. Oops!

scissorspapercard, Stampin' Up!, CASE, Beautiful Bouquet, Layered Leaves, Bouquet Bunch, Stitched Shapes

BJ didn't show the inside of her card, so I had to improvise for mine. I simply stamped the stems and then added a couple more flower die cuts. I didn't stamp an inside sentiment so that the card could be used for a variety of 'Congratulations' purposes.

Thanks for the inspiration, BJ!

Bye for now,

Tina

Monday, 9 October 2017

Eclectic Colour Theory

Hi!

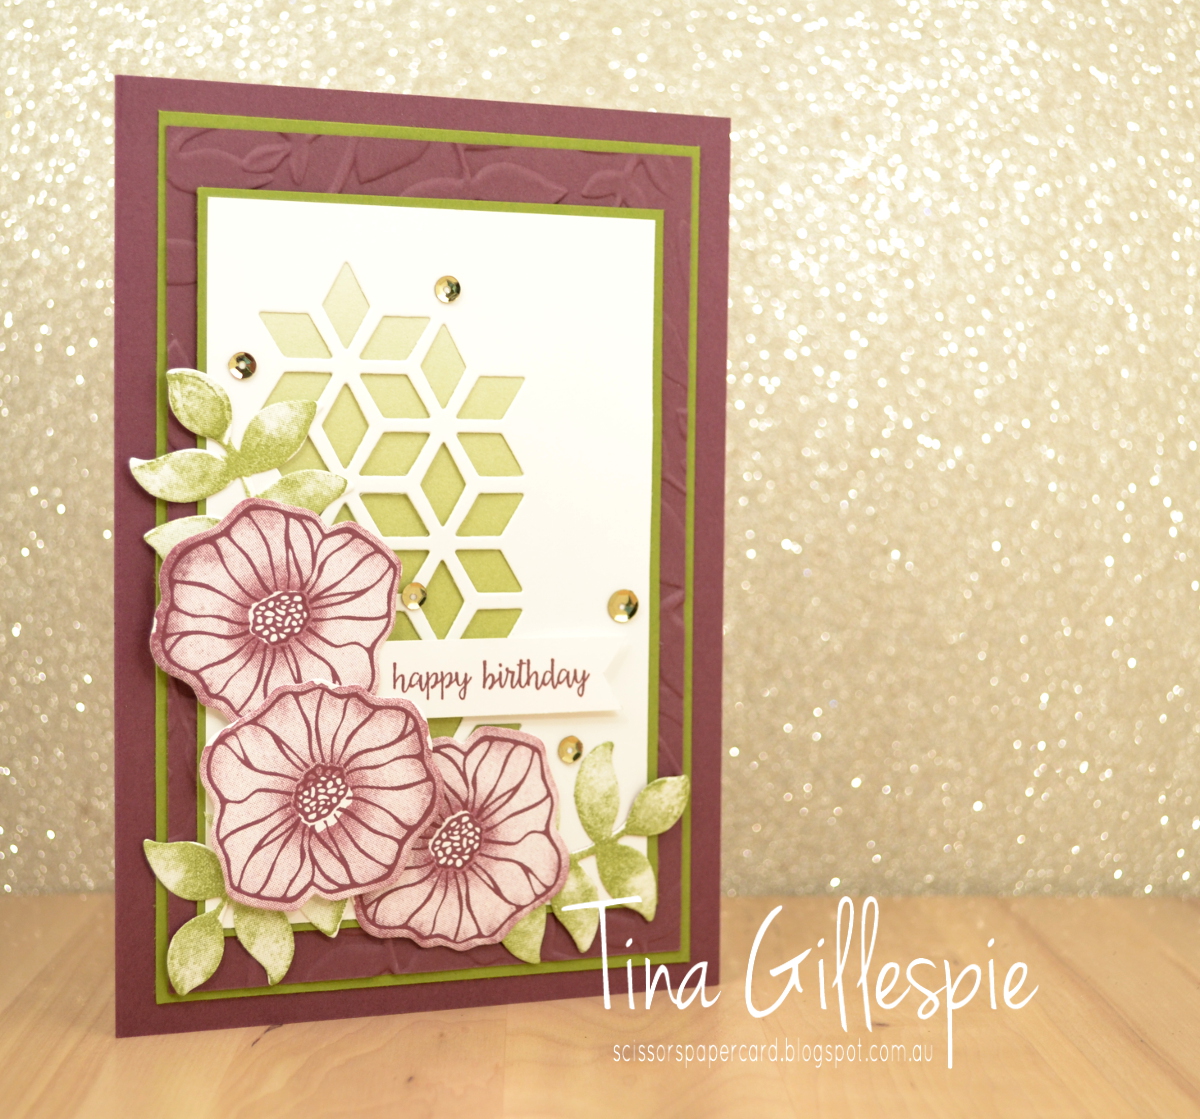
One of the DSP pack that is included in this month's Buy 3 Get 1 Free sale is the Colour Theory DSP stack. It's a great little 6x6 inch stack, that has lovely graduated colour pages. You can see the Old Olive paper behind the diamond grid die cut section in this card.

scissorspapercard, Stampin' Up!, Oh So Eclectic, Eclectic Layers, Happy Birthday Gorgeous, Colour Theory DSP, Layered Leaves

I recently purchased the Oh So Eclectic bundle and this was the first card I made with it. Do you ever buy a stamp set, die set or bundle just for one item? Sigh.... I have! In this case, I purchased the bundle just for that diamond grid die. I have come to love the rest of the bundle though.

scissorspapercard, Stampin' Up!, Oh So Eclectic, Eclectic Layers, Happy Birthday Gorgeous, Colour Theory DSP, Layered Leaves

There's lots of layers on this card - 6, not counting the flowers and leaves on the top. The colour combo of Fresh Fig, Old Olive and Very Vanilla is one I hadn't tried before, but I'm really loving it. What do you think?

scissorspapercard, Stampin' Up!, Oh So Eclectic, Eclectic Layers, Happy Birthday Gorgeous, Colour Theory DSP, Layered Leaves

Bye for now,

Tina