Hi!
It's Tuesday evening, so time for another Colour Creations Blog Share.
This week we are working with Daffodil Delight - a fun summery yellow that is always cheerful. I paired it with another colour from the Brights Collection - Bermuda Bay.
Once again I have used the smooshing technique. I will stop using the technique soon, I promise. Maybe...
I smooshed with the two colours, deliberately using the Bermuda Bay under where I planned to sit the Happy Birthday die cuts so that the Daffodil Delight would pop. The shadow effect created by offset layering the Bermuda Bay die cut underneath helps with that pop.
I used my Playful Backgrounds stamp to create a background on the inside that it a little bit like the smooshing on the outside. Close enough for me anyway!
You can see what the rest of the ladies have done with Daffodil Delight over on Catherine's blog. It's worth the look, everyone does such an amazing job each week!
Bye for now,
Tina
Showing posts with label Playful Backgrounds. Show all posts
Tuesday, 11 September 2018
Monday, 6 August 2018
A Fishy CASE
Hi!
I recently got around to purchasing the new set of Embossing Mats, and have been having some fun with them. As is often the case, I found a card to CASE for my first try with them. You can find the card I CASEd here at Kathy Maurer's blog. It was such a fun card that I couldn't resist CASEing it!
I kept the card pretty much the same - only a few minor changes. I switched the colour of the card base, simply because I didn't have enough of the colour Kathy used. I also used some retired epoxy dots to use for the air bubbles rather than rhinestones.
Can you see better in this picture - the long swirly die from Swirly Scribbles was used to emboss the cardstock base and represent waves? Perfect for the little fishies to swim in!
Kathy didn't show the inside of her card, so I was on my own here. I couldn't resist adding more fish and using the bubbles from my favourite background stamp underneath.
Bye for now,
Tina
I recently got around to purchasing the new set of Embossing Mats, and have been having some fun with them. As is often the case, I found a card to CASE for my first try with them. You can find the card I CASEd here at Kathy Maurer's blog. It was such a fun card that I couldn't resist CASEing it!
I kept the card pretty much the same - only a few minor changes. I switched the colour of the card base, simply because I didn't have enough of the colour Kathy used. I also used some retired epoxy dots to use for the air bubbles rather than rhinestones.
Can you see better in this picture - the long swirly die from Swirly Scribbles was used to emboss the cardstock base and represent waves? Perfect for the little fishies to swim in!
Kathy didn't show the inside of her card, so I was on my own here. I couldn't resist adding more fish and using the bubbles from my favourite background stamp underneath.
Bye for now,
Tina
Monday, 23 April 2018
A Magical Mermaid
Hi!
I love the whimsy of the Magic and Myths SDSP. Have you seen it in the Occasions Catalogue? It's retiring at the end of the Catalogue, so you need to get it before it's gone.
For this card, I have fussy cut one of the mermaids. How serene does she look? I've layered her on top of a Swirly Scribbles die cut, the was in turn layered over some stamped bubbles from the Playful Backgrounds stamp set.
I also fussy cut a few more elements from the SDSP - the seaweed, seahorse and the seashell. They were so cute, and I didn't want to waste them.
I carried over the bubbles to the inside. Playful Backgrounds is one of my favourite background sets, so I was very pleased to see that it's carrying over to the new Annual Catalogue.
Bye for now,
Tina
I love the whimsy of the Magic and Myths SDSP. Have you seen it in the Occasions Catalogue? It's retiring at the end of the Catalogue, so you need to get it before it's gone.
For this card, I have fussy cut one of the mermaids. How serene does she look? I've layered her on top of a Swirly Scribbles die cut, the was in turn layered over some stamped bubbles from the Playful Backgrounds stamp set.
I also fussy cut a few more elements from the SDSP - the seaweed, seahorse and the seashell. They were so cute, and I didn't want to waste them.
I carried over the bubbles to the inside. Playful Backgrounds is one of my favourite background sets, so I was very pleased to see that it's carrying over to the new Annual Catalogue.
Bye for now,
Tina
Thursday, 14 September 2017
JAI #377: Just Add Colour
Hi!
I'm a bit excited for this week's Just Add Ink challenge!
This week it's a colour combination, suggested by Rochelle, and I think it rocks! I love the mix of blues, and the addition of Lemon Lime Twist gives it a fresh lift. What do you think?
As I was very enthused about this combo, I decided to cut loose and have a lot of fun with it. You know that fun = mess, don't you? LOL
Would you believe that there are three different stamp sets used on this card? I started with the swooshy stamp in Playful Backgrounds in Pool Party. I then stamped some splatters from Swirly Bird in Dapper Denim over the top. I then got out my Embossing Paste and added some Lemon Lime Twist, before applying it over the top of the stamping using the diamond mask from the Pattern Party Decorative Masks.
While it dried, I stamped and watercoloured the images from Best Birds. I've had this bundle for a year and hardly used it - now that I've started playing with it, I'm not sure why I haven't done so before now. It's a great set!
I sort of ran out of room for a sentiment on the front, so I had to put it in the inside. I really tried on the front, but there wasn't anywhere to put it that didn't look tacked on. Oh well, sometimes it's good to break the rules and not put one on at all.
You can see what the rest of the Design Team have created with this fun colour combo this week over at the Just Add Ink blog. We'd love to see what you do with it too.
Bye for now,
Tina
I'm a bit excited for this week's Just Add Ink challenge!
This week it's a colour combination, suggested by Rochelle, and I think it rocks! I love the mix of blues, and the addition of Lemon Lime Twist gives it a fresh lift. What do you think?
As I was very enthused about this combo, I decided to cut loose and have a lot of fun with it. You know that fun = mess, don't you? LOL
Would you believe that there are three different stamp sets used on this card? I started with the swooshy stamp in Playful Backgrounds in Pool Party. I then stamped some splatters from Swirly Bird in Dapper Denim over the top. I then got out my Embossing Paste and added some Lemon Lime Twist, before applying it over the top of the stamping using the diamond mask from the Pattern Party Decorative Masks.
While it dried, I stamped and watercoloured the images from Best Birds. I've had this bundle for a year and hardly used it - now that I've started playing with it, I'm not sure why I haven't done so before now. It's a great set!
I sort of ran out of room for a sentiment on the front, so I had to put it in the inside. I really tried on the front, but there wasn't anywhere to put it that didn't look tacked on. Oh well, sometimes it's good to break the rules and not put one on at all.
You can see what the rest of the Design Team have created with this fun colour combo this week over at the Just Add Ink blog. We'd love to see what you do with it too.
Bye for now,
Tina
Wednesday, 26 April 2017
A Sugarplum Jar Of Love
Hi!
I've been a bit neglectful of my poor little blog lately! Today I have a post for you that celebrates some of my favourite stamps that are carrying over to the upcoming Annual Catalogue. I could get sad about the stuff I'm losing, but let's be happy and enjoy what's staying.
I love the bouquets you can create with the Jar Of Love stamp set, and the matching dies make cropping the images so easy! I also use the bubbly image from Playful Backgrounds a lot - as the name says, it really does make a playful background on a card.
I'm really looking forward to more opportunities to play with these stamp sets for another year at least.
How about you? Are there stamp sets or other products that you're glad aren't retiring?
Bye for now,
Tina
I've been a bit neglectful of my poor little blog lately! Today I have a post for you that celebrates some of my favourite stamps that are carrying over to the upcoming Annual Catalogue. I could get sad about the stuff I'm losing, but let's be happy and enjoy what's staying.
I love the bouquets you can create with the Jar Of Love stamp set, and the matching dies make cropping the images so easy! I also use the bubbly image from Playful Backgrounds a lot - as the name says, it really does make a playful background on a card.
I'm really looking forward to more opportunities to play with these stamp sets for another year at least.
How about you? Are there stamp sets or other products that you're glad aren't retiring?
Bye for now,
Tina
Wednesday, 30 November 2016
Happy Ornament Clear Block Stamping
Hi!
At the recent On Stage event, one of the stamping techniques we saw during a stamping demonstration was stamping with your clear blocks. I was very intrigued and decided to try it when I got home.
I used the new single stamp from the Holiday Catalogue called Happy Ornament. It was a stamp I overlooked a bit at first, but ended up buying, It's a great one for quick and easy Christmas cards.
So, onto the technique! To colour the bauble I scribbled on the clear block with my Tempting Turquoise marker, huffed on it, and then pressed the clear block to my cardstock to transfer the ink. You can repeat if you aren't happy with the result. I then stamped the bauble over the top and cut out just the bauble section with my snips. I stamped the bauble a second time, and adhered the coloured bauble over the top. I then coloured the rest of the bauble with my markers. Doesn't it look great?
I used the Playful Backgrounds bubbles on the background of the front, so I carried it over to the inside as well.
Bye for now,
Tina
At the recent On Stage event, one of the stamping techniques we saw during a stamping demonstration was stamping with your clear blocks. I was very intrigued and decided to try it when I got home.
I used the new single stamp from the Holiday Catalogue called Happy Ornament. It was a stamp I overlooked a bit at first, but ended up buying, It's a great one for quick and easy Christmas cards.
So, onto the technique! To colour the bauble I scribbled on the clear block with my Tempting Turquoise marker, huffed on it, and then pressed the clear block to my cardstock to transfer the ink. You can repeat if you aren't happy with the result. I then stamped the bauble over the top and cut out just the bauble section with my snips. I stamped the bauble a second time, and adhered the coloured bauble over the top. I then coloured the rest of the bauble with my markers. Doesn't it look great?
I used the Playful Backgrounds bubbles on the background of the front, so I carried it over to the inside as well.
Bye for now,
Tina
Friday, 24 June 2016
JAI #317: Just Add Colour
Hi!
Yes, it's that time of the week again!
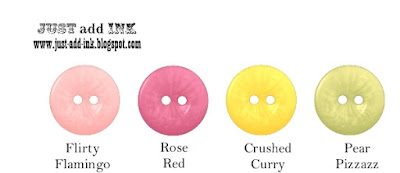
This week Kim has put together a fantastic colour combination for our Just Add Ink challenge.
What a lovely collection of pinks and yellow/greens. I immediately thought florals, but when I looked at my new stamp sets I suddenly got a flash of inspiration.
I've used the new set, Mixed Drinks to create a row of cocktail-looking drinks. I stamped the glasses and was all set with my inkpads and blender pens to colour to get the look of the liquid, when I realised the stamp set had a liquid stamp. So easy!
After I'd finished stamping I went over the drinks with my clear Wink Of Stella pen to give them a bit of shimmer. Hopefully you can see it in the Rose Red cocktail on the left. I stamped the background of the card with another new stamp set - Playful Background. I thought the bubble-like stamp might help invoke thoughts of bubbly cocktails.
The cocktail on the inside is Flirty Flamingo. LOL, I just realised that Flirty Flamingo could be a cocktail name!
The rest of the Design Team at Just Add Ink have made some stunning cards this week using Kim's gorgeous colour combination. You can head over to the blog to check them out.
Bye for now,
Tina
Yes, it's that time of the week again!
This week Kim has put together a fantastic colour combination for our Just Add Ink challenge.
What a lovely collection of pinks and yellow/greens. I immediately thought florals, but when I looked at my new stamp sets I suddenly got a flash of inspiration.
I've used the new set, Mixed Drinks to create a row of cocktail-looking drinks. I stamped the glasses and was all set with my inkpads and blender pens to colour to get the look of the liquid, when I realised the stamp set had a liquid stamp. So easy!
After I'd finished stamping I went over the drinks with my clear Wink Of Stella pen to give them a bit of shimmer. Hopefully you can see it in the Rose Red cocktail on the left. I stamped the background of the card with another new stamp set - Playful Background. I thought the bubble-like stamp might help invoke thoughts of bubbly cocktails.
The cocktail on the inside is Flirty Flamingo. LOL, I just realised that Flirty Flamingo could be a cocktail name!
The rest of the Design Team at Just Add Ink have made some stunning cards this week using Kim's gorgeous colour combination. You can head over to the blog to check them out.
Bye for now,
Tina
Subscribe to:
Posts (Atom)