Pages

Showing posts with label Seaside Notions. Show all posts

Wednesday, 5 May 2021

Colour Creations: Smoky Slate

 Hi!


Here we go again with the Colour Creations Creative Showcase, and this time we are looking at Smoky Slate. It's usually more of a background colour, I guess, so making it a feature was a little tricky! I love pairing crisp white with grey, so it was a no-brainer to go with the combo for my card.

scissorspapercard, Stampin' Up!, Colour Creations, Forever Fern, Forever Flourishing Dies, Painted Labels Dies, Subtle 3DEF, Seaside Notions

I started with the Forever Fern stamp set, stamping a few of the different fern images in Smoky Slate ink and cropping them with the matching Forever Flourishing Dies.

scissorspapercard, Stampin' Up!, Colour Creations, Forever Fern, Forever Flourishing Dies, Painted Labels Dies, Subtle 3DEF, Seaside Notions

The labels are from the Painted Labels Dies. The largest was used to crop some Silver Foil, and the smaller the Whisper White card that the sentiment, from Seaside Notions, was stamped on. A few Rhinestones finishes off the front.

scissorspapercard, Stampin' Up!, Colour Creations, Forever Fern, Forever Flourishing Dies, Painted Labels Dies, Subtle 3DEF, Seaside Notions

The inside is just more of the same die cut and images from the front. I'd stamped and cut a heap, so I had plenty left over!

It's time now to pop on over to Cathy's blog, where you'll find the rest of this week's Smoky Slate cards.

Bye for now,

Tina

Sunday, 18 April 2021

CTC 314: Favourite Retiring Punch

 Hi!


Welcome back to me log for the new CASEing The Catty Sunday Challenge Blog Hop. Do you like CASEing projects from Stampin' Up! catalogues? If so, this is the challenge for you! Each week we are set a challenge to CASE some aspect of the catalogue. This week we are farewelling our Favourite Retiring Punch.


I had a hard time choosing  a punch this week, but I ended up going for my 2" Circle punch. It's one that I use a lot, and will stay in my collection even though it's retiring from the SU range. It's a convenient punch to own!


Flipping through the catalogue, I found the High Tide card above that uses circles so nicely! I love how different parts of the scene are in the different circles. I found a few images from the retiring stamp set, Seaside View, floating around on my stamp desk, so I decided to see how they'd go using the technique.

scissorspapercard, Stampin' Up!, CASEing The Catty, Seaside View, Seaside Notions, Whale Of A Time DSP, Stitched Nested Labels Dies, Stampin' Blends

I started by colouring the whole image with my Stampin' Blends. I then took my 2"Circle punch and cropped the middle section of the image. I then used the same punch to crop the rest of the image on both sides of the middle These were then layered over layers of Grey Granite and Basic Black cardstock cropped using my Stitched Nested Labels Dies, which are also retiring.

scissorspapercard, Stampin' Up!, CASEing The Catty, Seaside View, Seaside Notions, Whale Of A Time DSP, Stitched Nested Labels Dies, Stampin' Blends

Here you can see how I popped the middle circle up on Dimensionals, while the two outside pieces are flat. Another retiring punch, Classic Label, cropped the sentiment from the retiring Seaside Notions stamp set. The final piece of the card was the DSP from the Whale Of A Time pack which, you guessed it, is also retiring.

scissorspapercard, Stampin' Up!, CASEing The Catty, Seaside View, Seaside Notions, Whale Of A Time DSP, Stitched Nested Labels Dies, Stampin' Blends

For the inside, I sponged a little Pacific Point ink into the corner and then layered another image from the Seaside View set over the top. I didn't stamp a sentiment on the inside, as I think the card is more versatile without an inside sentiment. It could be a retirement card, birthday card, or just a congrats card as it is.

That's all from me tonight, but the fun is just starting for you. Which retiring punch is your favourite? Is there one that you can't bear to let go of? We'd love to see the card you make using it. Just add your photo to our Facebook group before next Sunday night and you're all set!


In the meantime, though, please do continue on with the Blog Hop, as there's still lots to see. Next up is the lovely and talented Julia. She's got a pair of super sweet cards for you.

Bye for now,

Tina

Wednesday, 31 March 2021

Colour Creations: Rococo Rose

 Hi!


Welcome back to my blog for the new Colour Creations Creative Showcase. This week we are featuring one of the soon to be retired In Colours - Rococo Rose. At this start of this Showcase series, I would have described it as a dirty pink, but I have changed my ways and will now describe it as a dusky mid-pink. LOL! It's duskiness is what makes it a favourite pink that I will have a bit of trouble saying goodbye to.

scissorspapercard, Stampin' Up!, Colour Creations, Beautiful Friendship, Seaside Notions, Stitched Shapes Dies, Layering Ovals Dies

Another thing that I will have trouble farewelling is the gorgeous Beautiful Friendship stamp set. I'm not really big on floral stamp sets, but I loved how this one does all the hard work for you because the stamp itself is designed to leave different intensity of ink for different parts of the image.

scissorspapercard, Stampin' Up!, Colour Creations, Beautiful Friendship, Seaside Notions, Stitched Shapes Dies, Layering Ovals Dies

I also used another favourite, retiring, stamp set for the sentiments - Seaside Notions. It's been a go-to set this year, especially for the sentiments, as I love the mix of fonts and the size is usually perfect. Speaking of retiring, I have cropped the sentient with one of the dies in the Stitched Shapes set, which is also retiring. Sob! The Layering Oval underneath is also on the way out.

scissorspapercard, Stampin' Up!, Colour Creations, Beautiful Friendship, Seaside Notions, Stitched Shapes Dies, Layering Ovals Dies

I stamped the flower stamens in Memento ink, and then dotted over the top of them with a white gel pen. It helps to soften the starkness of the black ink.

That's all from me for tonight, but please do pop on over to Cathy's Blog, where you'll find the rest of this week's Rococo Rose cards. I can't wait to see what everyone has made!

Bye for now,

Tina

Sunday, 10 January 2021

CTC #300: CASE Any Mini Catalogue Project

 Hi!


Thanks for joining me for the newest CASEing The Catty Sunday Challenge Blog Hop. This week Bec has set the challenge for us to CASE any project from the new January-June Mini Catalogue. There's over 90 pages of delightful inspiration to choose from!


Have you guessed yet? Yep, I started my flicking from the back of the catalogue 😂. It wasn't long until I found this beauty on page 88.


I loved the way the card layered two patterns - DSP and a stamped DSP layer. A also adored the layering around  the sentiment and the focal bloom. I think it's a hydrangea? LOL, I am soooo not a gardener! I don't have any of the products used in the catalogue card, so I had to get inventive.

scissorspapercard, Stampin' Up!, CASEing The Catty, Dandy Garden DSP, Seaside Notions, Dragonflies Punch, Banners Pick A Punch

I had some Dandy Garden bits and pieces floating around on my desk, so I decided that they would work nicely for this card. I used two pieces of the DSP for my background, layered on a Calypso Coral card base. I changed the layers from the original by making them smaller and gluing each one at an angle.

scissorspapercard, Stampin' Up!, CASEing The Catty, Dandy Garden DSP, Seaside Notions, Dragonflies Punch, Banners Pick A Punch

The Coral dragonfly was punched from another piece of the DSP, I layered him over a piece of Seaside Spray cardstock that I'd stamped the sentiment on in Misty Moonlight ink. I punched the piece using my Banners Pick A Punch, which I was excited to see was a carry over product. Yay! A length of white ribbon from the Flowers For Every Season combo pack, some more Calypso card and a circle of Vellum completed the front of the card.

scissorspapercard, Stampin' Up!, CASEing The Catty, Dandy Garden DSP, Seaside Notions, Dragonflies Punch, Banners Pick A Punch

I finished off the inside with another strip of DSP to match the front. It's one of my favourite pieces from the DSP pack. The sentiment is from Seaside Notions, as is the one on the front. 

That's all from me for tonight, but now it's your turn to get creative! Make your card and upload it into our Facebook group to be in the running!


Before you dash off, though, please do finish our Blog Hop! Next up is the wonderful Rose! I wonder which card she's CASEd tonight?


Bye for now,

Tina

Sunday, 22 November 2020

CTC #295: CASE The Inside AC Cover

 Hi!


Thanks for joining me on a hot and thundery Sunday evening for the new CASEing The Catty Sunday Challenge Blog Hop. Was it hot and thundery where you were? It certainly was here in Adelaide!


This week for our challenge, we are CASEing these In Colour cards from the inside cover and page 1 of the Annual Catalogue. 


I quite liked the split in this card, with the sentiment stamped in the gap, so that's what I took from the sample card to make mine.

scissorspapercard, Stampin' Up!, CASEing The Catty, Seaside Notions, Whale Of A Time DSP

I've only recently purchased the Whale Of A Time DSP, so this was a good excuse to play with it again.I chose the seahorse paper, as it was a pretty, all-over pattern like the floral on the original card. However, I decided to split my paper horizontally rather than on the diagonal. I adhered the DSP to some pieces of Thick Whisper White, leaving a small border as there was a similar border on the original.

scissorspapercard, Stampin' Up!, CASEing The Catty, Seaside Notions, Whale Of A Time DSP

The sentiment from Seaside Notions was heat embossed in White on the card base. I felt that the card was too plain, so I also heat embossed a seahorse from the same stamp set on Watercolour Paper and coloured it with Just Jade ink.

scissorspapercard, Stampin' Up!, CASEing The Catty, Seaside Notions, Whale Of A Time DSP

I used the left over piece of DSP on the inside of the card. I normally wouldn't use such a big piece, but I didn't want to lose the Seahorses by cutting it in half. I will just have to write my message a little smaller!

We'd love to see which of the five cards inspires you to CASE it. Will you CASE the whole card, or just elements of it? When you've made your card, please post it in our Facebook group. We'd all love to see it.


For now though, please do continue on with the Blog Hop. Next up is my lovely friend, Rachel. Her lovely projects are what convinced me that I had to have the Whale Of A Time DSP!

Bye for now,

Tina

Thursday, 12 November 2020

AWH Creative Showcase: 5 Supplies

 Hi!


Thanks for joining me for the November Art With Heart Creative Showcase. This month we have been challenged to make a project using only 5 supplies. We decided that things like adhesives, snips, clear blocks, trimmers, etc did not count in our limit, but other things like DSP, ink, stamp sets, etc do count!

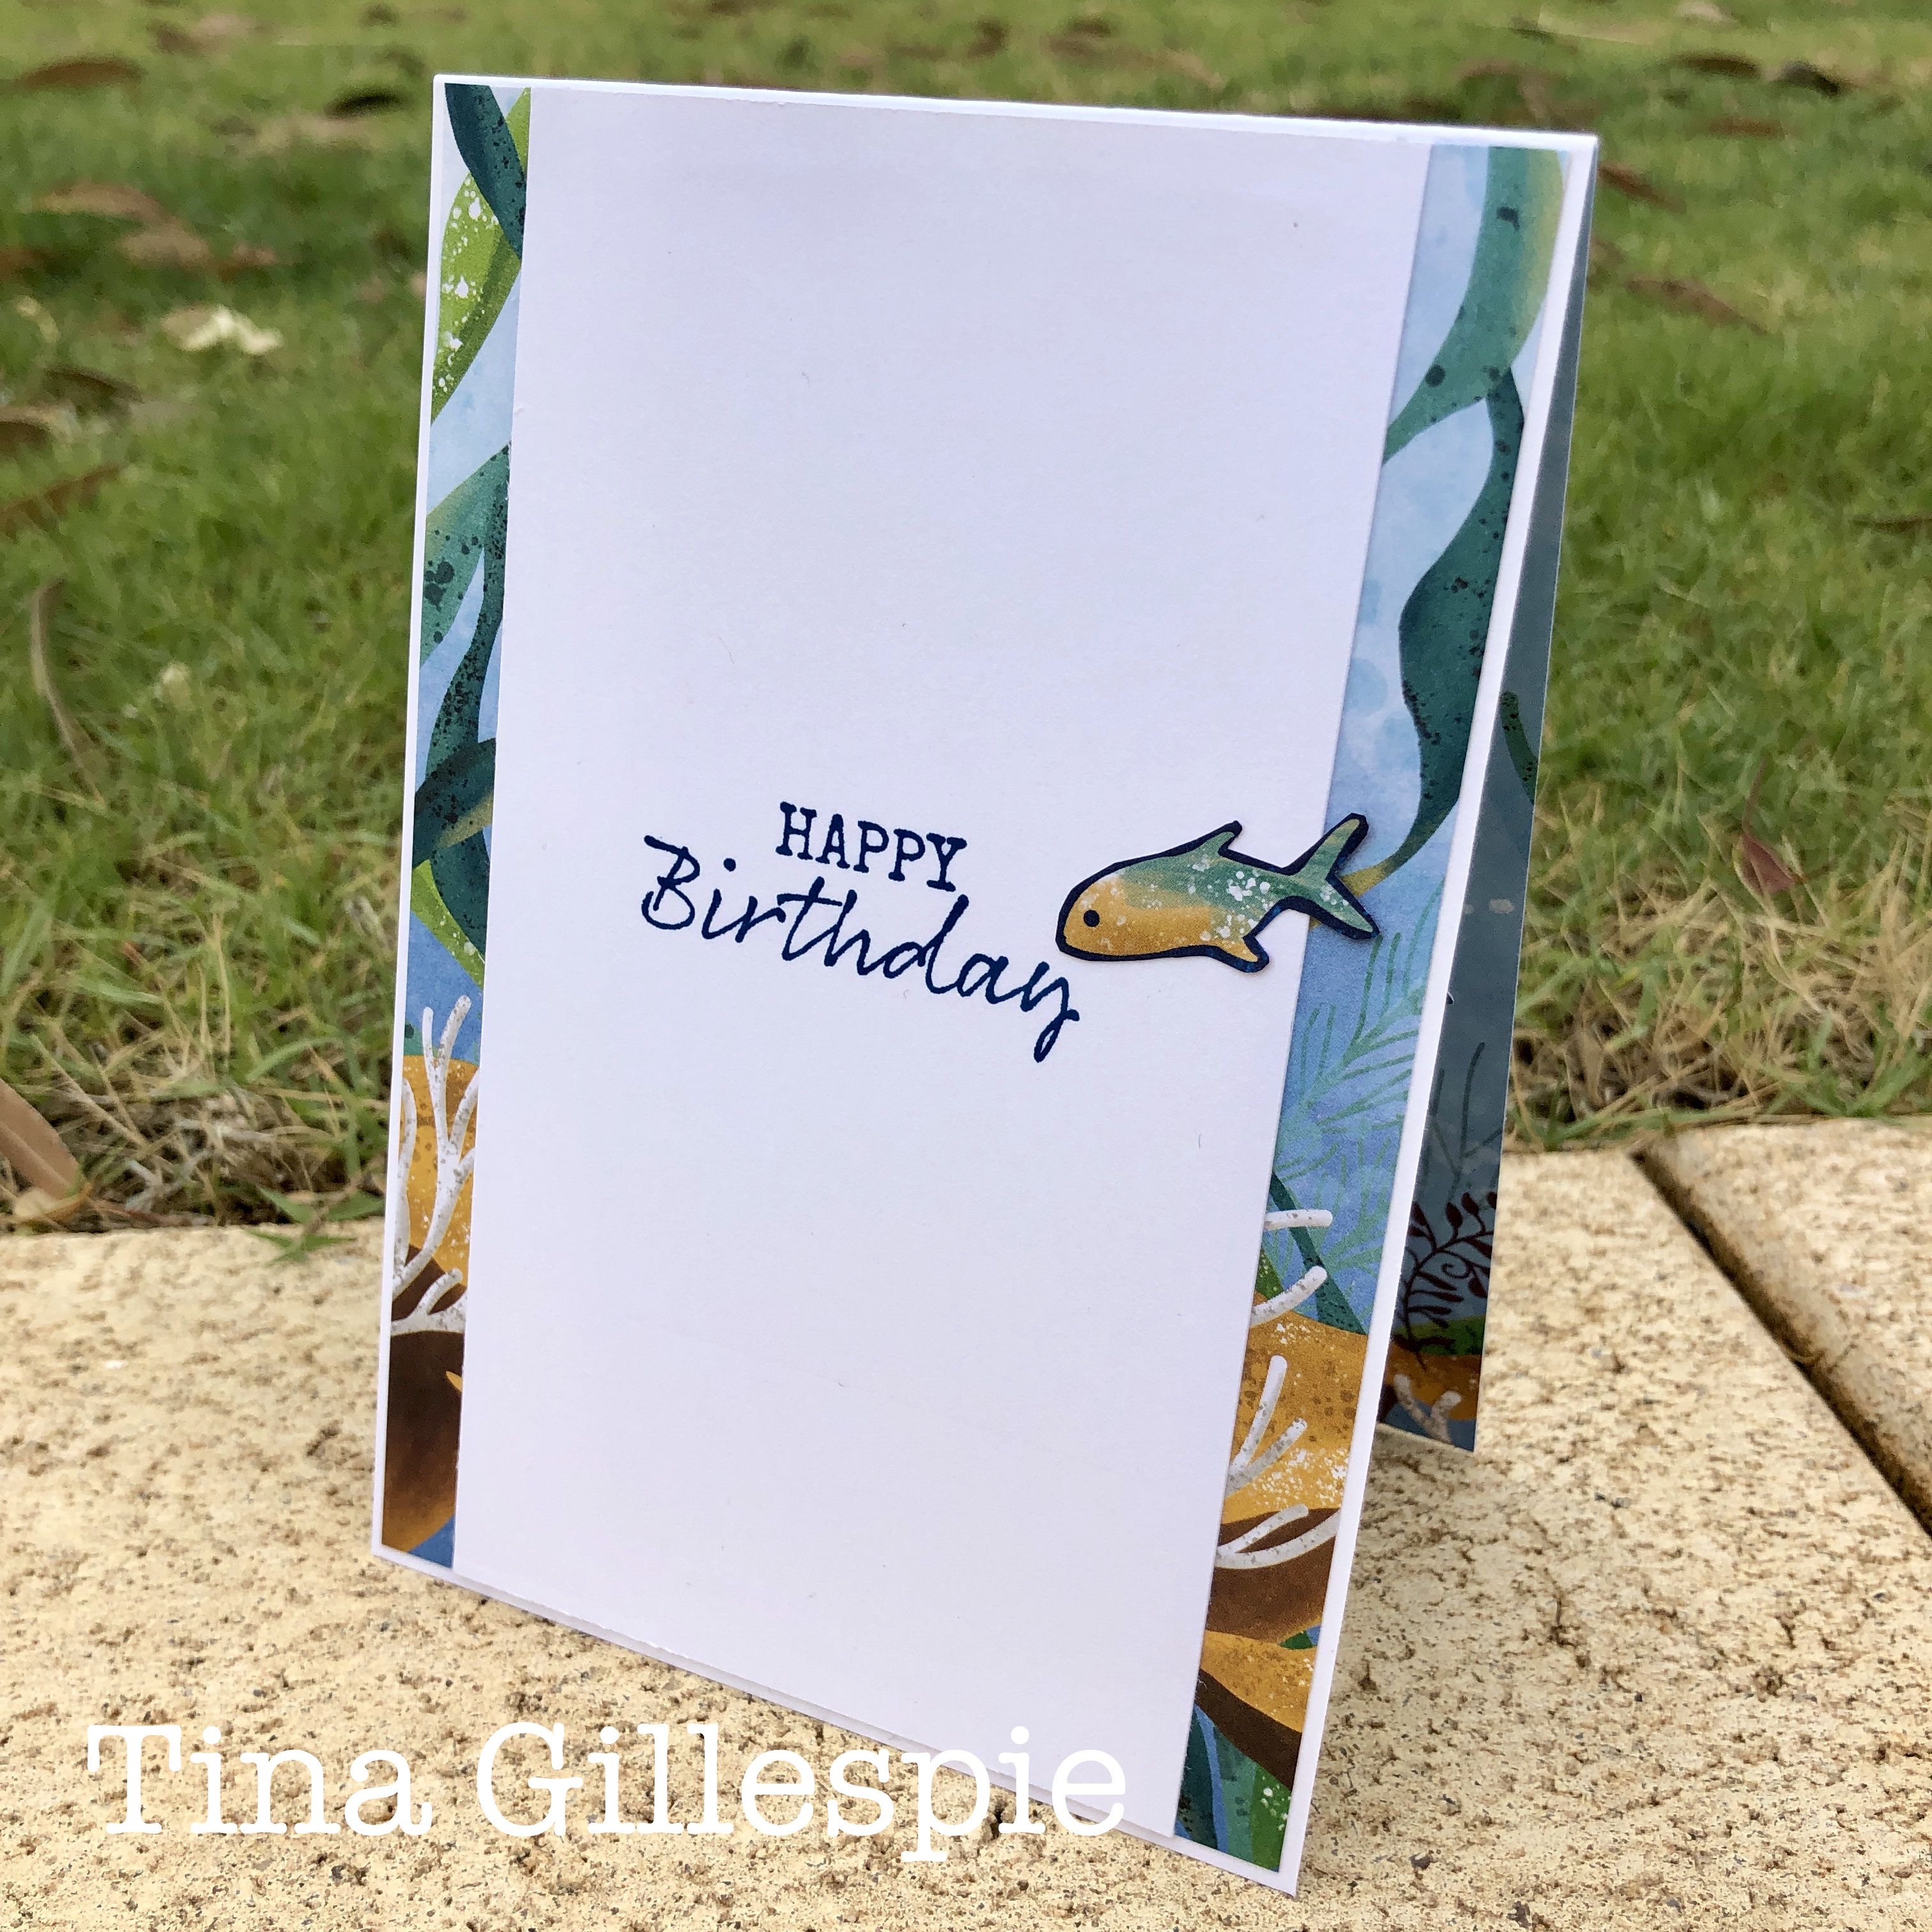
I decided to use the opportunity to crack open one of the DSP packs that I purchased in the recent DSP sale - Whale Of A Time DSP. I was really attracted to the scenes in the DSP, so that's the direction I went on my card. I actually came in 'under budget' on my supply list - I only used 4! They were the Whale Of A Time DSP, Thick Whisper White cardstock, Seaside Notions and my Pacific Point ink pad.

scissorspapercard, Stampin' Up!, Creative Showcase, Whale Of A Time DSP, Seaside Notions

I started by trimming the DSP to size and adhering it to a Thick WW card base. I trimmed an inch off either side of the DSP, as I wanted the beam of light at the top of the paper to stay in the middle of the card. Normally, I'd use a darker card base that coordinated with the DSP, but that would have been an extra item on my 5 supplies list. By making the DSP edge to edge, it doesn't matter what colour the base is!

scissorspapercard, Stampin' Up!, Creative Showcase, Whale Of A Time DSP, Seaside Notions

The fish were roughly cut from another sheet of the DSP and glued to some scraps of Thick WW, before being fussy cut and popped up on the front. I had planned to stamp the sentiments on WW, but they would have been a bit too glaring white. Instead, I stamped them on the water section of one of the pieces cropped from the sides of the DSP I used on the front. This way, they match perfectly! So that they matched the fish with the darker blue border, I glued the fussy cut sentiments to the dark blue part of the DSP that the fish came from. It's the sheet with the fish swimming around the edge. I then fussy cut them again to give the blue border.

Before I move on - did you catch the pun in the sentiment? Birthday 'fishes' to you! LOL!

scissorspapercard, Stampin' Up!, Creative Showcase, Whale Of A Time DSP, Seaside Notions

I had one last strip of DSP that I trimmed from the piece I used on the front of the card. I cut it in half and adhered one piece on either side of the inside, with a piece of Thick WW adhered over the top. It's a cool way to use a scrap, don't you think? I couldn't resist adding another little fishie!

It was a bit harder than I thought, making a card with limited supplies! I tend to make things up as I go along, but limited supplies requires a little more planning and thought. It was certainly fun to try though. I hope you're keen to see what the rest of the ladies participating in the Creative Showcase tonight have made. Pop on over to Rachel's blog, where you'll find the rest of this month's links.

Bye for now,

Tina

Wednesday, 30 September 2020

Colour Creations: Gorgeous Grape

 Hi!


Hooray for Colour Creations Showcase time! This week we are looking at Gorgeous Grape, which is a colour that I like, even though I don't use it much. It's in the Brights colour family and pairs beautifully with Highland Heather. Like all of my Colour Creations cards this year, I have opted to use it on it's own, with just neutral colours.

scissorspapercard, Stampin' Up!, Colour Creations, A Good Man, Seaside Notions, Forever Gold SP

Hehe, I was watching The Block while I was making this card and guess what rooms they were working on? Yep, bathrooms! So many bathrooms feature subway tiles and it's a look I really like, so I decided to incorporate it into my card. I started with a 5 x 7 inch piece of Gorgeous Grape cardstock, which I backed with a similarly sized piece of Adhesive Sheet. I then chopped up the piece to create 10 strips that were 1/2 x 7 inches. These were then adhered to a 5 x 7 inch piece of Basic Black cardstock, leaving a small gap between each strip - the Adhesive Sheets make this a super easy task!  After applying a second 5 x 7 inch piece of Adhesive Sheet to the back of this piece, I turned it sideways and cut it into 1/4 x 5 inch strips. As with the first strips, these were adhered to a second 5 x 7 inch piece of Basic Black cardstock, leaving gaps between each one. This time, however, I staggered the placement of the strips so that I got the brick wall pattern. All that was left to do was to trim the piece to be card front size and adhere it to my Basic Black base. 

scissorspapercard, Stampin' Up!, Colour Creations, A Good Man, Seaside Notions, Forever Gold SP

To finish the front, I selected a wreath design from my Forever Gold Laser Cut Paper pack and adhered it using some glue dots. A few flowers with Gorgeous Grape Rhinestones in the centre, a Gold Twine bow and a sentiment from A Good Man and it was done. I didn't want to cover up too much of the background!

scissorspapercard, Stampin' Up!, Colour Creations, A Good Man, Seaside Notions, Forever Gold SP

The reason I created such a large background before trimming it down was so that I could use a left over piece on the inside. It's so much easier to do it all in one go, even if you end up needing a bit of muscle to trim all the layers down!

As always, Catherine is playing Hostess for our Creative Showcase. You can find the links to the rest of this week's Gorgeous Grape posts over on her blog.

Bye for now,

Tina

Wednesday, 23 September 2020

Colour Creations: Garden Green

Hi! 


Thanks for joining me again for the new Colour Creations Creative Showcase. This week it's the turn of Garden Green. It's a Goldilocks green - not too dark, not too light, but just right! I don't use green a lot, but when I do Garden Green is one of the greens I tend to consider first.

scissorspapercard, Stampin' Up!, Colour Creations, Butterfly Duet Punch, Free As A Bird, Seaside Notions, Regals DSP

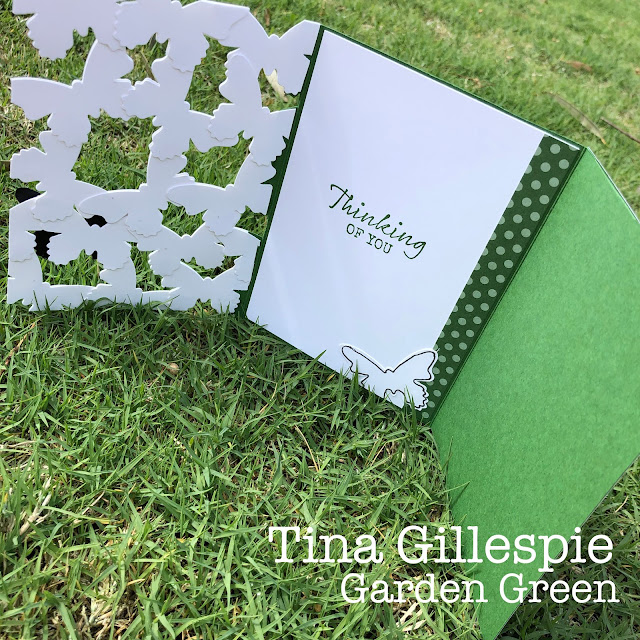
This week I revisited a technique that I'd tried a while ago. It's one by Jennifer MacGuire, where she used die cuts to create a layer card front. Last time I used daisies, this time it is butterflies. I just punched a heaps from Thick Whisper White and layered them until they were large enough to be a card front. I adhered them together at the points of overlap.

scissorspapercard, Stampin' Up!, Colour Creations, Butterfly Duet Punch, Free As A Bird, Seaside Notions, Regals DSP

They didn't quite have enough definition, so I used a fine tip marker to hand-draw around the edges of each butterfly. I then added a few of the little butterflies and a large black butterfly, each given a coat of Clear Wink Of Stella. I heat embossed the sentiment from Free As A Bird onto Garden Green cardstock and double punched it with my Classic Label Punch.

scissorspapercard, Stampin' Up!, Colour Creations, Butterfly Duet Punch, Free As A Bird, Seaside Notions, Regals DSP

The card is a tri-fold, so that I could add a plain background behind the butterflies. It then opens up again for the writing panel. I added another hand-outlined butterfly, a piece of left over DSP and the sentiment from Seaside Notions.

That's all from me tonight. As always, please head on over to Catherine's Blog, where you'll find the rest of this week's Garden Green cards.

Bye for now,

Tina

Sunday, 26 July 2020

CTC #278: CASE Your Favourite Annual Catalogue Project

Hi!


It's time once again for the new CASEing The Catty Sunday Challenge Blog Hop, which marks the start of our new challenge.


This week we are asking you to CASE your favourite project from the 2020-21 Annual Catalogue. That's a whopping 192 pages (plus covers) of visual artistry to select from!


I ended up choosing this cute Playful Pets card from page 41. I have so many favourites from the catalogue, so I ended up choosing this one with the idea that I could step it up.

scissorspapercard, Stampin' Up!, CASEing The Catty, Playful Pets DSP, A Good Man, Seaside Notions, Stitched Rectangles Dies, Banners Pick A Punch, Wiggly Bugs Dies, Rainbow Builder Dies

The card in the catalogue has a sponged background for the pets. To step it up I chose to use a die cut grass border in two layers. I used my retired Wiggly Bugs Dies, but the Special Day Dies also have a grass border. The pets were fussy cut from the Playful Pets DSP, as I don't own the stamp set. 

scissorspapercard, Stampin' Up!, CASEing The Catty, Playful Pets DSP, A Good Man, Seaside Notions, Stitched Rectangles Dies, Banners Pick A Punch, Wiggly Bugs Dies, Rainbow Builder Dies

It's very subtle, but I used a piece of Window Sheet, cut with a retired cloud die, to create a sponged cloudy sky background for the pets. The banner for the sentiment was cropped using my new Banners Pick a Punch punch. It's definitely a handy punch to own!

scissorspapercard, Stampin' Up!, CASEing The Catty, Playful Pets DSP, A Good Man, Seaside Notions, Stitched Rectangles Dies, Banners Pick A Punch, Wiggly Bugs Dies, Rainbow Builder Dies

I fussy cut another two pets for the inside of my card. These two look like they have just got back from a walk, not like the more energetic pets on the front of the card!

Our challenge is run through our Facebook Group, so if you'd like to play along you need to join the group so that you can post your card there. It's as easy as that! I think the hard part this week will be choosing which card to CASE.


Next you're off to visit Michelle's blog. She's made a pair of super adorable cards using some new August-December Mini Catalogue products.


Bye for now,

Tina