Pages

Showing posts with label Wizard Friends. Show all posts

Thursday, 23 October 2025

JAI 772: Colour & Inspiration

 Hi!


Welcome to the new Just Add Ink Challenge. We have changed to fortnightly challenges to give you more time to play along with us. This fortnight we have a fun Inspiration and Colour palette for you to play with.


This was a tricky one for me, as it screams Halloween, but I don't usually make and send Halloween cards. The witches hats on the cupcakes made me think of witches and wizards, and knowing my collection of pop culture stamps, you can probably guess where that led.


I started with the Witches & Wizards No 2 paper pack from Echo Park Paper Co. Both the background paper (which features witches hats and pumpkins) and the sentiment panel are from the pack. I love it when cards come together that easily!


The young wizard is from a Kindred Stamps set, called Wizard Friends. I coloured him with my Stampin' Blend markers and popped him up over the sentiment panel. To add a bit of bling, I dotted a small amount of glitter glue to the sparkles on the sentiment panel.

On the inside I used more stamps from the Wizard Friends set to decorate the inner. 

Thanks for stopping by my blog. We'd love for you to play along with us. You can pop on over to the Just Add Ink blog, where you'll find the rest of the Design Team cards. You'll also be able to link up your card to the challenge gallery using Mr Linky. Don't forget that you now have two weeks to get your entry in,

Bye for now,

Tina

Monday, 5 September 2022

FMS 551

 Hi!

EDIT: How exciting, my card was chosen as a Princess of Clean!


Just a quick post today with my entry for the current Freshly Made Sketches challenge. I've made a magical card this week!

scissorspapercard, Kindred Stamps, Echo Park, Freshly Made Sketches, Wizard Friends, Witches & Wizards DSP, Copics, Pop Culture

The paper is from a couple of Echo Park Witches & Wizards packs. I thought that the shelves of books were a great choice for the three lines in the sketch. I've made the sketch a smaller component of the card, just for something different.

scissorspapercard, Kindred Stamps, Echo Park, Freshly Made Sketches, Wizard Friends, Witches & Wizards DSP, Copics, Pop Culture

The stamped images are from one of the very first Kindred Stamps sets that I purchased, called Wizard Friends. It's long-retired now, but still has a treasured spot in my collection. I coloured her with my Copics. Hopefully you can see the swirl of stars that is very lightly stamped behind her.

scissorspapercard, Kindred Stamps, Echo Park, Freshly Made Sketches, Wizard Friends, Witches & Wizards DSP, Copics, Pop Culture

I've stamped the same starry swirl behind the word 'Magical' on the inside of my card. I can hear a magical swishing sound every time I look at it, LOL! Of course, I added another shelf of books to the inside. I think that the Witch on the front of my card would agree with more books, not less.

Bye for now,

Tina

Thursday, 6 May 2021

JAI 553: Just Add A Sketch

 Hi!


Hello, and welcome to Friday and the new Just Add Ink challenge. This week Kelly has designed a really cool sketch for us to use.


In case you haven't worked it out by now, me and my family are huge Harry Potter fans. I've been wanting to make a HP card using the Suit & Tie dies since I purchased them, and this sketch gave me the opportunity.

scissorspapercard, Stampin' Up!, Just Add Ink, Kindred Stamps, Suit & Tie Dies, In Good Taste DSP, Wizard Friends, Magic Planning

All I did was pull the four thin strips in the sketch to the front, rather than under the main panel. Four house ties later, and the card was nearly done! The sentiment is from a long-retired Kindred Stamps set, called Wizard Friends.

scissorspapercard, Stampin' Up!, Just Add Ink, Kindred Stamps, Suit & Tie Dies, In Good Taste DSP, Wizard Friends, Magic Planning

To create the ties, I cut one each of a full tie and the knot piece from Cherry Cobbler, Blueberry Bushel, Crushed Curry and Shaded Spruce cardstock. For the strips, I added a piece of Adhesive Sheet to the back of the appropriate colour and used my Mini Trimmer to cut thin strips, some wider than others. I adhered the stripes to the first tie and then, to get the ties to match, I laid the next tie over the top. By doing this, I was able to line up the strips exactly with the tie underneath. Once I'd finished the second tie, I lifted it off the first, trimmed the strips and moved onto the next. A bit fiddly, but worth it, I think!

scissorspapercard, Stampin' Up!, Just Add Ink, Kindred Stamps, Suit & Tie Dies, In Good Taste DSP, Wizard Friends, Magic Planning

I was a bit lot over making ties by the time I got to the inside, so I settled with stamping a tie image from another Kindred Stamps set, called Magic Planing. I used my Stamparatus to line them up, and stamped them in the matching inks as the ties on the front. The card is 5 inches square, so it leaves plenty of room for writing a message!

That's all from me tonight, but please do pop on over to the Just Add Ink blog, where you'll find the rest of this week's Design Team cards. They are all as wonderful as usual! We can't wait to see the wonderful card you make with the sketch as your inspiration.

Bye for now,

Tina

Thursday, 10 December 2020

JAI #535: Just Add Magical Creatures

 Hi!


Thanks for joining me for the new Just Add Ink challenge. It's one I've been looking forward to doing since we got our schedule of challenges. It was a great idea from Kelly!


Just Add Magical Creatures - that's right up my alley! The hardest part for me was deciding which stamps to use. In the end I settled on a set that I hadn't used yet, called Forrest Elves from Kindred Stamps.

scissorspapercard, Stampin' Up!, Kindred Stamps, Just Add Ink, Forrest Elves, Wizard Friends, Waterfront, Lovely As A Tree, Copic Markers

I started by stamping my Elven Queen on a piece of Whisper White and then used a sticky note to mask her off. The big tree from the retired favourite, Lovely As A Tree, was stamped behind her to create a forrest. I then masked the area for the moon and used a blending brush to add ink for the sky and ground. The sentiment is from another Kindred Stamps set, called Wizard Friends.

scissorspapercard, Stampin' Up!, Kindred Stamps, Just Add Ink, Forrest Elves, Wizard Friends, Waterfront, Lovely As A Tree, Copic Markers

The moon had a tiny bit of Soft Suede ink added. I just used the dirty brush I'd used to create the ground, as I only wanted minimal ink. I then stamped some of the splatters from Waterfront over the top to give the look of craters in the moon. I used the same stamp for the forrest floor. The Queen was coloured using my Copic Markers in the softest blues, greens and yellows that I own. I went a bit bolder for her hair and her amulet. I liked that the masking left a bit of a halo around her, as it looks a little like she is glowing - very elvish!

scissorspapercard, Stampin' Up!, Kindred Stamps, Just Add Ink, Forrest Elves, Wizard Friends, Waterfront, Lovely As A Tree, Copic Markers

The inside sentiment says 'I love you' in Elvish, so I will likely give this card to my daughter or someone very close to me.

Which Magical Creature will you choose to add to your card? I nearly went with Santa, but I'm a little ready to be finished with Christmas cards, so I chose something fun instead. The Design team have had fun with this challenge, and you can see their cards over on the Just Add Ink blog, where you can also link up your card.

Bye for now,

Tina

Thursday, 8 October 2020

JAI #526: Just Add Inspiration

 Hi!


Welcome back to the new Just Add Ink Challenge. This week Jo has found a really funky Inspiration Photo for us to be inspired by.


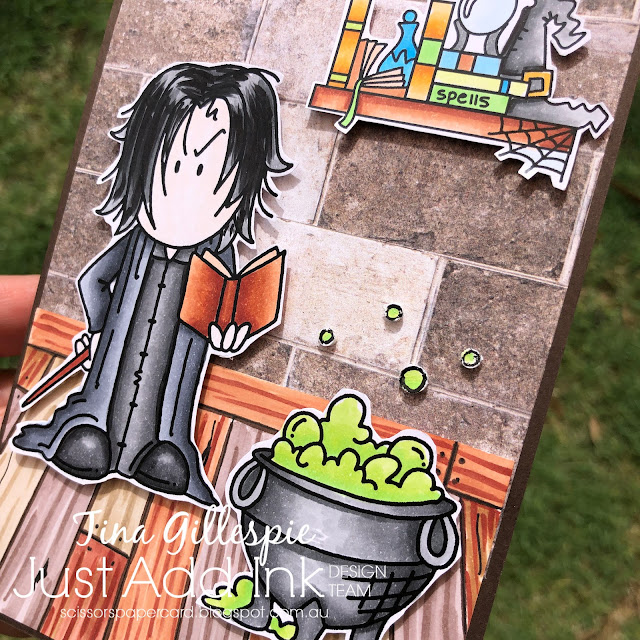
How cool is the blue in those toadstools? Or are they mushrooms? Either way, the colour is amazing! I wasn't only inspired by the colour this week - when I see strangely coloured toadstools like that I think of potions and magic. Perfect timing for Halloween cards! I don't usually make Halloweeen cards, so I decided to make a magical birthday card instead.

scissorspapercard, Stampin' Up!, Bugaboo, Kindred Stamps, Just Add Ink, Wizard Friends, Copic Markers, In Good Taste DSP

The stamps I used on the front are digital stamps from Bugaboo. I've had them for many years but not used them much. I really wanted a cauldron for my potions, and this was the only image I had. I printed it off, along with the wizard and the shelf. I coloured them with my Copic markers.

scissorspapercard, Stampin' Up!, Bugaboo, Kindred Stamps, Just Add Ink, Wizard Friends, Copic Markers, In Good Taste DSP

To create the base of my card I used a piece of In Good Taste DSP with the big bricks. Does it look like a castle wall? I hope so! The wooden floor was hand drawn and coloured, also using my Copic Markers. I had fun doing that! The digi images were just fussy cut and popped up over the top. To pop the tiny bubbles up I added a Mini Dimensional to the back of each on the cardstock and then punched each one out with my Crop-o-Dile. It cut through all layers very easily.

scissorspapercard, Stampin' Up!, Bugaboo, Kindred Stamps, Just Add Ink, Wizard Friends, Copic Markers, In Good Taste DSP

There was a second shelf image in the stamp set, so I printed it and coloured it for the inside. You may notice that I've used a really bright blue and green frequently in the books and bottles - that's a little nod back to the colours of the Inspiration Photo. The sentiment stamps are a retired Kindred Stamps set called Wizard Friends.

That's all from me for tonight, but please do pop on over to the Just Add Ink blog, where you'll find the rest of this week's cards. Once you've made your card, you can link it up there too. I can't wait to see what you'll do with this Inspiration photo - it sure is a fun one!

Bye for now,

Tina

Thursday, 23 May 2019

JAI #458: Just Add Q, X, Y Or Z

Hi!


Yay for Friday and a new Just Add Ink challenge. This week it's one of my alphabet challenges, and we are doing what I called the 'nasty letters' while I was trying to think of what to do!


I had a brilliant idea and went full tilt on the card, only to realised I'd lumped 'V' in with the letters and made completely the wrong card! Oops. In the end I made a similar card, based on the same pop culture universe (you may be able to guess what my V card was if you're familiar with the universe).

scissorspapercard, Stampin' Up!, Kindred Stamps, Just Add Ink, Waterfront, Pick A Pennant, Wizard Friends, Students Of Magic, Bendy Card

I ended up going with the letter Q to create a card based on a game that's played in the skies on broomsticks. The aim of the game is to get large balls through one of the hoops, while avoiding other balls that are thrown at you by the opposition, all the while trying to catch the tiny golden ball that has wings. LOL! If you're really confused, that's ok! I showed Ada the card (she's a big fan) and he thought it was pretty awesome, so I must have got it right.

scissorspapercard, Stampin' Up!, Kindred Stamps, Just Add Ink, Waterfront, Pick A Pennant, Wizard Friends, Students Of Magic, Bendy Card

This was my first ever Bendy Card, so called because the two flaps at the side create curves where they slot into the card base. There are heaps of tutorials on the web, just google 'bendy card'. The style allowes you to add dimension to a scene, but still fold the card flat for mailing.

The scene I created for the background was a mix of stamping, stencilling and watercoloring. The trees were stencilled using a Kindred stencil, and then I stamped over the top with the trees from Waterfront. The mountains, sun and ground were all stamped and then the lake and sky were watercoloured. Would you believe I didn't base it around the sentiment? It came last, and just happened to perfectly fit the space. Phew!

You can see that the goal posts are attached to the back of the left flap, and the golden ball is attached to the right flap. I used a sliver of Window Sheet so that it looked like it was floating through the sky.

scissorspapercard, Stampin' Up!, Kindred Stamps, Just Add Ink, Waterfront, Pick A Pennant, Wizard Friends, Students Of Magic, Bendy Card

I carried over the banners from the front of the card to the back - there is no 'inside' on this card. You can see where I used a craft knife to slice through the card to allow one of the flaps to slot into place.

Well, that's my card for challenge - I hope you like it! You can see what the rest of the team have created by visiting the Just Add Ink blog. Which letter will you choose to create with?

Bye for now,

Tina