Pages

Showing posts with label Pinewood Planks DTIEF. Show all posts

Thursday, 4 June 2020

JAI #508: Just Add F

Hi!


Thanks for joining me for the new Just Add Ink challenge. This week it's one of my alphabet challenges. I love doing these, just because there's so much scope for what you could create!


I had so many ideas, it was hard to settle on just one. I tried a feline as a part of a fandom card, but I wasn't happy with the results, so it got binned. Then as I was doing my newsletter and writing about the upcoming global Paper Pumpkin kit, I remembered that I had a few past kits, and that one of them would work nicely!
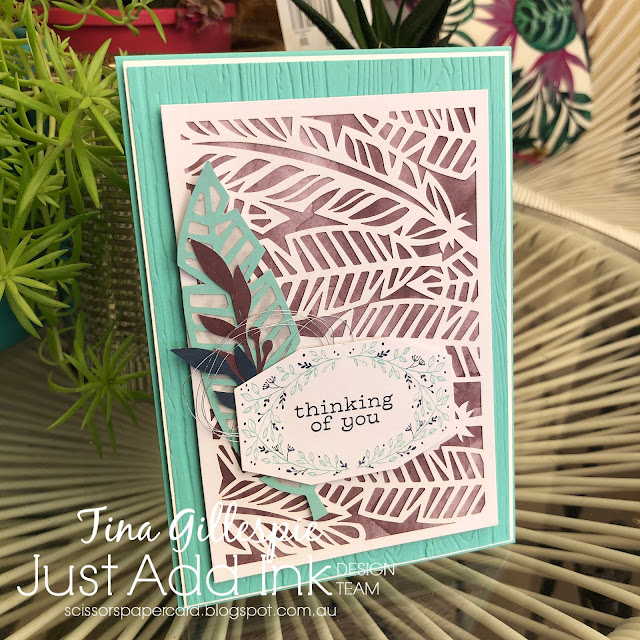
scissorspapercard, Stampin' Up!, Just Add Ink, Friends Of A Feather, Paper Pumpkin, Pinewood Planks 3DEF, Stitched Rectangles Dies

The Friends Of A Feather Paper Pumpkin kit was perfect! I really love the laser cut feather card front. It's meant to be the front of a tri-fold card, with the Fresh Fig (ooh, there's another F!) as the next layer, but I cropped the two pieces and just layered them together.

scissorspapercard, Stampin' Up!, Just Add Ink, Friends Of A Feather, Paper Pumpkin, Pinewood Planks 3DEF, Stitched Rectangles Dies

I wasn't happy with the Coastal Cabana feather on top - it was just blending in too much. Backing it with vellum helped to make it stand out more. A few foliage layers (more F's!) and I was done with the front.

scissorspapercard, Stampin' Up!, Just Add Ink, Friends Of A Feather, Paper Pumpkin, Pinewood Planks 3DEF, Stitched Rectangles Dies

For the inside a simple Stitched Rectangle die cut, cropped from the Whiper White layer on the front, and one final Fresh Fig feather (say that 5 times, fast!) and the card was done!

What F element will you use on your card? Make sure you let us know in your post, especially if it's not obvious. You can link your card up over at the Just Add Ink blog, where you can also find the rest of this week's Design team cards.

Bye for now,

Tina

Thursday, 17 October 2019

JAI #479: Just Add Colour

Hi!


Hooray, it's Friday, so it's time for the newJust Add Ink challenge. This week Jackie has given us an unusual colour combination to work with.


I say unusual, because I wouldn't usually pair those shades of blue and green. I'm happy to say though, that they work together nicely!

scissorspapercard, Stampin' Up!, Uniquely Creative, Just Add Ink, Bloom and Grow, Sweet Sentiments Builder, Pinewood Planks EF, Follow Your Art DSP

I decided to focus mostly on Coastal Cabana, with just a few Pear Pizzazz and Whisper White highlights. I started by heat embossing the sprays from Bloom and Grow using Copper Embossing Powder. I bent the stamp a little before I stamped so that it would fit around the oval better. It's very hard to see, but there is a vellum oval, dry embossed with the Pinewood Planks folder under the flowers and sentiment! The flowers were then watercoloured. I started with the middle flower, and worked my way out, diluting the ink more for each flower.

scissorspapercard, Stampin' Up!, Uniquely Creative, Just Add Ink, Bloom and Grow, Sweet Sentiments Builder, Pinewood Planks EF, Follow Your Art DSP

The sentiment is from Uniquely Creative, and it's called Sweet Sentiments Builder. I love that some of the words in the set have matching dies - it makes my life a little easier! I layered everything onto a base of Coastal Cabana DSP from the Follow Your Art pack. I wanted something with a bit of variation in the colour, not just a flat piece of blue.

scissorspapercard, Stampin' Up!, Uniquely Creative, Just Add Ink, Bloom and Grow, Sweet Sentiments Builder, Pinewood Planks EF, Follow Your Art DSP

The inside was stamped and coloured the same way as the front. I often use Shimmery White cardstock when I am watercolouring, as it's more cost effective than watercolour paper and it handles the water very well.

That's it for me - why not pop on over to the Just Add Ink blog, where you can see the rest of the Design Team cards and link up your own for the challenge. I think you'll like this colour combo!

Bye for now,

Tina

Sunday, 5 May 2019

CTC #227: Favourite Retiring Bundle

Hi!


Welcome to by blog for the CASEing The Catty Sunday Challenge Blog Hop! The blog before mine was Julia's. You know the drill by now - grab a cuppa and keep hopping until you get back to where you started.


This week the crew are making projects using our favourite retiring bundle. It was really hard to pick a favourite of all those going, so I picked the one that I wished I'd used more while it was current. I think it will find it's way to my 'keep' shelf though, as I think it's great for teen girls.


It's the Follow Your Dreams bundle from page 54. The dream catchers, feathers and flowers are the perfect mix for teen girls, don't you think? As my daughter is about to turn 14, and I have 3 nieces around the same age, I have a bit of a need for teen girl things in the next few years or more!

scissorspapercard, Stampin' Up!, CASEing The Catty, Follow Your Dreams Bundle, Rectangle Stitched Framelits, Pinewood Planks DTIEF

I started by die cutting the 'dream' and the dream catcher 4 times each - one in the Gold Foil paper and three times in Bermuda Bay cardstock. I then glued all of the layers together with the foil on top. It's a great way to get dimension, especially when die cuts like the dream catcher are very fiddly to pop up with Dimensionals. I cut the gold pieces out of the panel I used to matt my main panel, as you never see it and would never know unless you (shock horror!) pulled the card apart.

scissorspapercard, Stampin' Up!, CASEing The Catty, Follow Your Dreams Bundle, Rectangle Stitched Framelits, Pinewood Planks DTIEF

If you look closely, you can see that I stamped the little star/flower image all over the main panel in VersaMark. I then sponged over the top with Bermuda Bay and Coastal Cabana ink. Finally, I splattered some water over the top to lift the colour under the splatters. It's such a cool effect. It's hard to see in the photo, but I embossed the Whisper White layer with the Pinewood Planks DTIEF - yes, there are other embossing folders besides Subtle!! Finally, I added some (retired) tiny pearls to the dreamcatcher.

scissorspapercard, Stampin' Up!, CASEing The Catty, Follow Your Dreams Bundle, Rectangle Stitched Framelits, Pinewood Planks DTIEF

I'd also cut some feathers out of the Gold Foil matt to use on the front, but didn't end up using them there. Instead, I made a home for them on the inside by sponging Coastal Cabana and Bermuda Bay inks on the bottom corner and flicking it with water before adhering the feathers over the top.

I showed this card to Miss Nearly 14 and asked her if I should add or change anything. She told me it was perfect the way it was, so I'm happy with that!

Don't forget to check out our Facebook group, where you can add your card to this week's challenge. What's your favourite retiring bundle? It can be one that's completely retiring, or one that will carry over, but no longer be sold as a bundle. Too easy!


Don't forget to complete the Blog Hop though! Next up is Rose, I wonder what bundle she'll choose?


Bye for now,

Tina