Pages

Showing posts with label Detailed Dragonfly Thinlits. Show all posts

Tuesday, 15 January 2019

Dragonflies In The Mossy Meadow

Hi!


This week's Colour Creations features Mossy Meadow, a colour I am yet to really warm to. It's a part of the Neutrals family and is a dark, earthy green. It's a feature colour in the gorgeous Petal Promenade DSP pack, so that was my starting point for this card.

scissorspapercard, Stampin' Up!, Art With Heart, Colour Creations, Humming Along, Varied Vases, Petal Promenade DSP, Detailed Dragonfly Thinlits

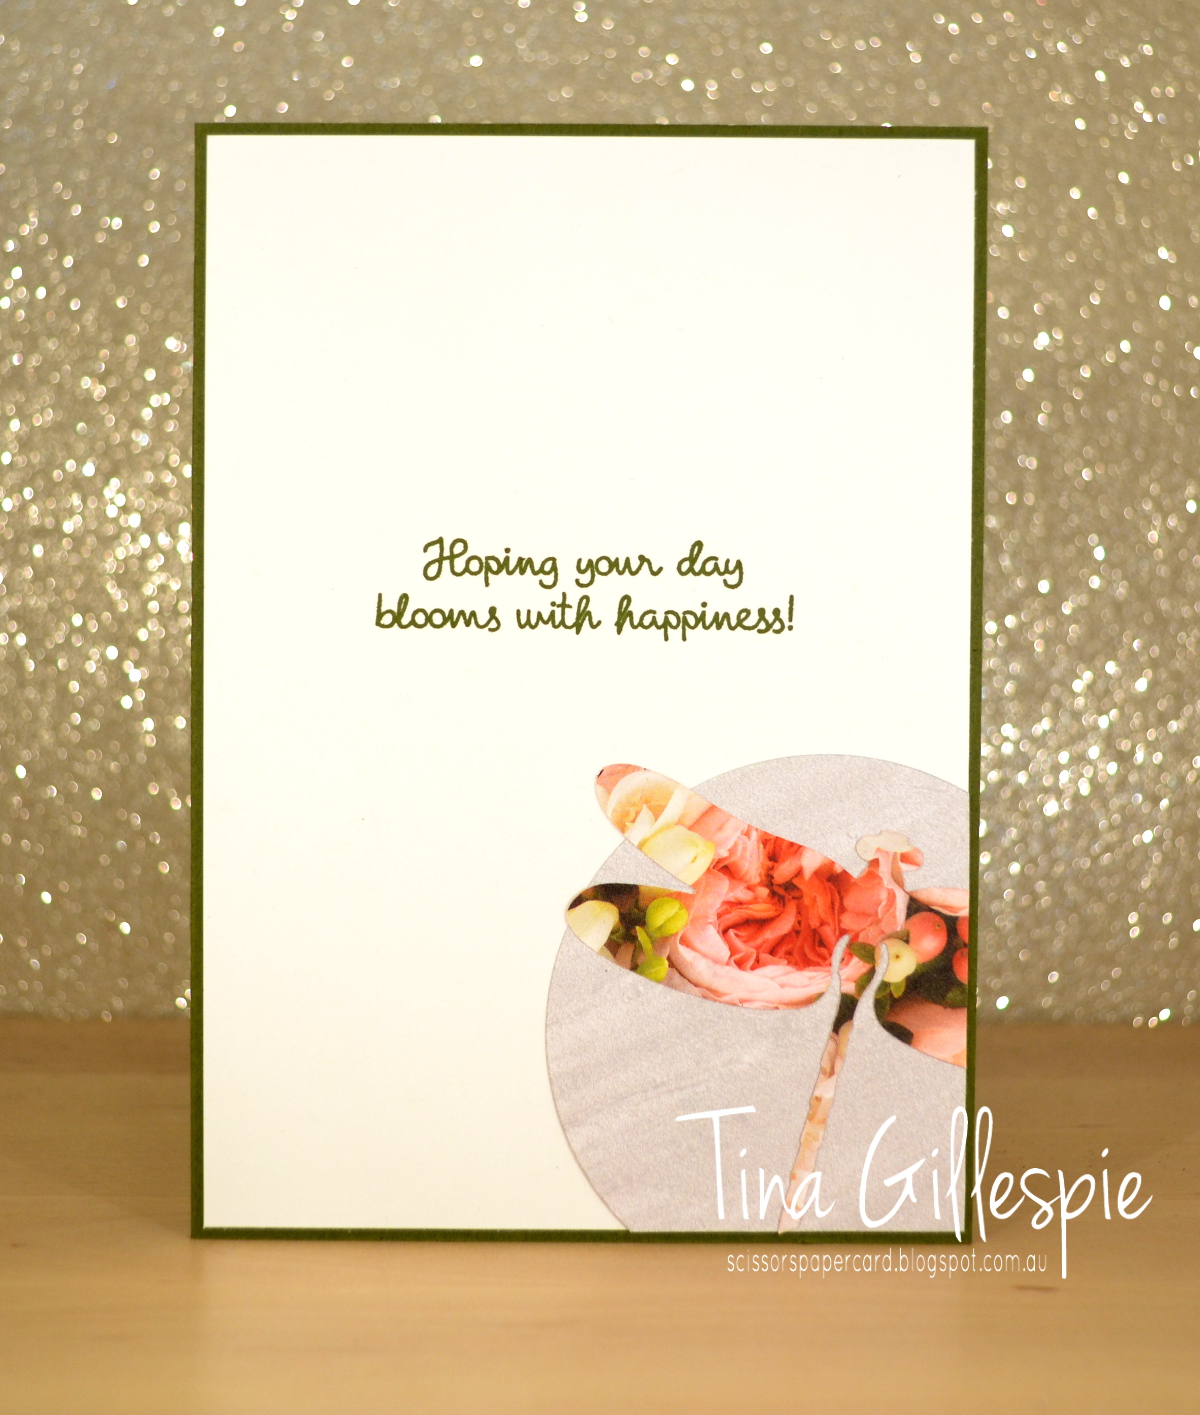
My class ladies had seen this card on my blog, featuring the Inlaid Dies Technique, and were keen to give it a go. That card was too complicated for a class situation, so I made this as a simpler alternative. I love how the floral paper looks cut into the dragonfly shape!

scissorspapercard, Stampin' Up!, Art With Heart, Colour Creations, Humming Along, Varied Vases, Petal Promenade DSP, Detailed Dragonfly Thinlits

So as a recap, the technique is a bit like masking, but with dies. You start at the back by cutting the circle. The hole is then 'filled' by the same sized circle in a different pattern paper, held in place with washi tape on the back. Next I cut the top dragonfly, again filling the hole with the floral paper. Finally, I cut and filled the lower dragonfly. You need to use a *lot* of washi on the back to hold it all in place, but it's worth it - I love the look!
scissorspapercard, Stampin' Up!, Art With Heart, Colour Creations, Humming Along, Varied Vases, Petal Promenade DSP, Detailed Dragonfly Thinlits

I kept the circle from the front, and also the first dragonfly die cut, to use on the inside. The dragonfly wasn't a complete cut, so I made sure he was flying off the edge to disguise that fact.

I hope you like the card and try out the technique - it's a fun one!

Why not pop on over to Catherine's Blog, where you can see what everyone else has done with Mossy Meadow this week?

Bye for now,

Tina

Wednesday, 5 December 2018

CASEing Colour Combinations

Hi!

Papercrafters often talk about CASEing, but usually it refers to copying the design of a card and maybe changing a few things to make it a little more unique. Sometimes though, it's the colour combination that grabs you and begs to be made into something totally different. That's the challenge this week for CASEing The Catty - take a colour combo from a card in the Holiday Catalogue and use the colour combo to make a new card.

scissorspapercard, Stampin' Up!, CASEing The Catty, Beautiful Bouquet, Dragonfly Dreams Bundle, Stitched Labels Framelits

I flicked through the catalogue for inspiration and stopped on page 42 when I got to the Country Lane suite of products. I don't actually own any of it, apart from the Chicken Wire Elements, but the Blackberry Bliss, Mint Macaron, Crumb Cake and Whisper White combo on the first card was one I loved.

scissorspapercard, Stampin' Up!, CASEing The Catty, Beautiful Bouquet, Dragonfly Dreams Bundle, Stitched Labels Framelits

In the end the only things the same were the Chicken Wire Element and the use of a circle, but otherwise I went in a completely different direction with my card.

scissorspapercard, Stampin' Up!, CASEing The Catty, Beautiful Bouquet, Dragonfly Dreams Bundle, Stitched Labels Framelits

I hope this gets you thinking about looking at cards in a whole new way now. Another great reason to flip through the catalogue - colour inspiration!

Bye for now,

Tina

Monday, 30 July 2018

Polished Stone Dragonflies

Hi!

Remember a little while ago I was playing around with the Polished Stone technique? Well, I found one more card in my 'To Blog' folder using the technique that I hadn't shown you yet. Here it is!

scissorspapercard, Stampin' Up!, Happy Birthday Gorgeous, Dragonfly Dreams, Detailed Dragonfly Thinlits, Flourish Thinlits, Subtle 3D DTIEF

I used Night Of Navy and Mint Macaron ink to create the Polished Stone panel. Isn't it pretty?

scissorspapercard, Stampin' Up!, Happy Birthday Gorgeous, Dragonfly Dreams, Detailed Dragonfly Thinlits, Flourish Thinlits, Subtle 3D DTIEF

Speaking of pretty - how's that Subtle 3D Dynamic Textured Impressions Embossing Folder? I've been using it so much, as it adds that little something extra on so many cards.

scissorspapercard, Stampin' Up!, Happy Birthday Gorgeous, Dragonfly Dreams, Detailed Dragonfly Thinlits, Flourish Thinlits, Subtle 3D DTIEF

That's the last of my Polished Stone cards for now - hopefully I'll get back to the technique some more soon, as it's a fun one!

Bye for now,

Tina

Wednesday, 24 May 2017

Dragonfly Dreams CASE

Hi!


Today's card was one I CASEd from Pam Scales. You can see her blog here, but I couldn't find her gorgeous card on her blog, so I can't link directly to it.


I changed a few things, but essentially the card is the same. Pam used a banner across the top of her DSP for the sentiment, instead of the ribbon I used. She also used a different DSP. I used Blooms and Bliss on my version.


The layers on the Dragonfly are so pretty. The top layer was cut from more of the Blooms and Bliss DSP, and was adhered onto a solid Rich Razzleberry Layer.


I love the dotty stamp in the set for creating little borders on my cards. It can either be bold or subtle, or anywhere in between.


Bye for now,


Tina

Monday, 3 April 2017

Dragonflies in Ombre

Hi!


I may have mentioned once or twice that I have been playing a lot with the sponge brayers. Today's card is another of my creations. It's one of my favourite cards I've made using the brayer ombre backgrounds.


This card was given to my sister for her 40th Birthday. Her favourite colour is purple, so that's naturally the colour I used. I first tried Perfect Plum, but it turned a brownish, dusky purple - lovely, but not the look I was going for. I tried Rich Razzleberry next, and it was perfect.


After I'd brayered the background, I clear heat embossed a few dragonflies over the front. The main dragonfly was heat embossed in Silver and watercoloured with Rich Razzleberry ink. So pretty!


A special birthday like a 40th deserves a special card - and I think this one fills the brief. What do you think?


Bye for now,


Tina

Monday, 6 February 2017

Dragonfly Dreams in Bermuda Bay

Hi!


Do you ever CASE someone else's card? I do! Typically I CASE when I have a new stamp set that I love, but I'm a bit intimidated by the set because I've already seen soooo much great stuff that I'm sure I'll never be able to make anything as good. Sound familiar? CASEing is a great way to get the set inky and build up some confidence.


Today's card is a CASE of this card by Carolyn King. I didn't change very much at all, because I loved her card so much.


While Carolyn used Enamel Dots on her card, I used clear sequins. I really liked the subtle touch they added.


Carolyn also mentioned that she coloured her wings using the rock 'n' roll method. I chose to colour mine with the new Watercolour Pencils and then blend them using my Clear Wink Of Stella pen. I stamped the dragonfly in Momento ink so I didn't smudge it using the Wink Of Stella. Using the pencils allowed me to use Pacific Point, Old Olive and Bermuda Bay to colour the wings.


Carolyn didn't show the inside of her card on her blog, so I was on my own for my inside. I didn't stamp a sentiment, so that the card is versatile enough for several different occasions.


Bye for now,


Tina

Friday, 25 November 2016

JAI #338: Just Add Inspiration

Hi!


Phew! I've had a busy week! How about you? Is it time to sit a bit and relax over the weekend? I hope so!


http://just-add-ink.blogspot.com/2016/11/just-add-ink-338inspiration.html

This week's Just Add Ink challenge is a fun inspiration photo, put forward by Jan. I deliberately didn't think about using paint brushes to paint a wall, because that's no fun! Well, not for me anyway. Instead I thought about paint on an artist's palette and went from there. What do you think of?


I decided to have a play with some of my reinkers and my Stampin' Spritzer to create an arty background using the colours in the picture. It took me 5 goes to get a piece I was happy with, but then I ended up going back to the first piece after they had all dried!


To get the background I spritzed a piece of Shimmery White cardstock with water using my Stampin' Spritzer. I then dripped ink from my reinkers onto the cardstock. If the colour didn't spread well, I gave it another spritz. Once I was happy, I placed a paper towel over the top to soak up some of the extra water and then left the pieces to dry. I then used my largest die in the Layering Circles Thinlits set to cut the circle. I laid it on the paper and moved it about until I was happy with the mix of colours within the circle.


From memory, the colours I used were Tempting Turquoise, Island Indigo, Real Red, Watermelon Wonder and Elegant Eggplant. The dragonfly (a sneak peek from the upcoming Occasions Catalogue) was cut from Gold Foil paper.


The sentiment stamp set I used is also from the Occasions Catalogue, it is a set that is designed to coordinate with the Dragonfly dies. You can see that I've also used a small dragonfly on the inside of the card. The bundle was one of my first 'must-haves' from the catalogue.


I hope you have a fabulous weekend, with hopefully some time to join us at Just Add Ink.


Bye for now,


Tina