Pages

Showing posts with label Weather Together. Show all posts

Thursday, 30 November 2017

JAI #388: Just Add Glitter

Hi!


This week at Just Add Ink Rochelle has challenged us to add glitter to our projects.


I was recently gifted a cute little dream catcher die, and straight away I thought of it over a tie-dye type background, so that's where I started with this card.

scissorspapercard, Stampin' Up!, Just Add Ink, Glimmer Paper, Weather Together, Smooshing

I was a bit stumped on how to get the tie-dye effect, so in the end I went with the smooshing technique for the background. I took my largest clear block and spread some water on it using an Aqua Painter. I then dripped some Blushing Bride, Soft Sky and Wisteria Wonder ink on the block, and spread it around a little with the Aqua Painter. When I was happy, I took a piece of Naturals Ivory cardstock (retired) and laid it over the ink on the block. I then left it to dry.

scissorspapercard, Stampin' Up!, Just Add Ink, Glimmer Paper, Weather Together, Smooshing

The smooshing looks very cool - just the touch of hippie I was after! I cut the dream catcher from Blushing Bride Glimmer paper (also retired). It was popped up on Mini Dimensionals, and then I tied some Very Vanilla Baker's Twine around the panel to finish off the front.

scissorspapercard, Stampin' Up!, Just Add Ink, Glimmer Paper, Weather Together, Smooshing

I wish I'd done an extra little smooshed piece for the inside, but I'd packed away all the reinkers before I thought of it, and I was too time poor to drag it all out again. Oh well, it's a glitter challenge, not a smooshing challenge, so another piece of Glimmer paper works!

You can see the gorgeous cards that the rest of the Design Team have made over at the Just Add Ink blog, where you can also link up your glittery card.  See you over there!

Bye for now,

Tina

Monday, 22 May 2017

Perth OnStage Swap

Hi!


I just realised that I haven't showed you the card I made as my swap while I was at OnStage in Perth last month. If you follow me on Fabebook, you probably would have seen a photo of me making them, but not the finished product. Well, here it is!


Yes, my love affair with the Sponge Brayers lives on! I used Sweet Sugarplum ink to create the ombre background, which went a lovely, deep, dusky pink. I loved the sentiment for this card, as I made it as a swap for my friends that were going to OnStage.


The Basic Black butterfly had a layer of Gold Foil paper behind it. I think it looks a little like a Monarch butterfly. The gold certainly added a bit of luxe to the card.


Most people only make a card front for swaps, but as I was only making 12 I decided to make a whole card.


Bye for now,


Tina

Thursday, 20 April 2017

AWH Blog Hop: Retiring Products

Hi!


Today I am participating in a blog hop along with the super talented ladies in the Art With Heart Team. We thought it would be fun to share some projects using our favourite retiring products from both the 2016-2017 Annual and 2017 Occasions catalogues!


Select retiring products have discounts of up to 50% off but are only available until sold out. Be sure to place orders before the sun sets on these items on 31 May. You don’t want to miss out – ask me how!
At first I really struggled with deciding which of my retiring products to use. I'm not losing too many stamp sets this year, but I am losing a lot of punches, so I decided to go in that direction. My son Hudson has a classmate that is in hospital at the moment, so I wanted to make a card for his mum to let her know that we were thinking of them.

I think the two punches featured here - Elegant Butterfly and Decorative Label - are two of my very favourites. I'm not sure I'll be able to bring myself to part with them.


I started with the Very Vanilla strip on the front of the card, and punched the Elegant Butterfly shape from it five times, making sure that I overlapped the punched holes. It was popped up on the front of the card using Dimensionals, making sure that the Basic Black Background showed through.


I then punched five more Elegant Butterflies in a mix of Mint Macaron and Watermelon Wonder (both retiring In Colours). After I curled the wings up a little, I adhered them in the correct spots in the Vanilla piece. Hopefully you can see what I mean in the picture! I finished the bodies with a short strip of Rhinestones. The Rhinestones are also retiring - kind of. They are actually being reconfigured, so they will be back in the new Annual Catalogue, just a little different.


I finished off the inside with another strip of the Blooms and Bliss DSP. It's also retiring, as is the Bitty Butterfly punch.


You're off to see the work of the lovely Monika next. Happy Hopping!


http://www.monstampingcorner.com/2017/04/2017-stampinup-favourite-retiring.html

If you find a broken link or have come to this blog hop from a different entry point, you can view the participants below:
Bye for now,
Tina

Friday, 12 August 2016

JAI #234: Just Add Inspiration

Hi!


Woo Hoo! It's Friday, which means it's nearly the weekend. I'm super excited about this weekend, because I had my new freezer delivered and Rob and I will finally have time to get it unboxed and set up. I've been wanting an upright freezer for ages, and I just can't wait to fill it up.


http://just-add-ink.blogspot.com.au/

Of course, Friday also means it's Just Add Ink's new challenge day, another reason to be excited! This week Trish has chosen a gorgeous Inspiration photo for us to use.


Don't those flowers look beautiful? I feel like running though the grass, trailing my fingers through them as I go. Or maybe lie down among them and look for shapes in the clouds.... Before I get too carried away, I'd best get to my card!


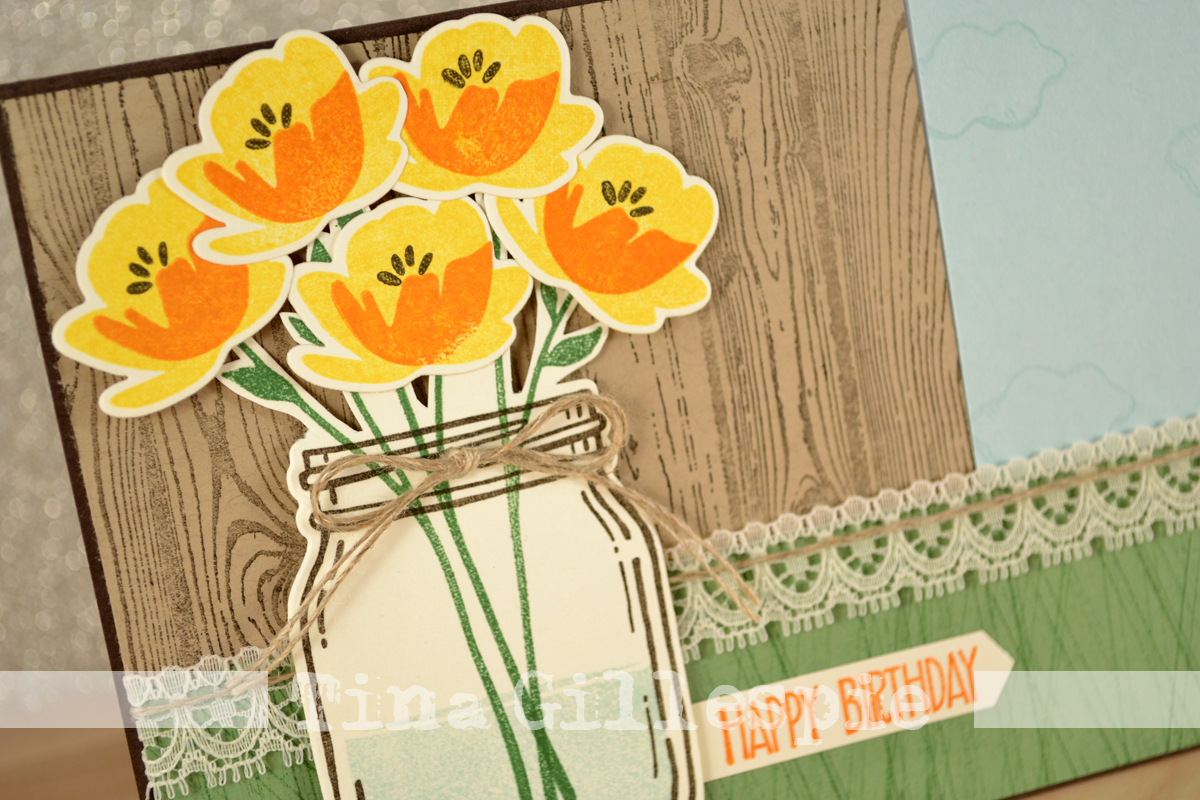
I went fairly literal for the background of my card, with the wood grain and clouds on top, and the line stamp from Gorgeous Grunge to simulate the grass on the bottom. I added the lace ribbon, as it was sitting on my desk and I think it goes with the country theme of the card. Same goes for the Linen Thread over the top.


I finally cracked open my Jar Of Love stamps and Framelits. They are so sweet - I really love the look of the flowers. I must have had a little moment and forgot that the flowers in the pic were purple, not yellow. Oh well, I still think they look great!


I stamped and cut a heap of flowers, as I wasn't sure how many I'd use for the front. Lucky I had some left over to use on the inside!


What do you see in the Inspiration photo? You can see how it inspired the rest of the Design Team over on the Just Add Ink Blog, where you can join in the fun with your interpretation.


Bye for now,


Tina

Thursday, 30 June 2016

CASEing The Catty Again

Hi!


I had an unexpectedly free day today, so I decided to sneak in an extra entry in the current CASEing the Catty challenge. This week they are challenging us to make a card from the Love and Sympathy section of the Annual Catalogue.


I hadn't yet had a play with my Weather bundle, so I decided I'd CASE the card on the far left on page 55. I kept most elements pretty much the same, with a few little changes. I changed the blues to Melon Mambo (despite the cardstock looking more like Watermelon Wonder!). I also switched the rhinestones for clear sequins, and added an extra layer to the card.


By far, the biggest change I made was to make the umbrella 3D. It was easy to do - I just stamped and cut four umbrellas, then folded three in half and glued them together and finally glued them to the fourth umbrella. Done!


I had cut an umbrella like on the card I CASEd before I changed my mind. I really dislike waste, so it was put to use on the inside of my card with a few clouds stamped behind it. I probably should have stamped the handle in a different colour on the inside  - I will know for next time!


http://caseingthecatty.blogspot.com.au/2016/06/ctc81-birthdays.html


I had fun with my two CASEing The Catty cards this month, especially because today's was the result of unexpected time to create.


Bye for now,


Tina