Pages

Thursday, 8 October 2020

JAI #526: Just Add Inspiration

 Hi!


Welcome back to the new Just Add Ink Challenge. This week Jo has found a really funky Inspiration Photo for us to be inspired by.


How cool is the blue in those toadstools? Or are they mushrooms? Either way, the colour is amazing! I wasn't only inspired by the colour this week - when I see strangely coloured toadstools like that I think of potions and magic. Perfect timing for Halloween cards! I don't usually make Halloweeen cards, so I decided to make a magical birthday card instead.

scissorspapercard, Stampin' Up!, Bugaboo, Kindred Stamps, Just Add Ink, Wizard Friends, Copic Markers, In Good Taste DSP

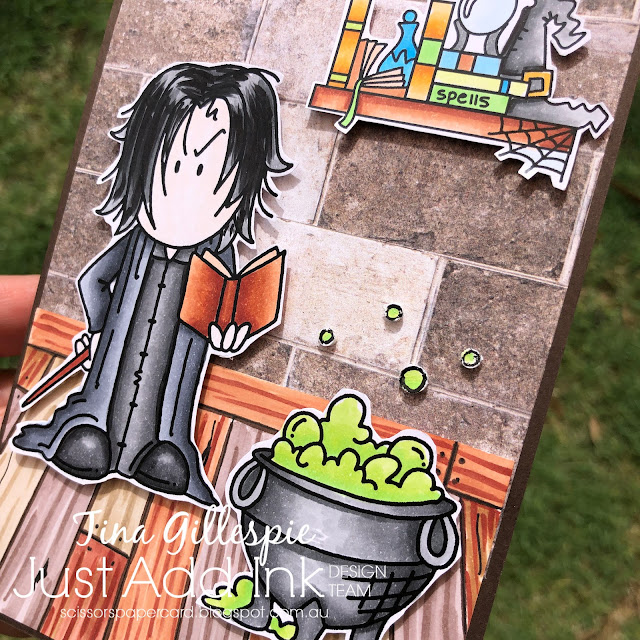
The stamps I used on the front are digital stamps from Bugaboo. I've had them for many years but not used them much. I really wanted a cauldron for my potions, and this was the only image I had. I printed it off, along with the wizard and the shelf. I coloured them with my Copic markers.
scissorspapercard, Stampin' Up!, Bugaboo, Kindred Stamps, Just Add Ink, Wizard Friends, Copic Markers, In Good Taste DSP

To create the base of my card I used a piece of In Good Taste DSP with the big bricks. Does it look like a castle wall? I hope so! The wooden floor was hand drawn and coloured, also using my Copic Markers. I had fun doing that! The digi images were just fussy cut and popped up over the top. To pop the tiny bubbles up I added a Mini Dimensional to the back of each on the cardstock and then punched each one out with my Crop-o-Dile. It cut through all layers very easily.

scissorspapercard, Stampin' Up!, Bugaboo, Kindred Stamps, Just Add Ink, Wizard Friends, Copic Markers, In Good Taste DSP

There was a second shelf image in the stamp set, so I printed it and coloured it for the inside. You may notice that I've used a really bright blue and green frequently in the books and bottles - that's a little nod back to the colours of the Inspiration Photo. The sentiment stamps are a retired Kindred Stamps set called Wizard Friends.

That's all from me for tonight, but please do pop on over to the Just Add Ink blog, where you'll find the rest of this week's cards. Once you've made your card, you can link it up there too. I can't wait to see what you'll do with this Inspiration photo - it sure is a fun one!

Bye for now,

Tina

October Creative Showcase: Using DSP

 Hi!


Welcome to the monthly Art With Heart Creative Showcase. Stampin' Up! are holding a DSP sale this month, and so we have chosen to feature the DSP packs that are on sale in this month's Showcase. There are quite a number of packs to choose from at a 15% discount, but I couldn't go past my all-time favourite Christmas DSP: Trimming The Town. I think I will need to purchase a second pack before the sale ends!

scissorspapercard, Stampin' Up!, Creative Showcase, Trimming The Town, Home Together Dies, Christmas Card

This card was inspired by the sentiment sheet of DSP. I've only ever used individual sentiments cut from the sheet. I decided it was about time to use a larger piece of it. Because I've mounted it against a bit of a busy background, I've matted the sentiment piece in white. I also used a Thick Whisper White card base, to help balance all of the darker colours.

scissorspapercard, Stampin' Up!, Creative Showcase, Trimming The Town, Home Together Dies, Christmas Card

Each of the elements on the front of the card were cropped from the DSP. To give them a bit more stability, especially for the ones getting popped up, I adhered each roughly cut piece to Thick Whisper White cardstock before cropping them with the coordinating Home Together Dies.

scissorspapercard, Stampin' Up!, Creative Showcase, Trimming The Town, Home Together Dies, Christmas Card

The inside scene is a bit snowier! The snowy hill on the inside is simply the offcut from the snowy hill on the front. I just added some extra fussy cut elements from the DSP to finish off the scene. I have not used ink at all on my card, but I think that it would also look nice to have sponged a little Balmy Blue ink as a sky on the inside.

That's all from me tonight. Please pop on over to Rachel's blog, where you will find the links for the rest of this month's DSP Creative Showcase cards.

Bye for now,

Tina

Wednesday, 7 October 2020

Colour Creations: Granny Apple Green

 Hi!


Thanks for joining me for the new Colour Creations Creative Showcase. We are looking at Granny Apple Green this week. I really like this bright, cheerful green.

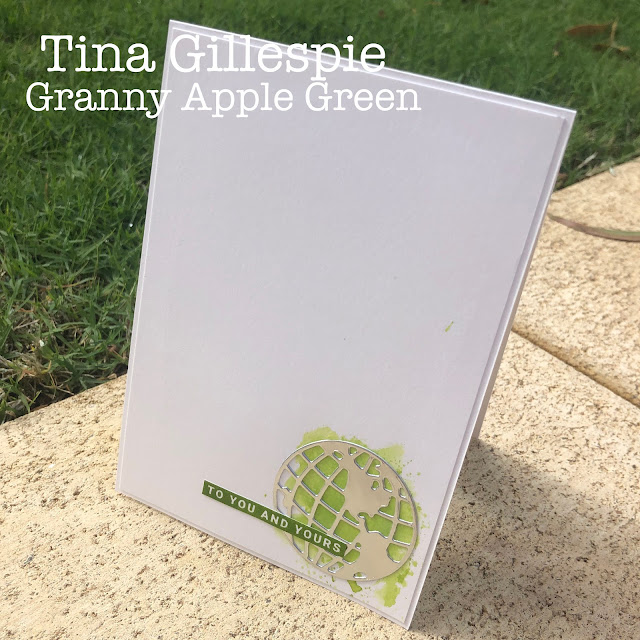
scissorspapercard, Stampin' Up!, Colour Creations, Peace & Joy Bundle, World Map Dies, Silver Foil, Smooshing Technique

I started off with some Shimmery White cardstock, and then I smooshed it with some Granny Apple Green Ink. To do this, I used my Aqua Painter to add some water my largest clear block. I then used the Aqua Painter to add some GAG ink and then smooshed the cardstock over the ink. I let it dry a little and then repeated until I was happy with the look. Letting it dry between smooshes gives you a few 'tide lines' instead of one great big blob of ink.

scissorspapercard, Stampin' Up!, Colour Creations, Peace & Joy Bundle, World Map Dies, Silver Foil, Smooshing Technique

A Silver Foil globe from the World Map dies - showing Australia, of course - was the perfect compliment to the sentiments I used on the front of the card. I backed my foil with an Adhesive sheet before die cutting, which makes adhering so much easier. I cropped a few stars from the left over foil to go on the front.

scissorspapercard, Stampin' Up!, Colour Creations, Peace & Joy Bundle, World Map Dies, Silver Foil, Smooshing Technique

I couldn't do only half of the world, so the other globe went on the inside. I'd smooshed this piece of card when I did the front so that I only have one lot of mess to clean up. I hate when I don't remember to do the inside until after I've cleaned up!

As always, please pop on over to Catherine's blog, where you'll find the rest of the links to this week's Granny Apple Green cards.

Bye for now,

Tina

Sunday, 4 October 2020

CTC #288: CASE A Kit Project

 Hi!


Thanks for joining me for the new CASEing The Catty Sunday Challenge Blog Hop. I have two confessions for you tonight: first, I nearly missed the Hop. It's a long weekend here in Adelaide, so in my head the Hop was tomorrow because it's the last day of the weekend. Oops - luckily I remembered in time! I'll let you know my second confession later in my post.


This week we are challenging you to choose a Kit Card or Project from either catalogue to CASE. Unusually for me, I started my search for inspiration at the beginning of the Annual Catalogue. I soon came across the Gorgeous Posies Kit. I don't own it, but it's one I've admired. I absolutely love the Gold Foil outlines on some of the base cards.


It made me think of the (sadly) retired Magnolia Notecards, which have a Silver Foil outline. I'm much more of a silver person anyway!

scissorspapercard, Stampin' Up!, CASEing The Catty, Poinsettia Petals Bundle, Plush Poinsettia SP, Itty Bitty Christmas, Magnolia Notecards, Stampin' Blends, Christmas Card

I started by trimming a piece of Plush Poinsettia SP to fit within the Silver Foil outline and adhering it with Glue Dots. The Poinsettia Petals die cuts were then layered over the top. I love the texture that is added to the petals and leaves as you crop the shapes.

scissorspapercard, Stampin' Up!, CASEing The Catty, Poinsettia Petals Bundle, Plush Poinsettia SP, Itty Bitty Christmas, Magnolia Notecards, Stampin' Blends, Christmas Card

A couple of sprigs cut from Silver Foil were added to really highlight the Silver Foil on the card base. The flag end of the sentiment was cut using the Banners Pick A Punch.

scissorspapercard, Stampin' Up!, CASEing The Catty, Poinsettia Petals Bundle, Plush Poinsettia SP, Itty Bitty Christmas, Magnolia Notecards, Stampin' Blends, Christmas Card

I stamped the complete poinsettia from the Poinsettia Petals stamp set, and then masked it so I could add some leaves in behind. A sentiment from Itty Bitty Christmas finished off the card, or so I thought...

So here is confession number two: I accidentally made two half cards, rather than one whole card. Another oops! The two notecards had stuck together, and it wasn't until after I'd glued my inside to what I thought was the card I'd just decorated the front of, that I realised. 

scissorspapercard, Stampin' Up!, CASEing The Catty, Poinsettia Petals Bundle, Plush Poinsettia SP, Itty Bitty Christmas, Magnolia Notecards, Stampin' Blends, Christmas Card

So now I have two half done cards that I will have to finish at a later date, as due to confession #1, I had no time to finish off both today before the blog hop. Oh dear!

I hope you have a better run than me when you make your card for this week's challenge. Once it's done, just post a photograph in our Facebook group. Don't forget to tell us which Kit you CASEd.


Before you go, please do continue on with our Blog Hop. Next up is the very clever Julia, who has been very inventive with her CASE!

Bye for now,

Tina
Thursday, 1 October 2020

JAI #525: Just Add Thank You

 Hi!


Thank you for joining me for the new Just Add Ink challenge - with 'Thank You' being key words! You see, this week we are challenging you to add Thank You to your cards. We all need thank you cards on occasion - right?


Even though a thank you often goes hand in hand with a bunch of flowers or a box of chocolates, I decided to go in a masculine direction for my card.

scissorspapercard, Stampin' Up!, Just Add Ink, Uniquely Creative, Tim Holtz Gearhead Dies, Sweet Sentiments Builder, Sweet Sentiments Dies, Golden Honey SDSP, Brushed Metallic Cardstock, Masculine Card

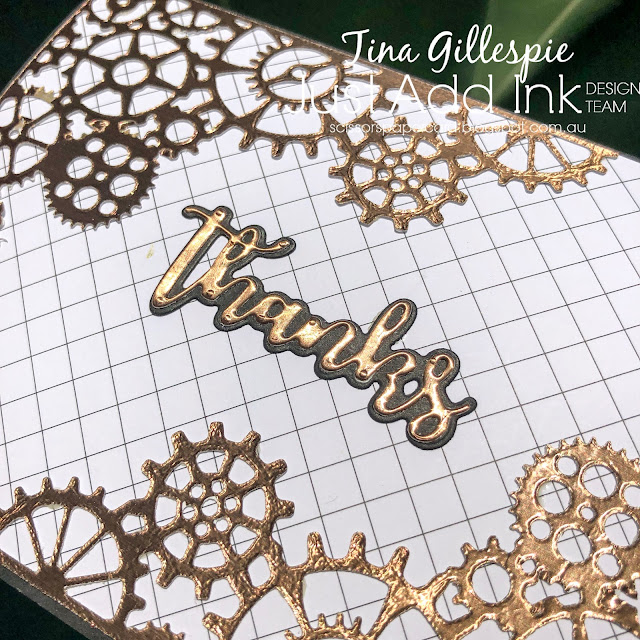
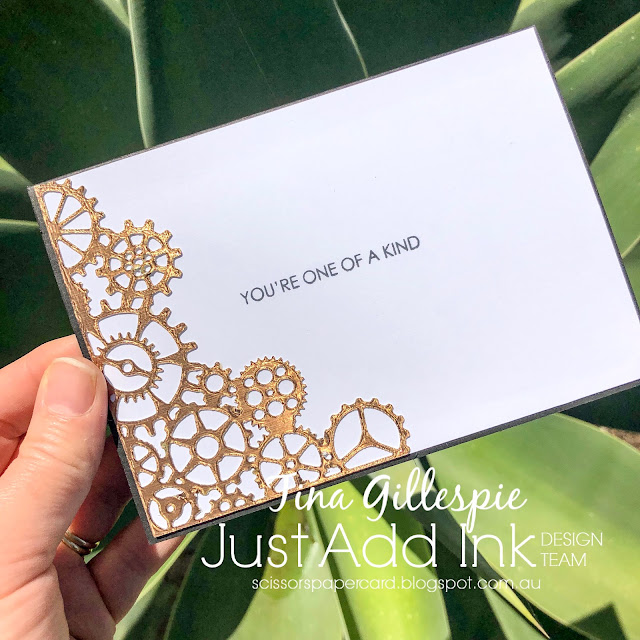
I have had these Tim Holtz Gearhead dies for quite a while, but haven't used them much. I thought that this would be a grea opportunity. I love how the die makes a corner piece from the cogs. I cut the two pieces from some Brushed Metallic Cardstock and then layered it over some retired Golden Honey SDSP.

scissorspapercard, Stampin' Up!, Just Add Ink, Uniquely Creative, Tim Holtz Gearhead Dies, Sweet Sentiments Builder, Sweet Sentiments Dies, Golden Honey SDSP, Brushed Metallic Cardstock, Masculine Card

The layered 'thanks' dies are from a Uniquely Creative set called Sweet Sentiments. The top layer was cut from some more of the metallic card, with a Basic Black layer underneath.

scissorspapercard, Stampin' Up!, Just Add Ink, Uniquely Creative, Tim Holtz Gearhead Dies, Sweet Sentiments Builder, Sweet Sentiments Dies, Golden Honey SDSP, Brushed Metallic Cardstock, Masculine Card

A third cogs die cut finished off the inside, with a sentiment from the Sweet Sentiments Builder stamp set, designed to coordinate with the thanks die on the front. All in all, it's a fairly simple card - it took me longer to pop out the pieces from the die cuts than it did to put the card together - but sometimes simple works best!

Please head on over to the Just Add Ink blog, where you'll see the rest of this week's gorgeous Design team cards. You can also enter your card in our challenge. Who do you need to say 'thank you' to?

Bye for now,

Tina
Wednesday, 30 September 2020

Colour Creations: Gorgeous Grape

 Hi!


Hooray for Colour Creations Showcase time! This week we are looking at Gorgeous Grape, which is a colour that I like, even though I don't use it much. It's in the Brights colour family and pairs beautifully with Highland Heather. Like all of my Colour Creations cards this year, I have opted to use it on it's own, with just neutral colours.

scissorspapercard, Stampin' Up!, Colour Creations, A Good Man, Seaside Notions, Forever Gold SP

Hehe, I was watching The Block while I was making this card and guess what rooms they were working on? Yep, bathrooms! So many bathrooms feature subway tiles and it's a look I really like, so I decided to incorporate it into my card. I started with a 5 x 7 inch piece of Gorgeous Grape cardstock, which I backed with a similarly sized piece of Adhesive Sheet. I then chopped up the piece to create 10 strips that were 1/2 x 7 inches. These were then adhered to a 5 x 7 inch piece of Basic Black cardstock, leaving a small gap between each strip - the Adhesive Sheets make this a super easy task!  After applying a second 5 x 7 inch piece of Adhesive Sheet to the back of this piece, I turned it sideways and cut it into 1/4 x 5 inch strips. As with the first strips, these were adhered to a second 5 x 7 inch piece of Basic Black cardstock, leaving gaps between each one. This time, however, I staggered the placement of the strips so that I got the brick wall pattern. All that was left to do was to trim the piece to be card front size and adhere it to my Basic Black base. 

scissorspapercard, Stampin' Up!, Colour Creations, A Good Man, Seaside Notions, Forever Gold SP

To finish the front, I selected a wreath design from my Forever Gold Laser Cut Paper pack and adhered it using some glue dots. A few flowers with Gorgeous Grape Rhinestones in the centre, a Gold Twine bow and a sentiment from A Good Man and it was done. I didn't want to cover up too much of the background!

scissorspapercard, Stampin' Up!, Colour Creations, A Good Man, Seaside Notions, Forever Gold SP

The reason I created such a large background before trimming it down was so that I could use a left over piece on the inside. It's so much easier to do it all in one go, even if you end up needing a bit of muscle to trim all the layers down!

As always, Catherine is playing Hostess for our Creative Showcase. You can find the links to the rest of this week's Gorgeous Grape posts over on her blog.

Bye for now,

Tina

Sunday, 27 September 2020

CTC #286: CASE A Leaf Or Tree Project

 Hi!


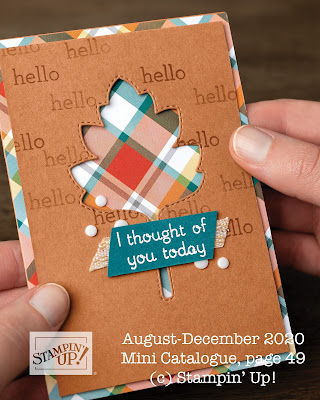
Thanks for joining me once again for the new CASEing The Catty Sunday Challenge Blog Hop. This week we are challenging you to find a Leaf Or Tree Project from the August-December Mini Catalogue and CASE it.


For these kinds of challenges, I always start at the back of the catalogue and flick forwards. I kinda assume that most people start at the front, and I don't want the back of the catalogue to feel unloved! I got to page 49 before I found a suitable candidate for CASEing.


Part of the reason that it took quite a few pages was that I don't really have a lot of leaf or tree stamps or dies, so I had to find something that would translate to the products I do have. In this instance I liked the DSP that both framed the main panel and peeked through the leaf opening. I also liked the stitched detail around the leaf, so when it came time to reach for my supplies, I pulled out my Stitched Stars Dies.

scissorspapercard, Stampin' Up!, CASEing The Catty, Brightly Gleaming SDSP, Peace & Joy Bundle, Stitched Stars Dies, Stitched Rectangles Dies, Itty Bitty Christmas, Brushed Foil, Christmas Card

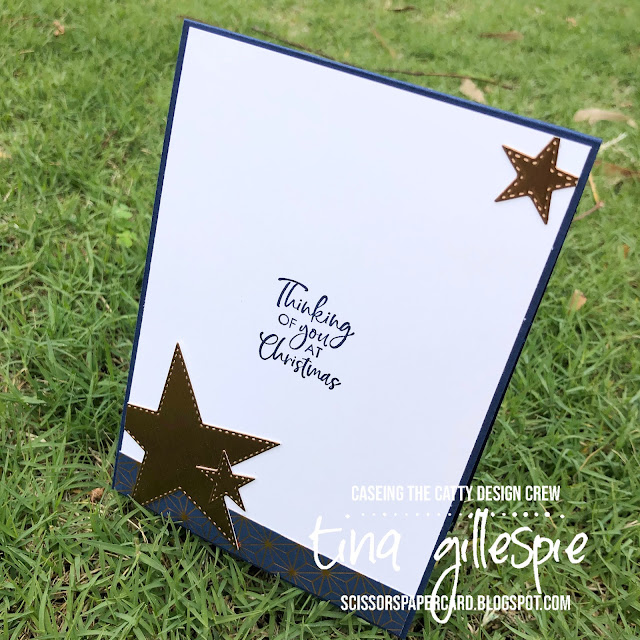
I die cut three star windows, because that suited my layout better. The Brushed Copper Foil, layered over some Night Of Navy and Copper DSP from the Brightly Gleaming SDSP pack, is so lush for a Christmas card.

scissorspapercard, Stampin' Up!, CASEing The Catty, Brightly Gleaming SDSP, Peace & Joy Bundle, Stitched Stars Dies, Stitched Rectangles Dies, Itty Bitty Christmas, Brushed Foil, Christmas Card

The hardest part of this card was getting the 'on Earth' part of the sentiment. I didn't want to add another colour to the mix as it would have been really glaring. Embossing with Copper powder on Night Of Navy cardstock was a fizzer, as was the retired Delicata inks. I ended up using Bright Copper Shimmer Paint. The paint pooled into the letters, which I was trying not to do, but in the end I actually preferred how it looked. Gotta love those happy accidents!

scissorspapercard, Stampin' Up!, CASEing The Catty, Brightly Gleaming SDSP, Peace & Joy Bundle, Stitched Stars Dies, Stitched Rectangles Dies, Itty Bitty Christmas, Brushed Foil, Christmas Card

I had a tiny strip of DSP left from the front, and the three stars cut from the main panel. I may as well use them on the inside, alongside a sentiment from Itty Bitty Christmas.

Our challenge is hosted in our Facebook group. It's super easy to participate - just join the group and post your photo. Easy!


Next up on our Blog Hop is the lovely Julia, who has made a stunning Christmas card for the challenge.


Bye for now,

Tina