Pages

Thursday, 13 August 2020

August Creative Showcase: Rainbows

Hi!


With all that’s happening worldwide at the moment the Art With Heart Team are here with a Rainbow Creative Showcase to brighten your day. Every month the talented ladies share their inspirational ideas in a monthly Showcase and this month our projects are inspired by Rainbows.


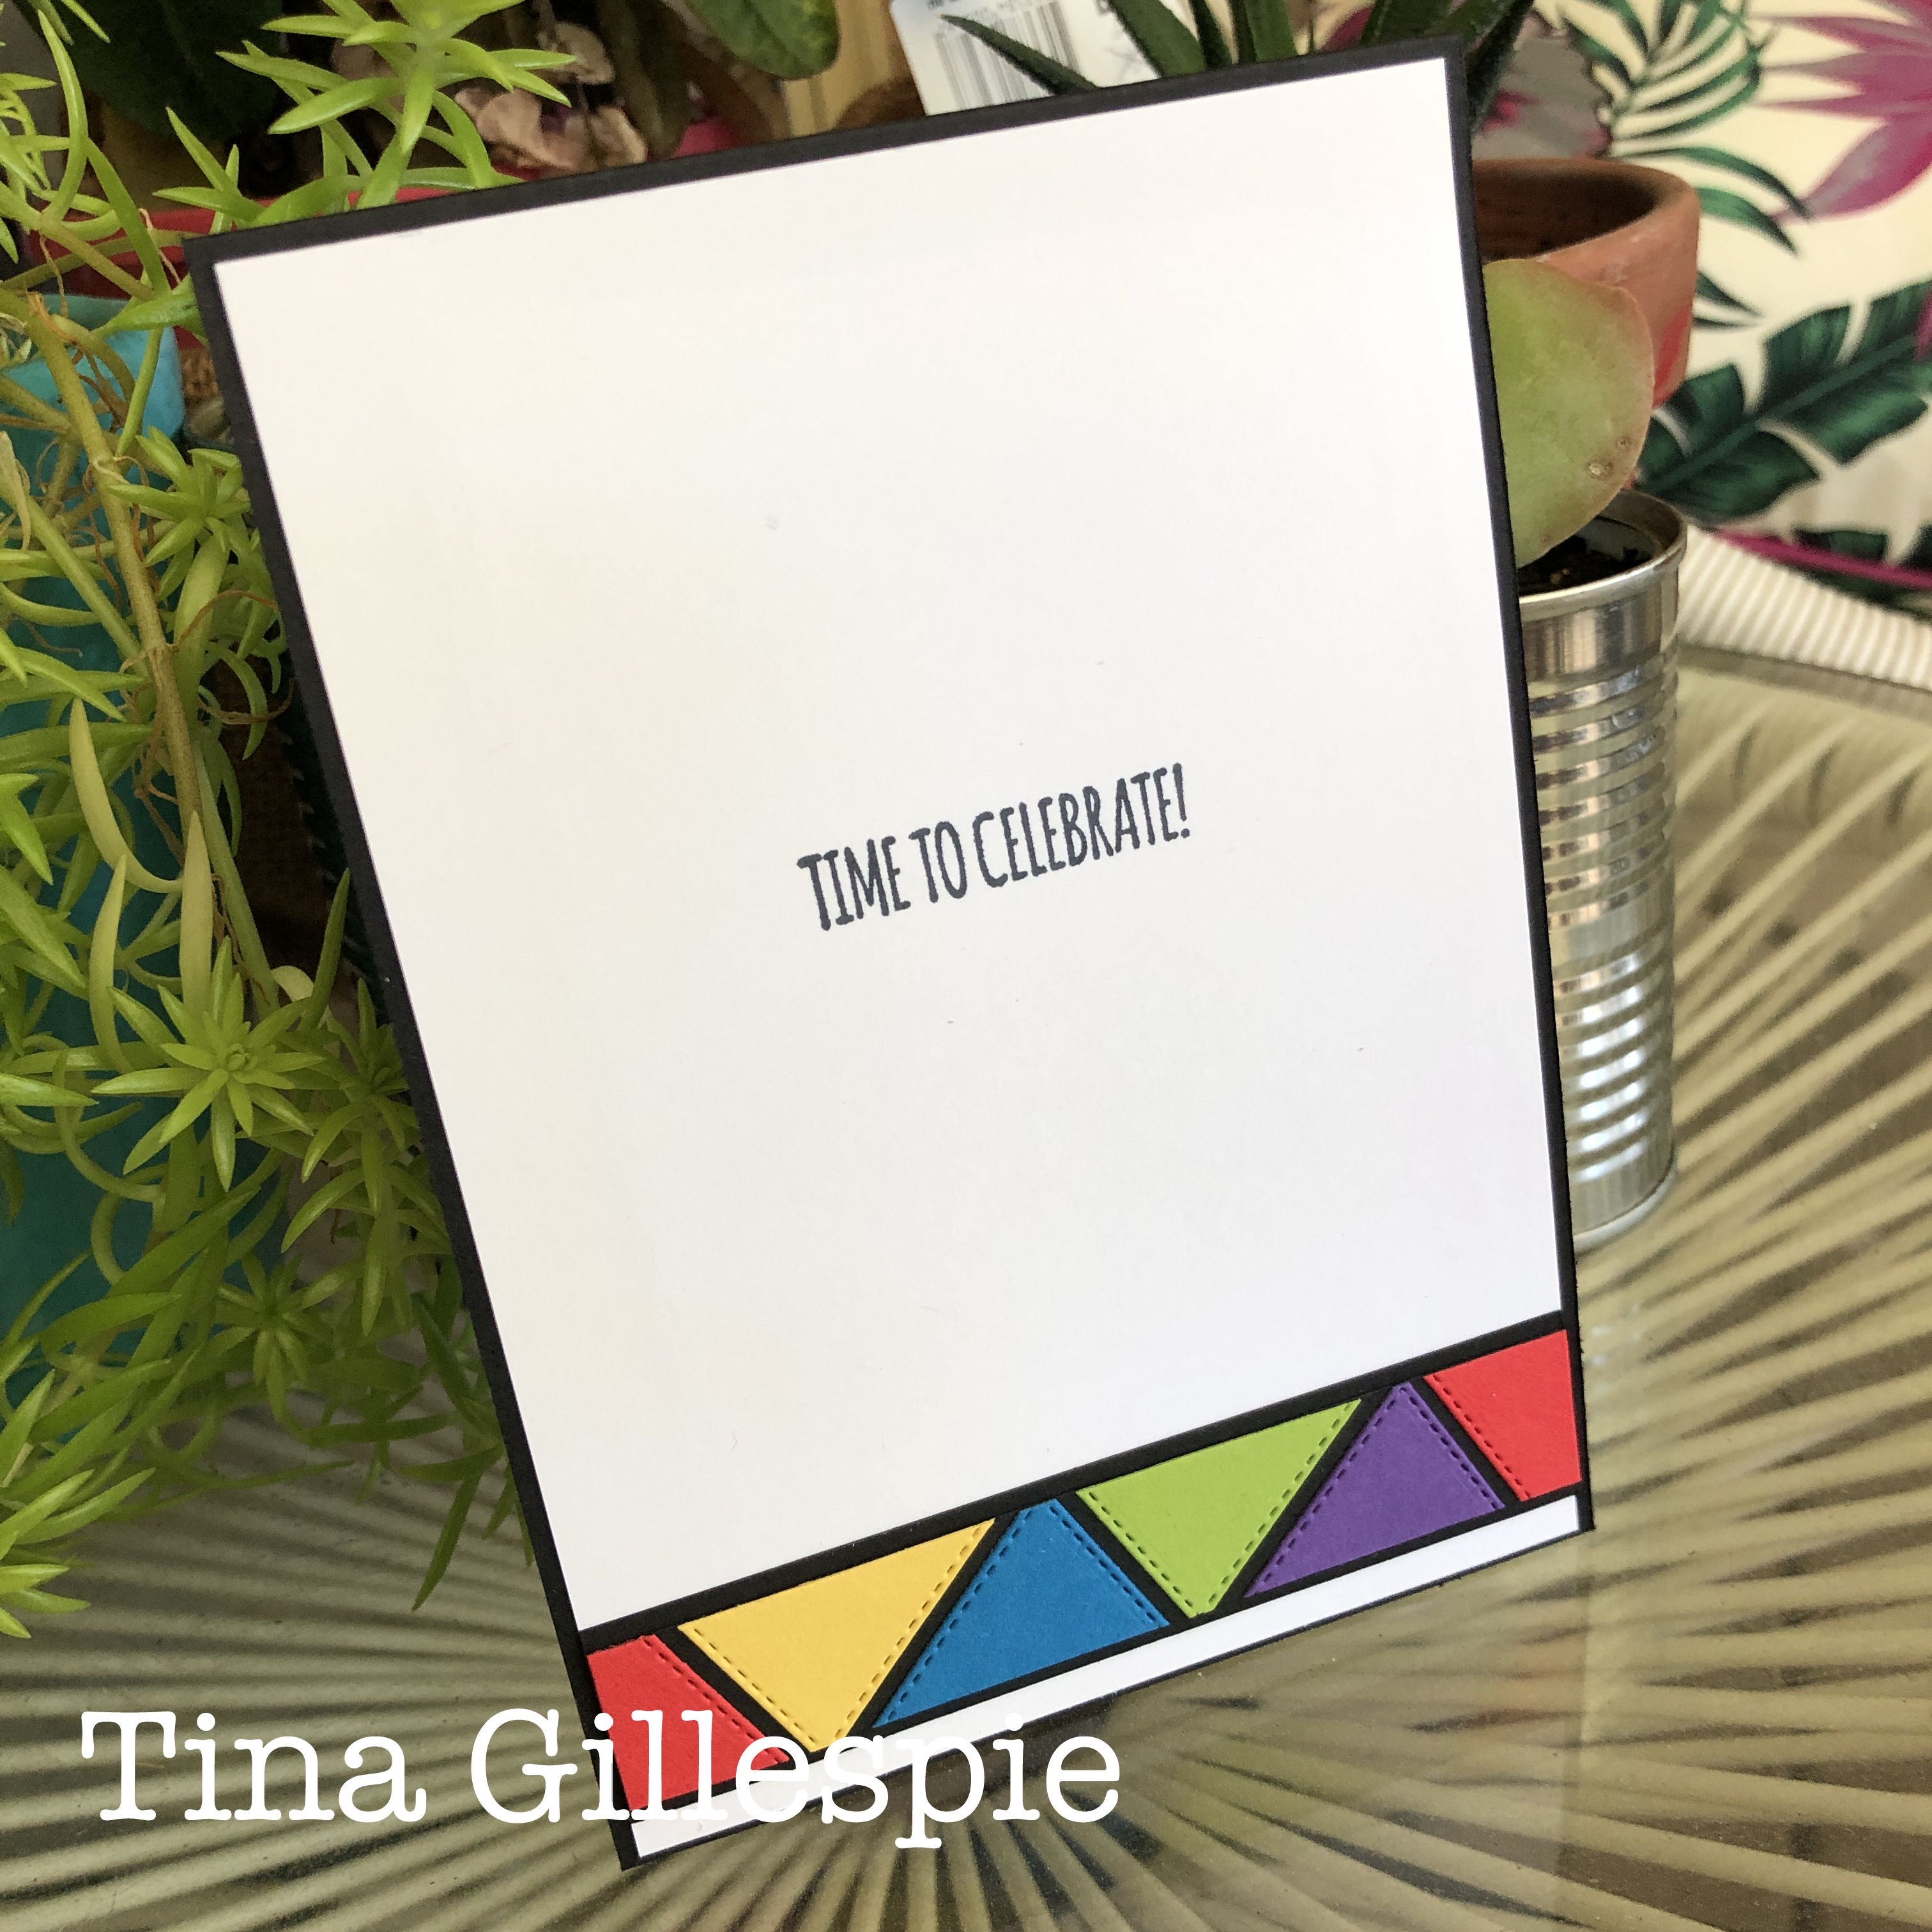
I recently cracked open my new Stitched Triangles Dies, and have been having a wonderful time playing with them ever since. I decided that I could quite easily use them to create my rainbow for tonight's Showcase.

scissorspapercard, Stampin' Up!, Art With Heart, Creative Showcase, Stitched Triangles Dies, Stitched Shapes Dies, Beautiful Friendship, Itty Bitty Birthdays, Rainbow Card
I used the largest isosceles triangle die to cut tow triangles in Poppy Parade, Daffodil Delight, Pacific Point, Granny Apple Green and Gorgeous Grape. I decided upon my focal point and then glued the triangles onto a piece of Basic Black cardstock, cut slightly smaller than my card base. I was aiming for rainbow order, but my daughter pointed out that I got blue and green the wrong way around. Oops!
scissorspapercard, Stampin' Up!, Art With Heart, Creative Showcase, Stitched Triangles Dies, Stitched Shapes Dies, Beautiful Friendship, Itty Bitty Birthdays, Rainbow Card
The sentiment is from Beautiful Friendship, and was stamped in Memento Tuxedo Black so that it didn't compete with the colour on the rest of the card. The ribbon was added to try to hide the evidence that I didn't quite line up the triangles correctly!
scissorspapercard, Stampin' Up!, Art With Heart, Creative Showcase, Stitched Triangles Dies, Stitched Shapes Dies, Beautiful Friendship, Itty Bitty Birthdays, Rainbow Card
I used the offcuts from the front of the card to create the little strip along the bottom of the inside. I was quite pleased with how that bit turned out! The sentiment here is from Itty Bitty Birthdays.

The next stop on the Rainbow Tour is the lovely Vicki Boucher. LOL, now I have the Evita soundtrack playing in my head!


If you have a broken link or have come to this blog hop midway, you can view all the participants below:


Rachel Woollard

Tina Gillespie

Vicki Boucher

Sharon Davern

Ros Davidson

Catherine Proctor

Caroline Manwaring

Michele Taylor


Bye for now,


Tina
Wednesday, 12 August 2020

Colour Creations: Coastal Cabana

Hi!


It's time once again for this week's Colour Creations Showcase. This week we are up to Coastal Cabana, the second of the Brights in the alphabetical order list of colours. It's a colour that I love, so I was excited to see it pop up in the list.
scissorspapercard, Stampin' Up!, Colour Creations, Beautiful Moments, Poppy Moments Dies, Stitched Rectangle Dies, Subtle 3DEF, Faux Mother Of Pearl
I recently participated in an ATC swap, where we used the Faux Mother Of Pearl technique. I quite enjoyed doing my ATC, and thought that Coastal Cabana was the perfect colour for the technique. Basically, you use scrunched up plastic wrap to 'pounce' Frost White Shimmer Paint over your cardstock and then, once dry, use a Sponge Brayer to apply your chosen ink over the top. You can see the gorgeous shimmer better in the next photo.
scissorspapercard, Stampin' Up!, Colour Creations, Beautiful Moments, Poppy Moments Dies, Stitched Rectangle Dies, Subtle 3DEF, Faux Mother Of Pearl
The poppy was cropped from Whisper White card using the Poppy Moments Dies. To colour the solid layer I laid the outline die over the top and watercoloured each of the petals individually. I coloured quickly and didn't try to be too neat as I like the messy look.
scissorspapercard, Stampin' Up!, Colour Creations, Beautiful Moments, Poppy Moments Dies, Stitched Rectangle Dies, Subtle 3DEF, Faux Mother Of Pearl
On the inside I used a trick learned from my wonderful friend, Judy May. I deliberately made my Faux Mother Of Pearl Panel larger than I needed for the front so that I could use the offcuts on the inside. I made sure that when I cut the piece for the front I cut it from the centre of the panel. I then just inset a second piece of Whisper White, cut with the same sized Stitched Rectangle Die, for the inside of my card. A smaller poppy finishes it off nicely.

That's all from me tonight. The lovely Catherine is once again hosting the Showcase, so you can find the links for the rest of our Coastal Cabana cards over on her blog.

Bye for now,

Tina

Sunday, 9 August 2020

CTC #280: CASE The Cover Of The Aug-Dec Mini Catalogue

Hi!


It's time once again for the new CASEing The Catty Sunday Challenge Blog Hop. The new August-December Mini Catalogue went live to customers this week, and so we chose to CASE the cover of the catalogue for our first challenge.
There's so much inspiration to be found! You could CASE the colour scheme, one of the cards, or take elements from a few. Turn a card into a tag, or a tag into a card - the possibilities are endless!

I chose this card on the far right of the cover to CASE. I liked that the whole front was covered in DSP, and that the die cut layer under the bells butted up to the edge of the card.
scissorspapercard, Stampin' Up!, CASEing The Catty, Peace & Joy Bundle, Heartwarming Hugs DSP, Stitched Nested Labels Dies, Glimmer Paper, Christmas
I don't have the DSP used on the front, but I do have the Heartwarming Hugs DSP. The paper I used on my card today is one of my favourites in the pack. It's not a really obvious Christmas pattern, but a pretty one nonetheless.
scissorspapercard, Stampin' Up!, CASEing The Catty, Peace & Joy Bundle, Heartwarming Hugs DSP, Stitched Nested Labels Dies, Glimmer Paper, Christmas
I used the largest Stitched Nested Labels Die as my base and the Peace & Joy bundle to decorate it. Sadly, the Red Glimmer Paper is retired, but I can't help using it on my Christmas cards. How lovely is the Gold Trim? It's from the Forever Greenery Trim Combo pack. The ends fray very easily - but I think that's meant to be a feature. I like it!
scissorspapercard, Stampin' Up!, CASEing The Catty, Peace & Joy Bundle, Heartwarming Hugs DSP, Stitched Nested Labels Dies, Glimmer Paper, Christmas
I stamped the smaller of the stylised star images on the front, and carried it over to the inside. The two greens in the DSP are Pear Pizzazz and Mossy Meadow, so I stamped some in each colour and then added some Red Glimmer Paper to the centres.

As always, we'd love for you to join in with the fun by creating a card for our challenge. Just join our Facebook group, if you haven't already, and then add your card to the group. Easy!


In the meantime though, don't forget to continue on with the Blog Hop. Next up is Michelle, with a very clever card that I absolutely adore!


Bye for now,

Tina
Thursday, 6 August 2020

JAI #517: Just Add A Sketch

Hi!


Welcome back for the new Just Add Ink challenge. This week Kim has designed a very cool sketch to guide our creativity.


My husband, Rob, recently celebrated a birthday, and so naturally I made him a card. When I looked at the sketch I thought that perhaps it looked a bit like a panel in a comic book. He loves his comics, especially the classic superheroes, so I thought it was worth a try. I loved the results, and so did he!

scissorspapercard, Kindred Stamps, Heffy Doodle, Stampin' Up!, Justice Is Served, Beautiful Moments, In The City, Copic Markers, Cityscape Stencil

I used a retired Kindred Stamps set, called Justice Is Served for the two characters. For the top panel, I hand drew the building to make it look as it he is ready to take off in flight. I used my Copics to colour the scene, including using the chisel tip to create the look of bricks. The bird is from Beautiful Moments, masked so I just got one, and the plane from the retired In The City stamp set.

scissorspapercard, Kindred Stamps, Heffy Doodle, Stampin' Up!, Justice Is Served, Beautiful Moments, In The City, Copic Markers, Cityscape Stencil

The background of the bottom section was created with the use of the Heffy Doodle Cityscape Stencil. I traced the outline with a Copic Multiliner, and then coloured it with my markers. I'd draw in the black dividing lines before I started, and my final step was to colour them with a black Copic marker.

scissorspapercard, Kindred Stamps, Heffy Doodle, Stampin' Up!, Justice Is Served, Beautiful Moments, In The City, Copic Markers, Cityscape Stencil

The sentiment on the front was more suited to one of the characters than the other, so I had to include one for the other character on the inside. I had a lot of fun making this card, and I was so pleased that Rob loved it.

Please pop on over to the Just Add Ink blog, where you can find the rest of this week's Design team cards. As always, it's a stunning gallery!

Bye for now,

Tina

Wednesday, 5 August 2020

Colour Creations: Cinnamon Cider

Hi!


Welcome back to another week of the Colour Creations Showcase. We are up to Cinnamon Cider this week, which is one of the newest In Colours. It's what I'd call a caramel brown, perhaps. I'm still deciding if I like the colour or not - brown is not particularly a go-to colour for me. I definitely don't hate it though. I paired it with Very Vanilla for tonight's card.

scissorspapercard, Stampin' Up!, Colour Creations, Stitched Triangles Dies, Playful Alphabet Dies, well Said, Subtle 3DEF, Banners Pick A Punch, Masculine Card

The Stitched Triangles Dies were one of the very first things I ordered from the new Annual Catalogue, but it's taken me until now to crack them open. Thanks for the nudge, Christine! I started by using the third largest equilateral triangle die to cut five Cinnamon Cider triangles. I then embossed them with my Subtle Embossing Folder, all in random directions. I then adhered them across the front of my card, which is also embossed with the Subtle folder.

scissorspapercard, Stampin' Up!, Colour Creations, Stitched Triangles Dies, Playful Alphabet Dies, well Said, Subtle 3DEF, Banners Pick A Punch, Masculine Card

The Playful Alphabet dies were used for the' Happy' part of the sentiment. The new Adhesive Foam Sheets pop them up nicely, without any fuss. The rest the sentiment was stamped using Well Said, and cropped using my new Banners Pick A Punch tool.

scissorspapercard, Stampin' Up!, Colour Creations, Stitched Triangles Dies, Playful Alphabet Dies, well Said, Subtle 3DEF, Banners Pick A Punch, Masculine Card

The Stitched Triangles Dies have this fab die, which cuts a line of triangles in your cardstock. I though it was the perfect compliment for the front of my card.

To see the rest of this week's Cinnamon Cider cards you will need to head on over to Catherine's blog, where you'll find all the links. I wonder if I will finally decide if I like Cinnamon Cider after seeing them? I'm sure that I will!

Bye for now,

Tina

Sunday, 2 August 2020

CTC #279: CASE A Sketch

Hi!


Thanks for once again joining me for our CASEing The Catty Sunday Challenge Blog Hop. Before I start, I wanted to send a big hug out to everyone in Melbourne, Australia. Stage Four restrictions are going to be tough, but the rest of the country are cheering you on, all the way!


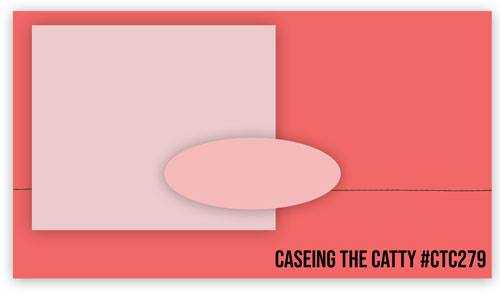
This week we have chosen this gorgeous card on page 72 of the Annual Catalogue and turned it into a sketch.


I decided to have a play with the new Trimming The Town DSP for my card. I was quite loose with the sketch, but hopefully you can see how I've applied it to my card.

scissorspapercard, Stampin' Up!, CASEing The Catty, Trimming The Town DSP, Coming Home, Come Together Dies, Stampin' Blends, Christmas Card

Instead of the twine on the original card, I have die cut a snowy slope with trees. The square has been replaced with the mountains, but I wish I'd chopped a little bit of sky off the top of the piece so that the mountains were a little more prominent. I have another piece of the DSP left, so I may have to CASE myself to see if I like it more!

scissorspapercard, Stampin' Up!, CASEing The Catty, Trimming The Town DSP, Coming Home, Come Together Dies, Stampin' Blends, Christmas Card

The car was the only stamped element on the whole card - the rest has been cropped from the Trimming The Town DSP, using the Home Together Dies. I coloured the car with my Dark Poppy Parade Blend. I just used a flat colour, as the rest of the DSP is coloured that way.

scissorspapercard, Stampin' Up!, CASEing The Catty, Trimming The Town DSP, Coming Home, Come Together Dies, Stampin' Blends, Christmas Card

I originally cropped this huge house to go on the front as the oval element, but it was too big for the space. It's perfect for the inside though. The sentiments were both also cropped from the DSP. There's a huge range sayings and languages - something for everyone!

That's all from me tonight. To enter our challenge, you just need to make a card based on the sketch and upload it to our Facebook group. No blog or fancy editing necessary!


Next on the hop is the fabulous Rebecca. You won't want to miss her pretty, floral card.


Bye for now,

Tina

Thursday, 30 July 2020

JAI #516: Just Add Inspiration

Hi!


Hooray for Friday - it's been a long week! All three of my kids have been home sick with colds - not COVID, thank heavens! They were heavy colds, so it's taken longer than usual for them to recover. Hopefully they are well enough for school next week.

Anyway, on with the show! This week at Just Add Ink we have this gorgeous Inspiration Photo that Jackie has found. I love the mix of colours - who says you can't have red and pink together?


I chose a colour combo of Coastal Cabana, Flirty Flamingo, Melon Mambo, Crumb Cake and Whisper White and used it to make a modern, fresh Christmas card. I used a new bundle from the upcoming August-December Mini Catalogue, called Peace & Joy.

scissorspapercard, Stampin' Up!, Just Add Ink, Peace & Joy Bundle, Red Glimmer Paper

I started this card by stamping the word 'bright' in the centre of the card. I did this so that I would have a better idea of where I needed to stamp the rest of the elements. I knew it would be covered up by the layered 'bright' die cuts. 

scissorspapercard, Stampin' Up!, Just Add Ink, Peace & Joy Bundle, Red Glimmer Paper

The smallest layer was cut from Red Glimmer paper. It's retired paper, but there are plenty of other options. I used a piece of Adhesive Sheet on the back of the Glimmer Paper so that I didn't have to mess with liquid glue on the thin letters. I punched some tiny circles from the scraps to dress up the starburst images.

scissorspapercard, Stampin' Up!, Just Add Ink, Peace & Joy Bundle, Red Glimmer Paper

I used the same stamps and colours on the inside, including the Glimmer dots. Such an easy way to add a bit of glam to a card!

It'stime now to head on over to the Just Add Ink Blog, where you'll find the rest of this week's Design team cards. We all clearly loved this challenge!

Bye for now,

Tina